# Menu « Assistants »
# Les différents Assistants
Ce chapitre explique comment utiliser les Assistants.
# L'assistant Utilisateurs
L'assistant Utilisateurs vous permet d'effectuer, après avoir sélectionné des apprenants, un certains nombre de tâches d'administration. Vous trouverez la liste de toutes les actions possibles plus loin dans la fiche.
### **Sélection des utilisateurs**
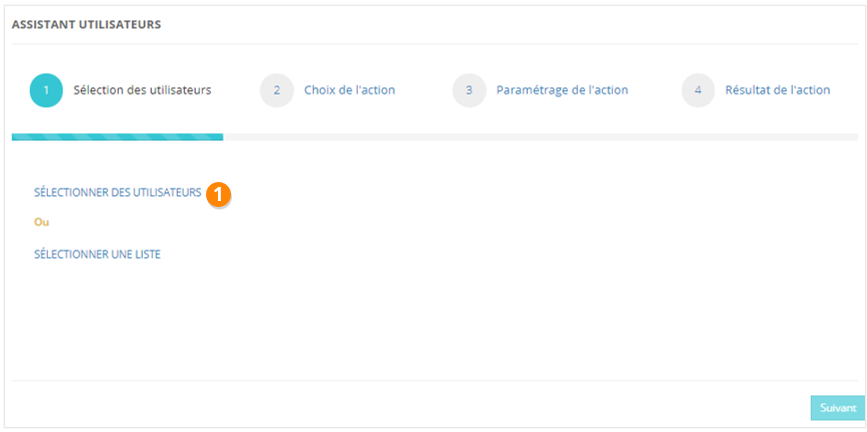
Dans le menu **Assistants > Assistant utilisateur**, vous pouvez sélectionner, au choix :
- des utilisateurs répartis dans différentes organisations
- ou une liste d'utilisateurs
#### **Option Sélectionner des utilisateurs**
1. Cliquez sur **Sélectionner des utilisateurs** ;
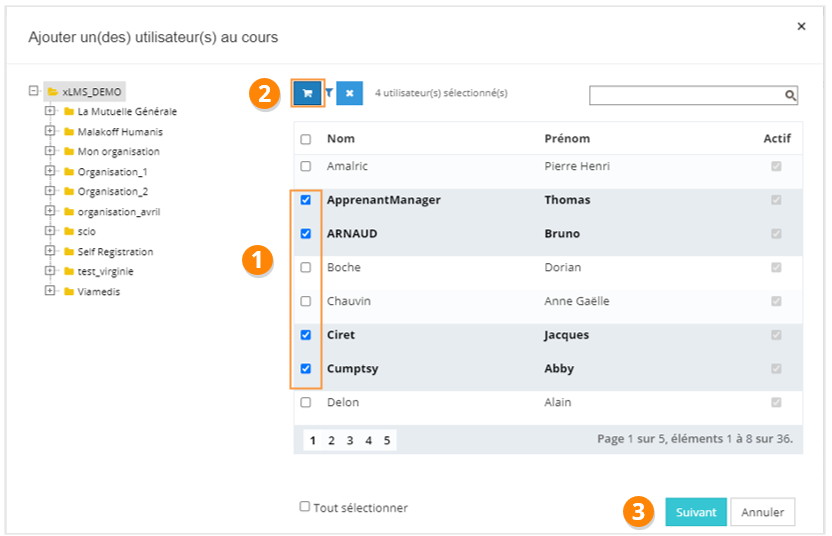
2. Choisissez les **utilisateurs** qui vous intéressent (vous pouvez vous aider de l'arborescence des organisations) ;
3. **Ajoutez au panier** avant chaque changement de page ou de dossier ;
4. Cliquez sur **Valider**.
[](https://documentation.xperteam.net/uploads/images/gallery/2024-05/Asiimage.png)
[](https://documentation.xperteam.net/uploads/images/gallery/2024-05/xbZimage.png)
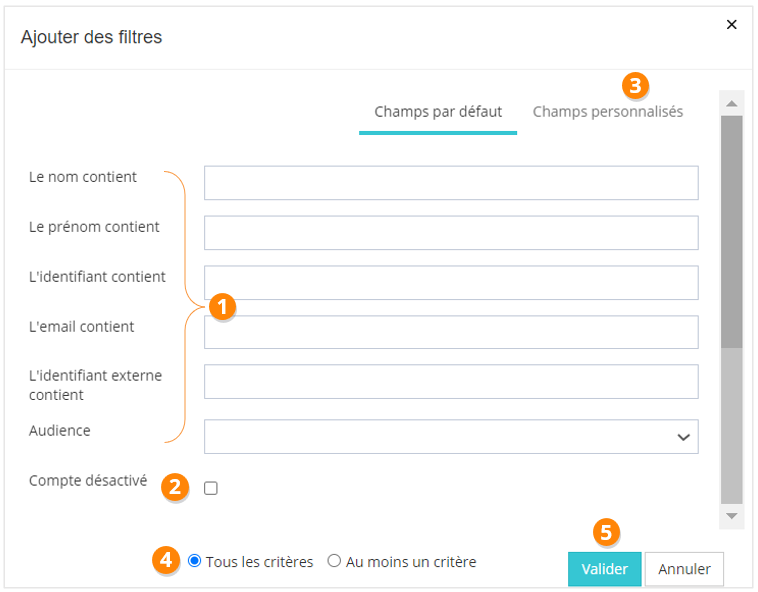
Le filtre d'utilisateurs
1. Vous pouvez **filtrer** votre recherche grâce : au **nom** de l'utilisateur, son **prénom**, son **identifiant**, son a**dresse email**, son **identifiant externe**, son **audience**.
2. Si vous cherchez parmi les **utilisateurs désactivés**, cochez cette case.
3. Vous pouvez également filtrer votre recherche à l'aide des **champs personnalisés** des utilisateurs.
4. Choisissez si les **critères** doivent tous être valides ou s'il suffit qu'un des critères soit valide pour proposer un résultat. Dans l'exemple ci-dessous, si vous choisissez :
**-** **Tous les critères :** vous obtiendrez toutes les personnes dont le nom contient la chaîne de caractères 'DUP' et le champ personnalisé 1 contient la chaîne de caractères '2024' ;
**-** **Au moins un critère :** vous obtiendrez l'ensemble de tous les utilisateurs dont le nom contient la chaîne de caractères 'DUP', ainsi que tous les utilisateurs dont le champ personnalisé 1 contient la chaîne de caractères '2024'.
5. Cliquez sur **Valider**.
6. Sélectionnez les **utilisateurs** qui vous intéressent parmi les utilisateurs trouvés par filtrage.
[](https://documentation.xperteam.net/uploads/images/gallery/2024-05/KScimage.png)
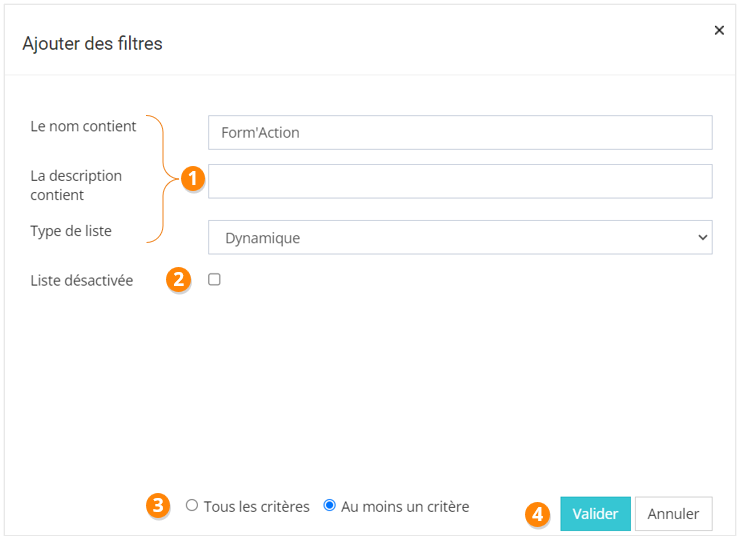
Le filtre de liste
1. Vous pouvez **filtrer** votre recherche grâce au **nom** de la liste, à sa **description** et à son **type** (dynamique ou statique).
2. Si vous cherchez une **liste désactivée**, cochez cette case
3. Choisissez si les **critères** doivent tous être valides ou s'il suffit qu'un des critères soit valide pour proposer un résultat. Dans l'exemple ci-dessous, si vous choisissez :
**-** **Tous les critères :** vous obtiendrez toutes les listes dynamiques dont le nom contient le mot Form'Action ;
**-** **Au moins un critère :** vous obtiendrez l'ensemble de toutes les listes dynamiques et de toutes les listes dont le nom contient Form'Action.
4. Cliquez sur **Valider**.
5. Sélectionnez la **liste** qui vous intéresse parmi les listes trouvées par filtrage.
[](https://documentation.xperteam.net/uploads/images/gallery/2024-05/jLoimage.png)
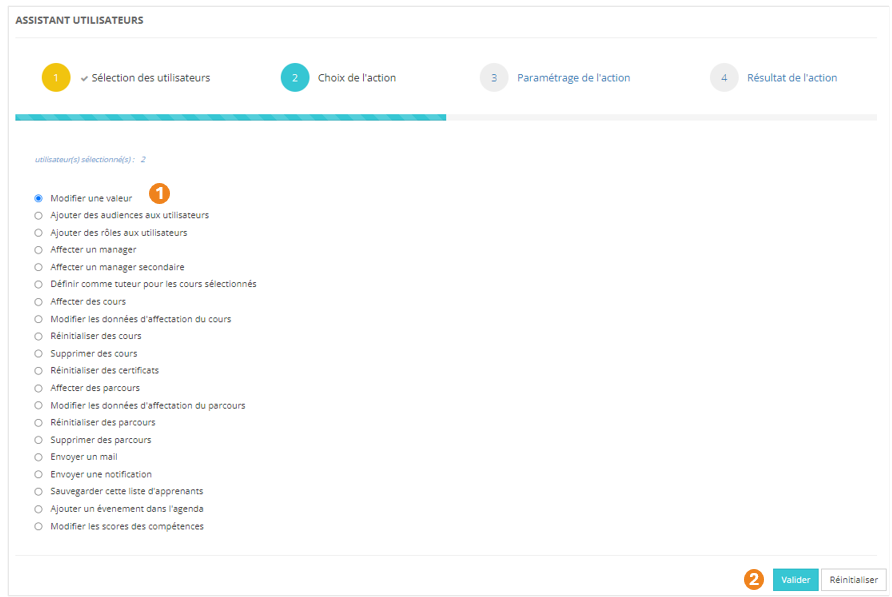
Modifier une valeur
1. Sélectionnez l'action **Modifier une valeur** ;
2. Cliquez sur **Valider**.
[](https://documentation.xperteam.net/uploads/images/gallery/2024-05/Cd4image.png)
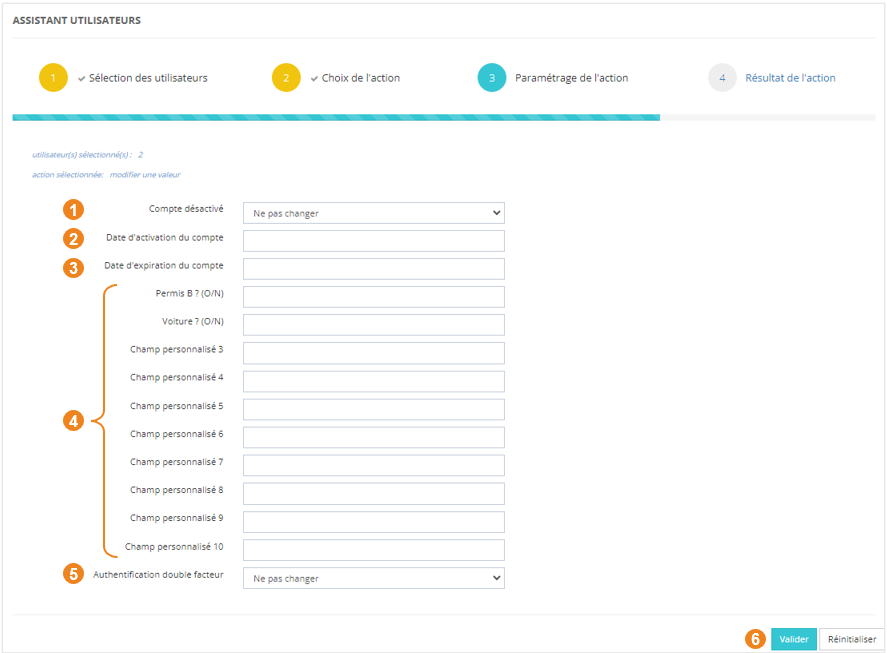
#### **Paramétrage de l'action**
Vous avez la possibilité de modifier une ou plusieurs des valeurs ci-dessous :
1. Le **statut** du compte : désactivé ou non (*Ne pas changer / Oui / Non*) ;
2. La **date d'activation** du compte ;
3. La **date d'expiration** du compte ;
4. Les valeurs dans les **champs personnalisés** 1 à 10 ;
5. L'option de **double authentification** (*Ne pas changer / Par défaut / Jamais / Première connexion de la journée / Toujours*)
6. Lorsque vous avez effectué les modifications souhaitées, cliquez sur **Valider**.
[](https://documentation.xperteam.net/uploads/images/gallery/2024-05/pvEimage.png)
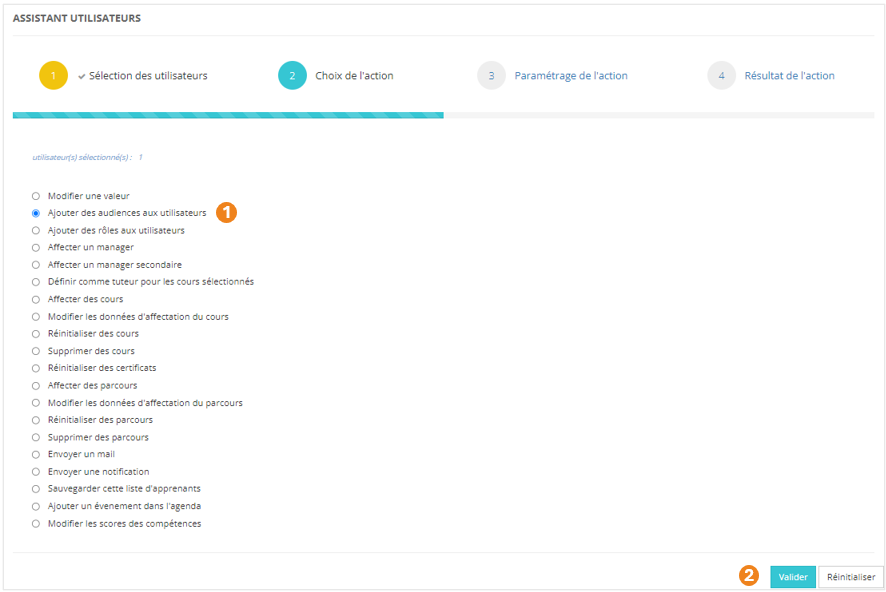
Ajouter des audiences aux utilisateurs
1. Sélectionnez l'action **Ajouter des audiences aux utilisateurs** ;
2. Cliquez sur **Valider**.
[](https://documentation.xperteam.net/uploads/images/gallery/2024-05/VX7image.png)
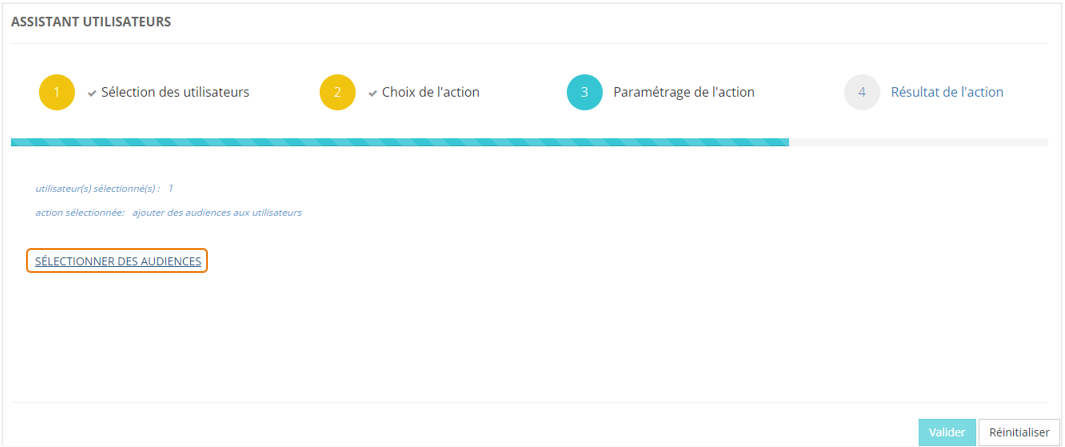
#### **Paramétrage de l'action**
Cliquez sur **SÉLECTIONNER DES AUDIENCES**.
[](https://documentation.xperteam.net/uploads/images/gallery/2024-05/R4Cimage.png)
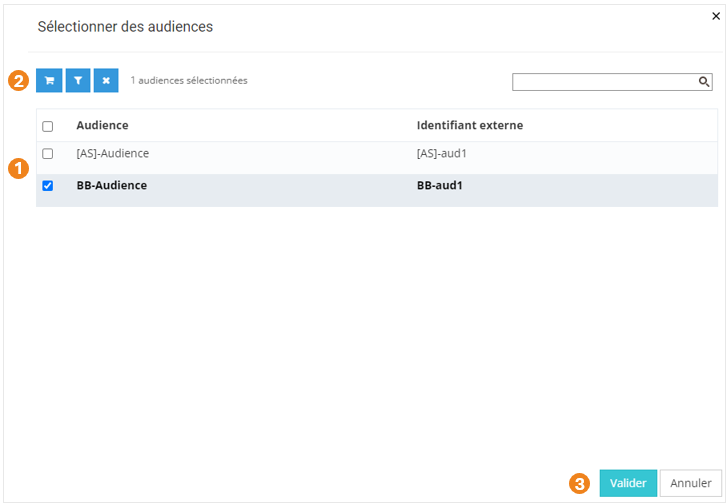
Dans la pop-up qui s'ouvre :
1. Sélectionnez la ou les **audience(s)** à ajouter aux utilisateurs ;
2. Cliquez sur le **chariot** ;
3. Cliquez sur **Valider**.
[](https://documentation.xperteam.net/uploads/images/gallery/2024-05/P9Mimage.png)
**Le filtre d'audiences**
Le filtre d'audiences fonctionne sur le même principe que le filtre d'utilisateurs (voir plus haut).
---
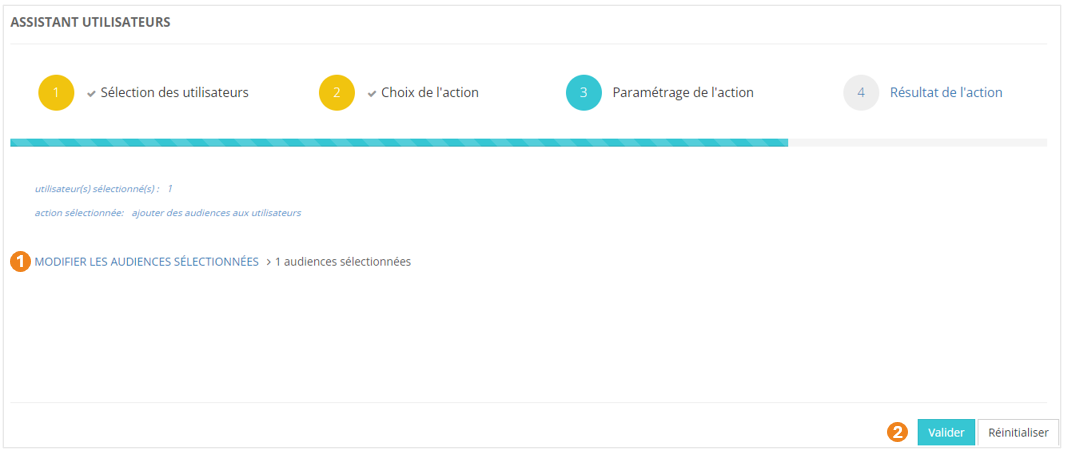
De retour sur l'écran principal, vous pouvez :
1. **Modifier** les audiences sélectionnées ;
2. **Valider** l'action lorsque vous êtes satisfait de la sélection des audiences.
[](https://documentation.xperteam.net/uploads/images/gallery/2024-05/A0Oimage.png)
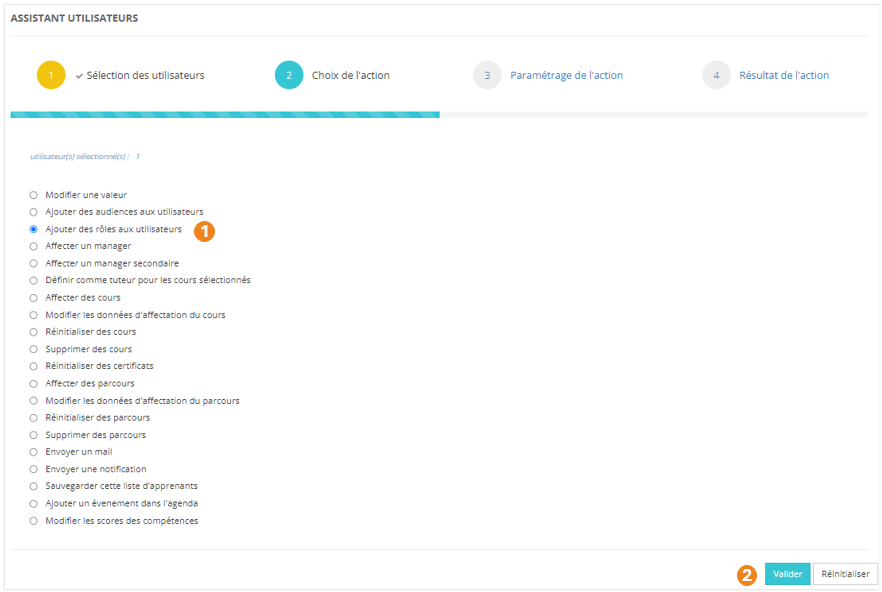
Ajouter des rôles aux utilisateurs
1. Sélectionnez l'action **Ajouter des rôles aux utilisateurs** ;
2. Cliquez sur **Valider**.
[](https://documentation.xperteam.net/uploads/images/gallery/2024-05/hJKimage.png)
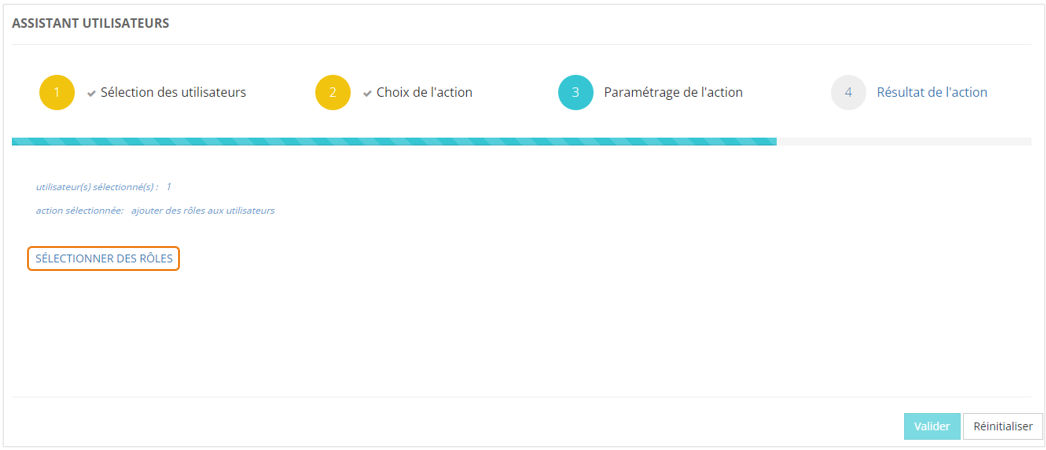
#### **Paramétrage de l'action**
Cliquez sur **SÉLECTIONNER DES RÔLES**.
[](https://documentation.xperteam.net/uploads/images/gallery/2024-05/vRMimage.png)
Dans la pop-up qui s'ouvre :
1. Sélectionnez le ou les **rôle(s)** à ajouter aux utilisateurs ;
2. Cliquez sur le **chariot** ;
3. Cliquez sur **Suivant**.[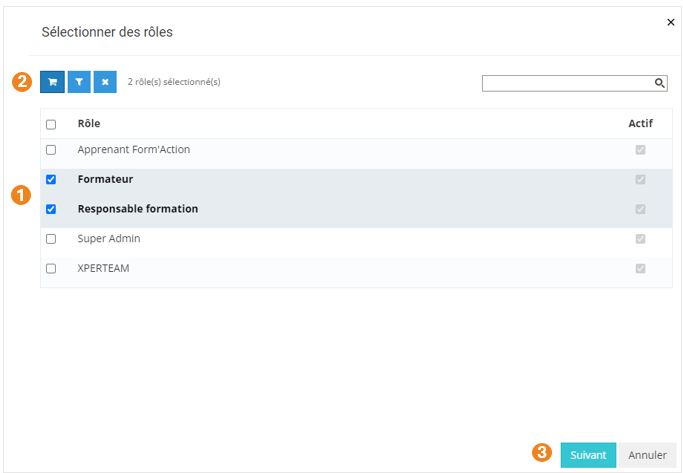](https://documentation.xperteam.net/uploads/images/gallery/2024-05/mU1image.png)
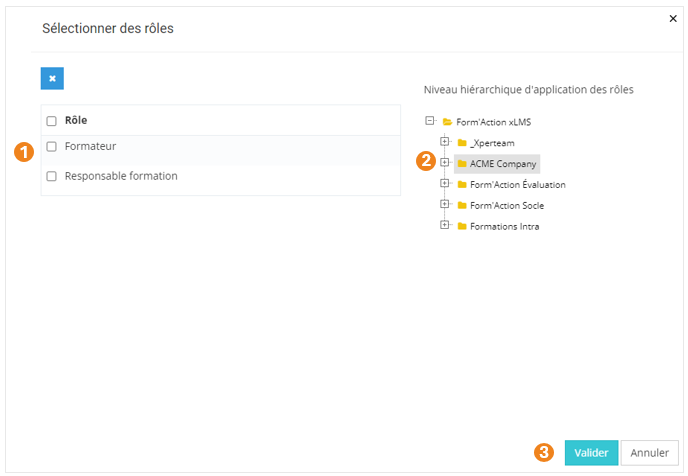
Dans la nouvelle pop-up :
1. Retrouvez le **récapitulatif des rôles** que vous avez sélectionnés ; À ce niveau, vous pouvez supprimer des rôles en les sélectionnant dans le tableau puis en cliquant sur le **bouton \[x\]**.
2. Sélectionnez leur **périmètre d'action**, c'est-à-dire le **niveau hiérarchique** sur lequel ces rôles s'appliqueront ; Si plusieurs rôles sont sélectionnés, le périmètre d'action s'appliquera à tous ces rôles, pour toutes les personnes sélectionnées à la première étape. Pour différencier les périmètres d'actions, il vous faudra recommencer le processus depuis le début.
3. Cliquez sur **Valider**.
[](https://documentation.xperteam.net/uploads/images/gallery/2024-05/Ustimage.png)
**Le filtre de rôles**
Le filtre de rôles fonctionne sur le même principe que le filtre d'utilisateurs (voir plus haut).
---
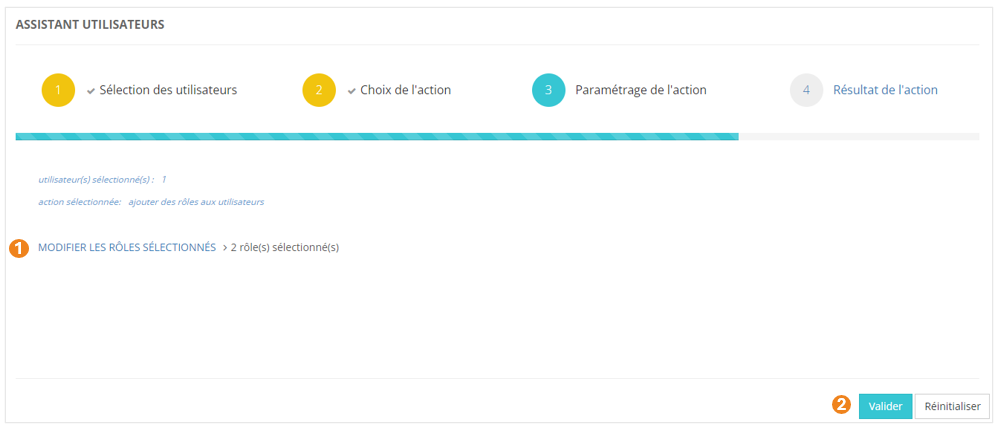
De retour sur l'écran principal, vous pouvez :
1. **Modifier** les rôles sélectionnés ;
2. **Valider** l'action lorsque vous êtes satisfait de la sélection des rôles.
[](https://documentation.xperteam.net/uploads/images/gallery/2024-05/UENimage.png)
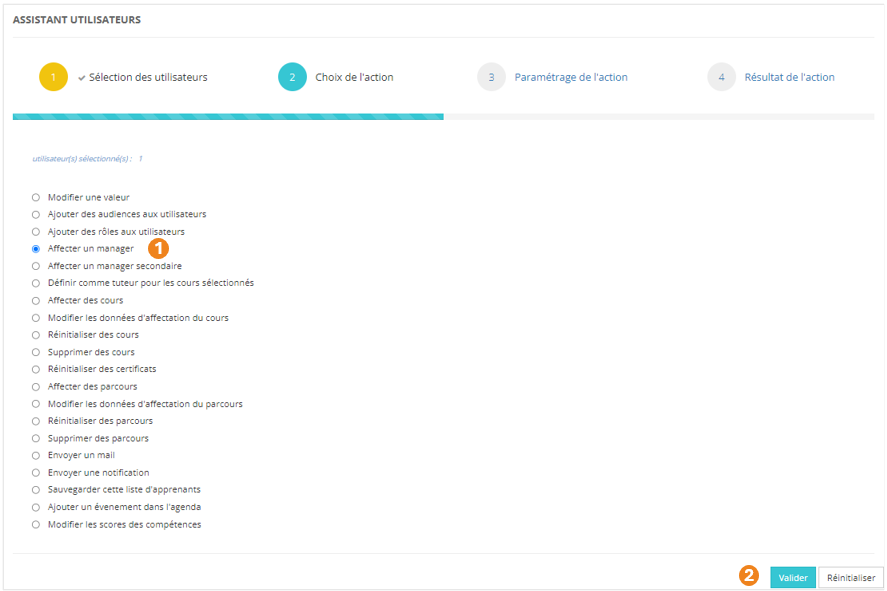
Affecter un manager
1. Sélectionnez l'action **Affecter un manager** ;
2. Cliquez sur **Valider**.
[](https://documentation.xperteam.net/uploads/images/gallery/2024-05/LCFimage.png)
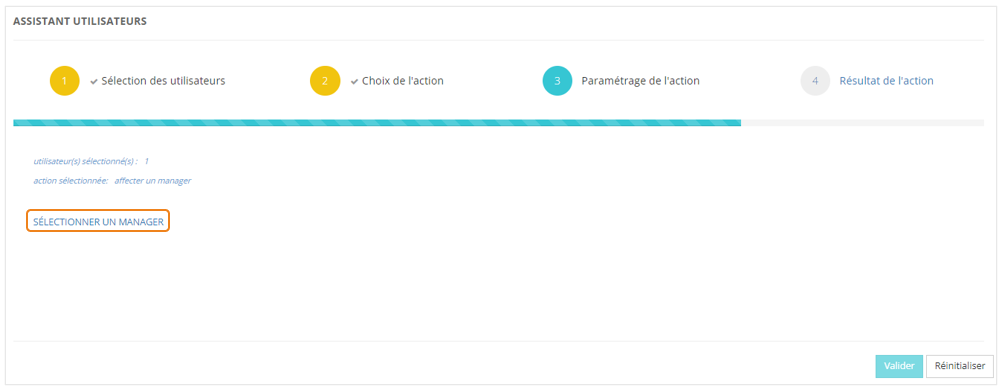
#### **Paramétrage de l'action**
Cliquez sur **SÉLECTIONNER UN MANAGER**.
[](https://documentation.xperteam.net/uploads/images/gallery/2024-05/9T2image.png)
Dans la pop-up qui s'ouvre :
1. Sélectionnez le **manager** à ajouter aux utilisateurs sélectionnés à l'étape précédente ; **Un seul manager** peut être attribué à un utilisateur. Il est cependant possible d'ajouter un manager secondaire (voir section suivante pour le faire via les assistants).
2. Cliquez sur **Valider**.
[](https://documentation.xperteam.net/uploads/images/gallery/2024-05/Fihimage.png)
---
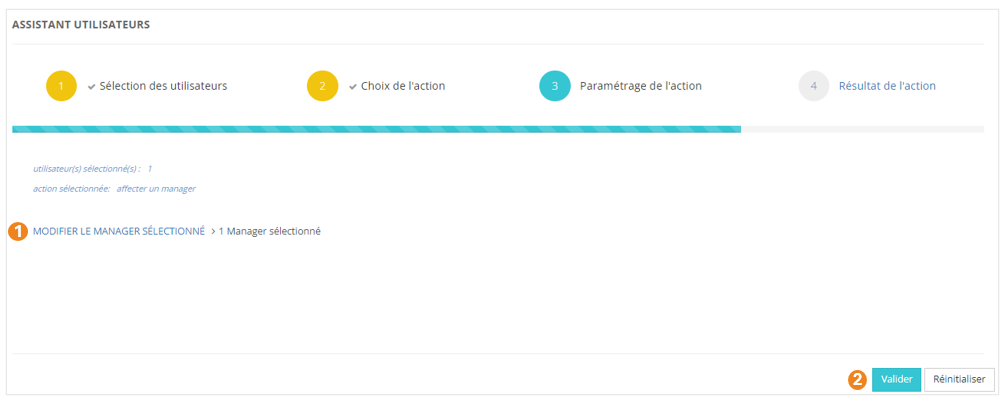
De retour sur l'écran principal, vous pouvez :
1. **Modifier** le manager sélectionné ;
2. **Valider** l'action lorsque vous êtes satisfait de la sélection du manager.
[](https://documentation.xperteam.net/uploads/images/gallery/2024-05/URNimage.png)
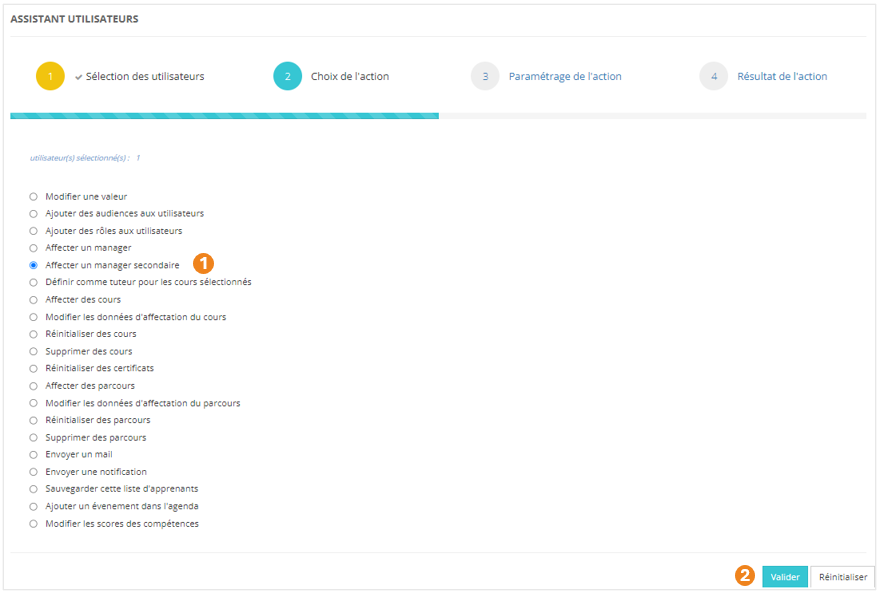
Affecter un manager secondaire
1. Sélectionnez l'action **Affecter un manager secondaire** ;
2. Cliquez sur **Valider**.
[](https://documentation.xperteam.net/uploads/images/gallery/2024-05/F2Fimage.png)
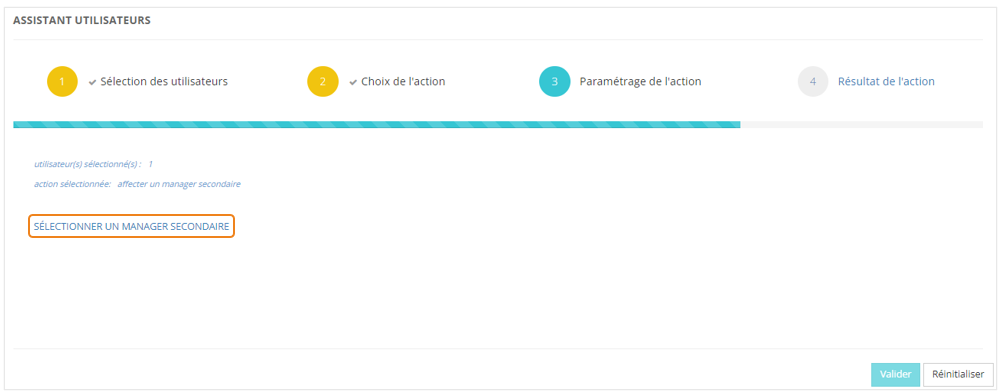
#### **Paramétrage de l'action**
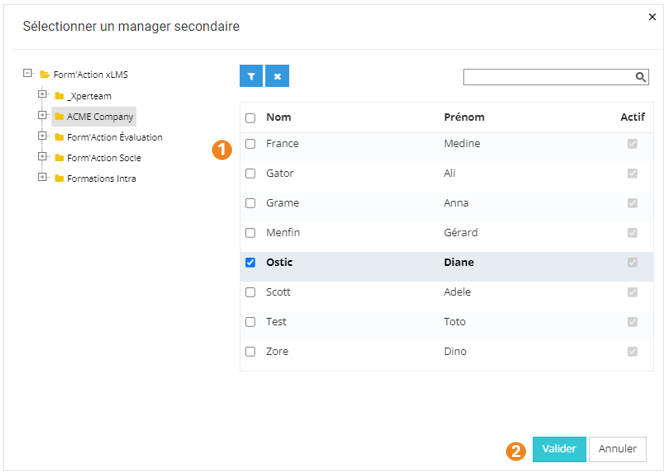
Cliquez sur **SÉLECTIONNER UN MANAGER SECONDAIRE**.
[](https://documentation.xperteam.net/uploads/images/gallery/2024-05/Npeimage.png)
Dans la pop-up qui s'ouvre :
1. Sélectionnez le **manager secondaire** à ajouter aux utilisateurs sélectionnés à l'étape précédente ; **Un seul manager secondaire** peut être attribué à un utilisateur.
2. Cliquez sur **Valider**.
[](https://documentation.xperteam.net/uploads/images/gallery/2024-05/3rGimage.png)
---
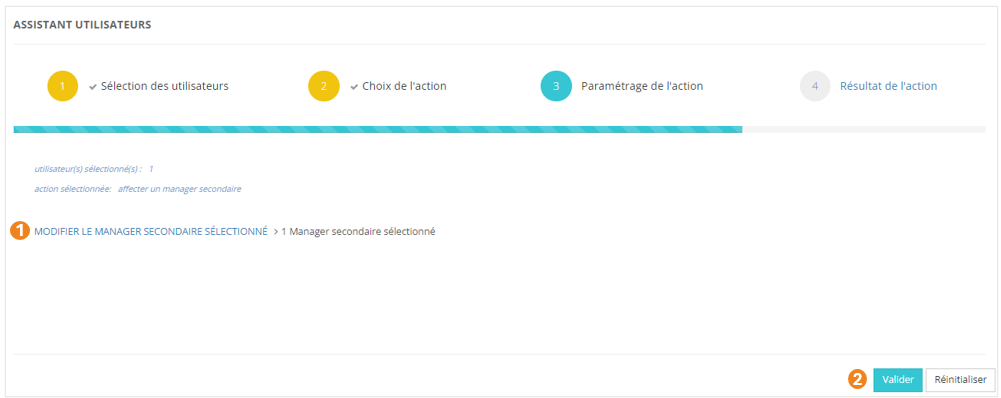
De retour sur l'écran principal, vous pouvez :
1. **Modifier** le manager secondaire sélectionné ;
2. **Valider** l'action lorsque vous êtes satisfait de la sélection du manager secondaire.
[](https://documentation.xperteam.net/uploads/images/gallery/2024-05/uOVimage.png)
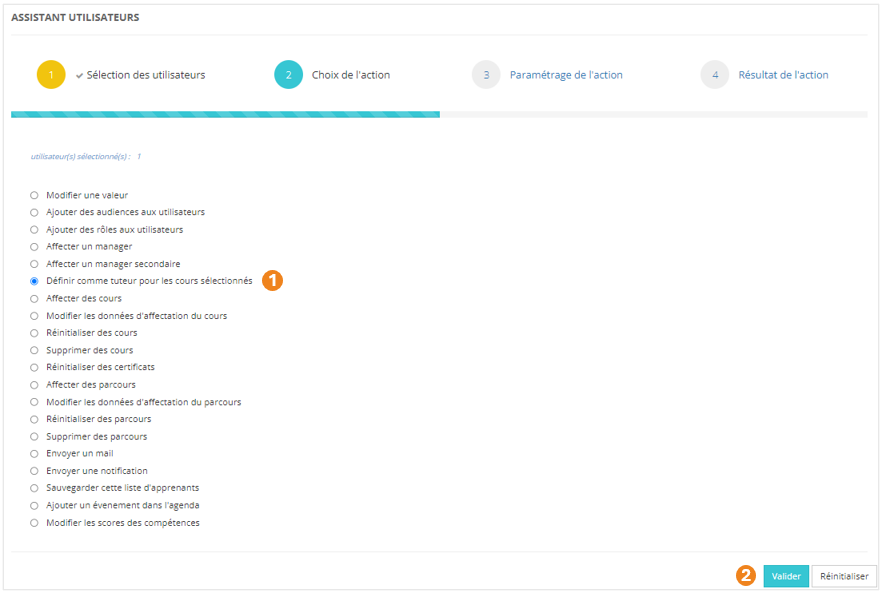
Définir comme tuteur pour les cours sélectionnés
1. Sélectionnez l'action **Définir comme tuteur pour les cours sélectionnés** ;
2. Cliquez sur **Valider**.
[](https://documentation.xperteam.net/uploads/images/gallery/2024-05/Soyimage.png)
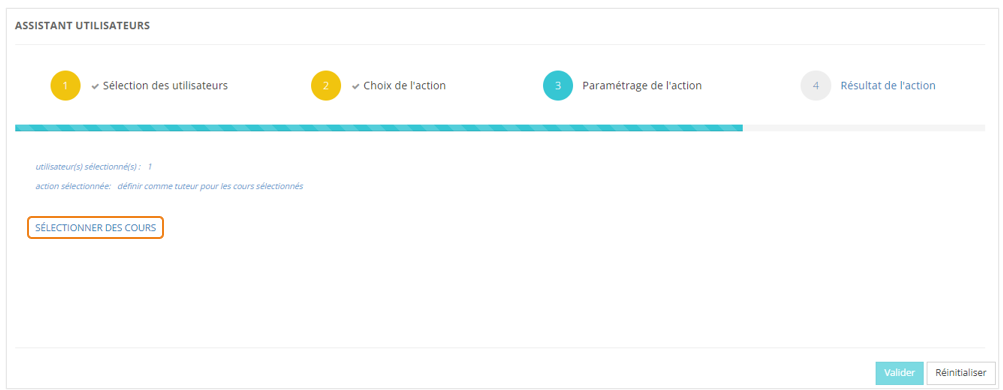
#### **Paramétrage de l'action**
Cliquez sur **SÉLECTIONNER DES COURS**.
[](https://documentation.xperteam.net/uploads/images/gallery/2024-05/Bnlimage.png)
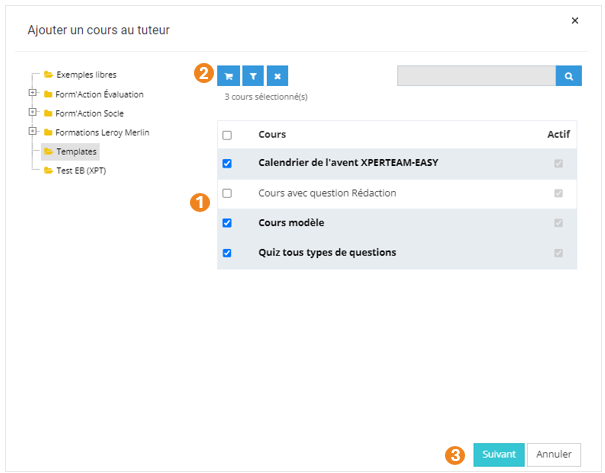
Dans la pop-up qui s'ouvre :
1. Sélectionnez le ou les **cours** dont le certificat doit être réinitialisé ;
2. Cliquez sur le **chariot** ;
3. Cliquez sur **Suivant**.
[](https://documentation.xperteam.net/uploads/images/gallery/2024-05/u0qimage.png)
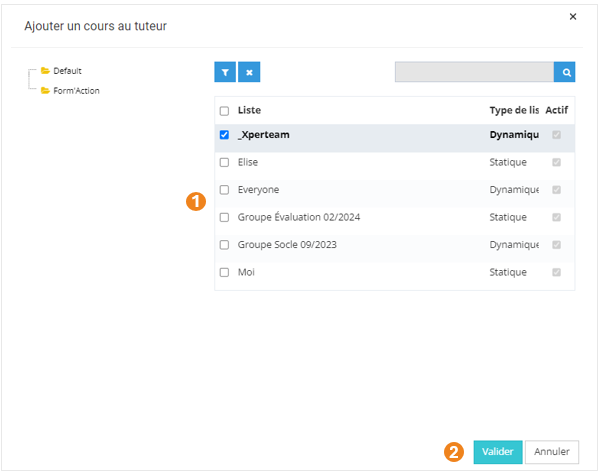
Dans la nouvelle pop-up :
1. Cliquez sur la **liste** pour laquelle les utilisateurs sélectionnés seront tuteurs des cours sélectionnés à l'étape précédente ;
2. Cliquez sur **Valider**.
[](https://documentation.xperteam.net/uploads/images/gallery/2024-05/d4nimage.png)
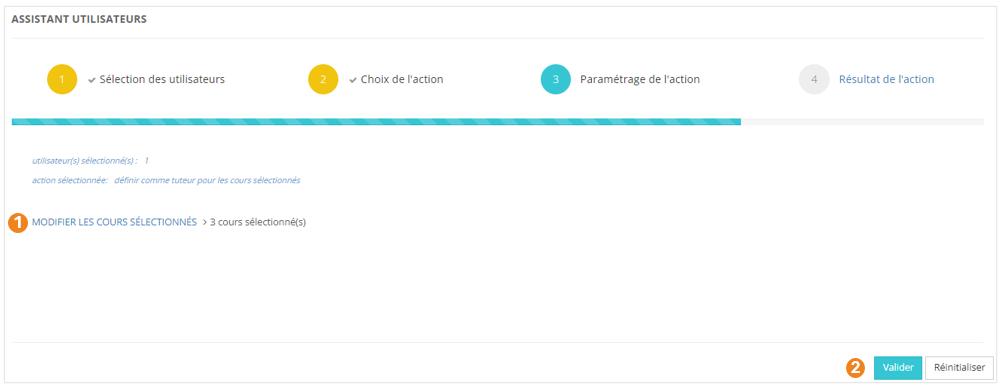
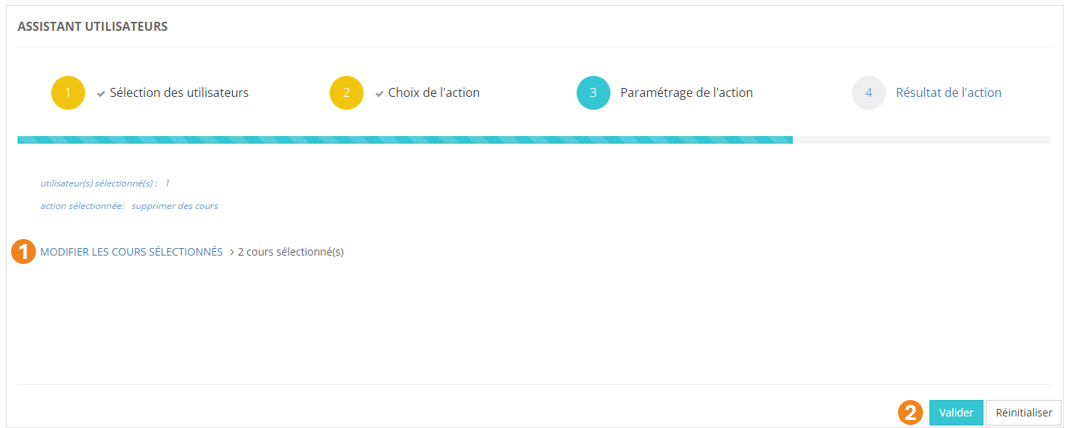
---
De retour sur l'écran principal, vous pouvez :
1. **Modifier** les cours sélectionnés ;
2. **Valider** l'action lorsque vous êtes satisfait de la sélection des cours.
[](https://documentation.xperteam.net/uploads/images/gallery/2024-05/HIdimage.png)
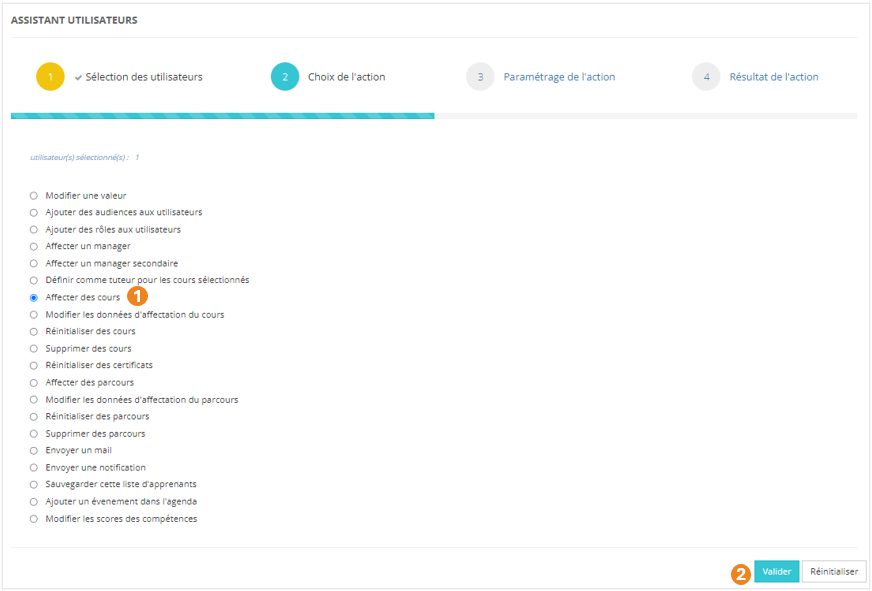
Affecter des cours
1. Sélectionnez l'action **Affecter des cours** ;
2. Cliquez sur **Valider**.
[](https://documentation.xperteam.net/uploads/images/gallery/2024-05/nOSimage.png)
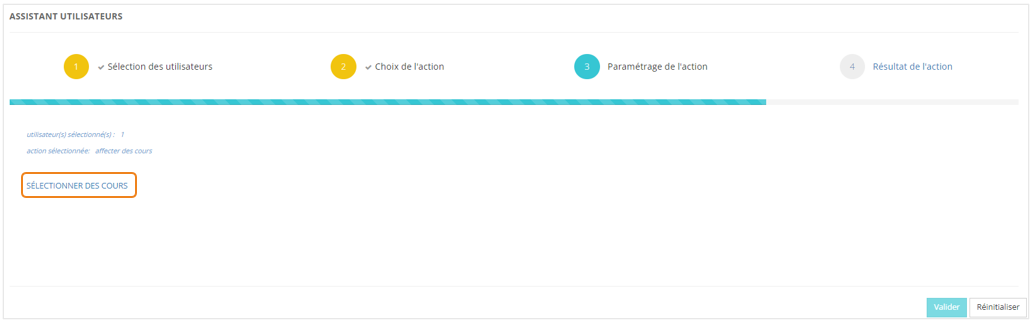
#### **Paramétrage de l'action**
Cliquez sur **SÉLECTIONNER DES COURS**.
[](https://documentation.xperteam.net/uploads/images/gallery/2024-05/bf2image.png)
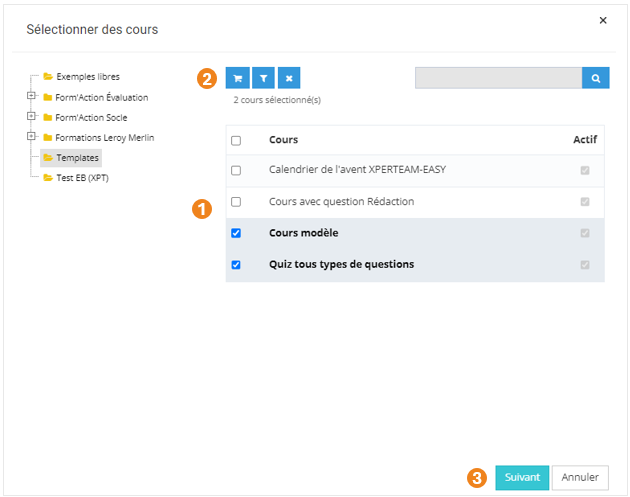
Dans la pop-up qui s'ouvre :
1. Sélectionnez le ou les **cours** à ajouter aux utilisateurs ;
2. Cliquez sur le **chariot** ;
3. Cliquez sur **Suivant**.
[](https://documentation.xperteam.net/uploads/images/gallery/2024-05/TKoimage.png)
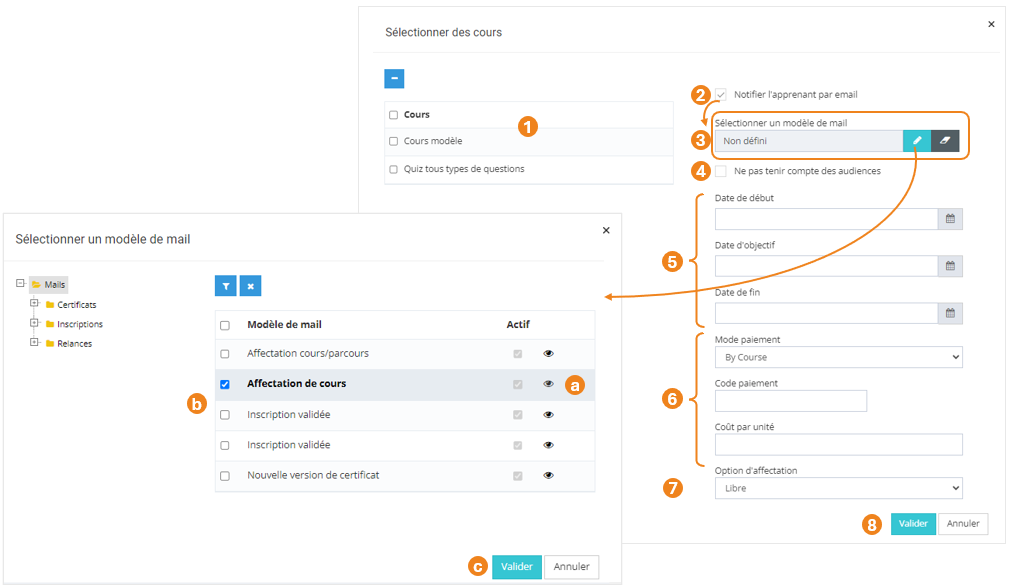
Dans la nouvelle pop-up :
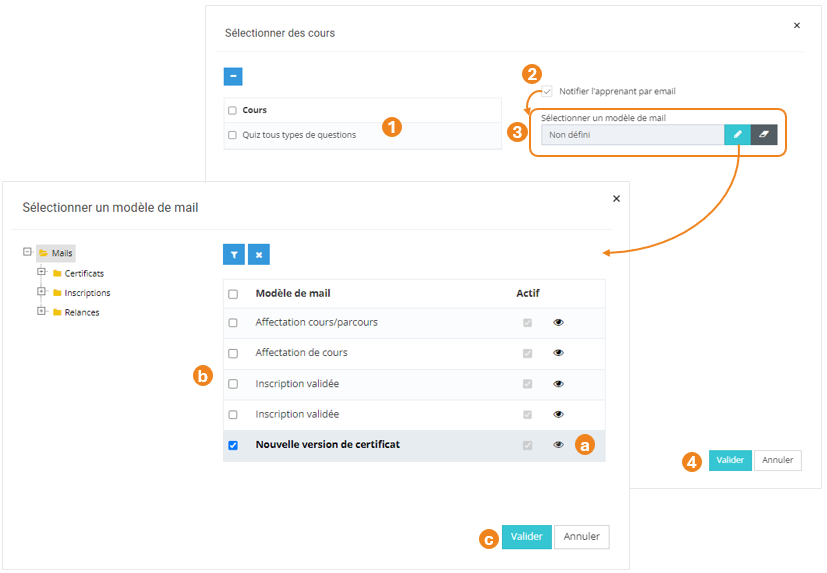
1. Retrouvez le **récapitulatif des cours** que vous avez sélectionnés ; À ce niveau, vous pouvez supprimer des cours en les sélectionnant dans le tableau puis en cliquant sur le **bouton \[x\]**.
2. Cochez cette case si vous souhaitez **informer les apprenants qu'un cours leur a été affecté** ;
3. Si la case est cochée, un nouveau champ apparaît pour renseigner le **modèle de mail** qui sera envoyé ;
\- Cliquez sur le **bouton Crayon** pour sélectionner un modèle de mail ;
Une nouvelle pop-up s'ouvre :
(a) Vous pouvez utiliser le **bouton Œil** pour visualiser les modèles de mails ;
(b) Sélectionnez le **modèle de mail** ;
(c) Cliquez sur **Valider**.
\- Cliquez sur le **bouton Gomme** pour supprimer le modèle de mail sélectionné.
4. Cochez cette case si vous souhaitez affecter le cours aux apprenants **même s'ils n'appartiennent pas aux éventuelles audiences** rattachées au cours ;
5. Renseignez éventuellement une date de début, une date d'objectif et une date de fin d'affectation du cours ;
6. Renseignez éventuellement un **mode de paiement**, un **code de paiement** (champ libre) et un **coût par unité** (champ libre) ;
7. Choisissez l'**option d'affectation** du cours (Libre / Recommandé / Obligatoire) ;
8. Cliquez sur **Valider**.
[](https://documentation.xperteam.net/uploads/images/gallery/2024-05/Mxyimage.png)
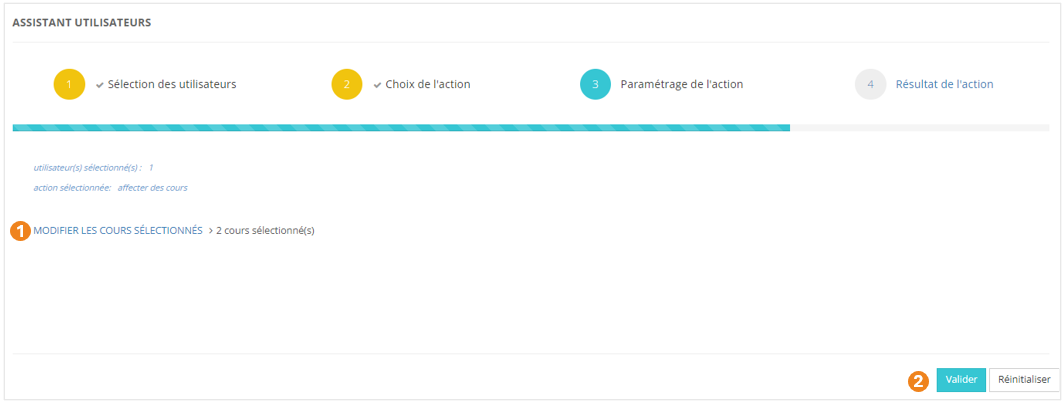
---
De retour sur l'écran principal, vous pouvez :
1. **Modifier** les cours sélectionnés ;
2. **Valider** l'action lorsque vous êtes satisfait de la sélection des cours.
[](https://documentation.xperteam.net/uploads/images/gallery/2024-05/evKimage.png)
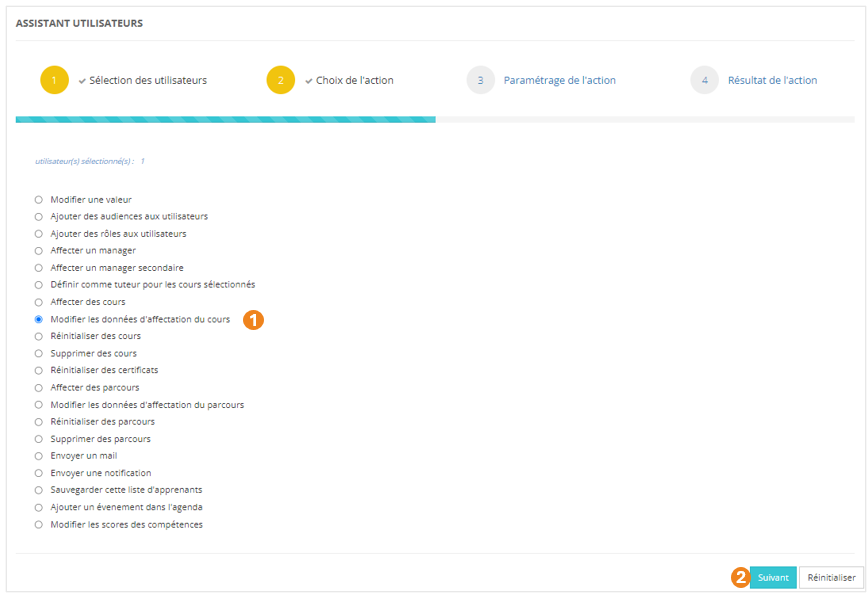
Modifier les données d'affectation du cours
1. Sélectionnez l'action **Modifier les données d'affectation du cours** ;
2. Cliquez sur **Valider**.
[](https://documentation.xperteam.net/uploads/images/gallery/2024-05/GRFimage.png)
#### **Paramétrage de l'action**
La suite se déroule exactement comme pour l'option « **Affecter des cours** » : rendez-vous à cette section pour plus d'informations.
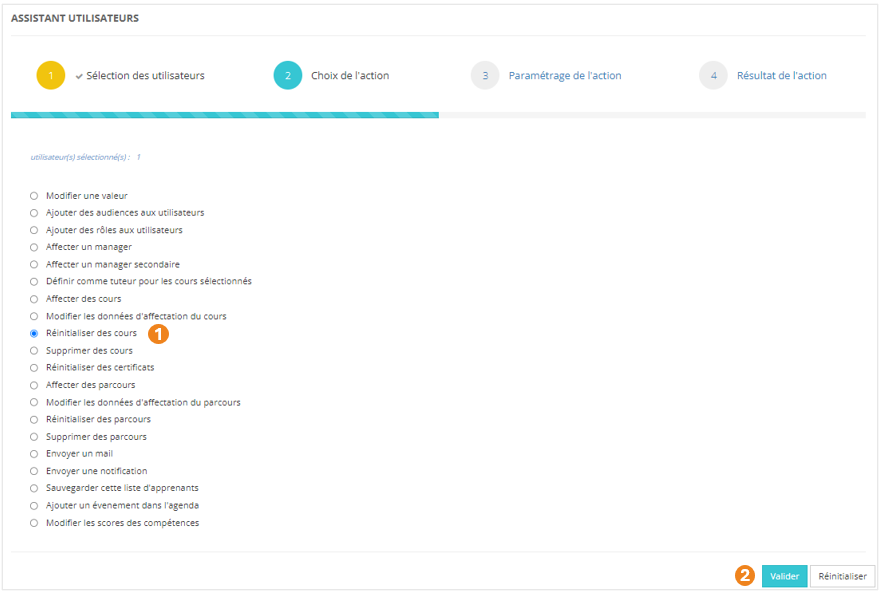
Réinitialiser des cours
1. Sélectionnez l'action **Réinitialiser des cours** ;
2. Cliquez sur **Valider**.
[](https://documentation.xperteam.net/uploads/images/gallery/2024-05/pT2image.png)
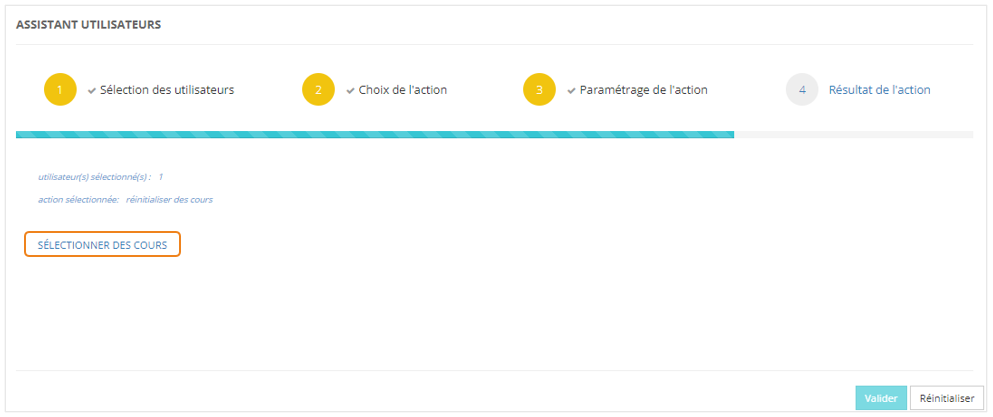
#### **Paramétrage de l'action**
Cliquez sur **SÉLECTIONNER DES COURS**.
[](https://documentation.xperteam.net/uploads/images/gallery/2024-05/4K4image.png)
Dans la pop-up qui s'ouvre :
1. Sélectionnez le ou les **cours** à réinitialiser ;
2. Cliquez sur le **chariot** ;
3. Cliquez sur **Suivant**.
[](https://documentation.xperteam.net/uploads/images/gallery/2024-05/TKoimage.png)
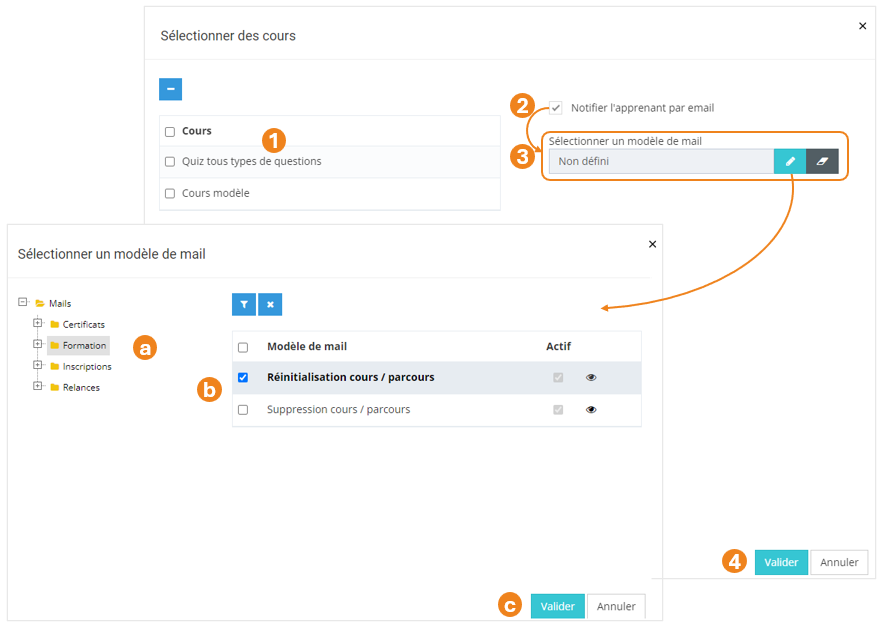
Dans la nouvelle pop-up :
1. Retrouvez le **récapitulatif des cours** que vous avez sélectionnés ; À ce niveau, vous pouvez supprimer des cours en les sélectionnant dans le tableau puis en cliquant sur le **bouton \[x\]**.
2. Cochez cette case si vous souhaitez **informer les apprenants qu'un cours a été réinitialisé** ;
3. Si la case est cochée, un nouveau champ apparaît pour renseigner le **modèle de mail** qui sera envoyé ;
\- Cliquez sur le **bouton Crayon** pour sélectionner un modèle de mail ;
Une nouvelle pop-up s'ouvre :
(a) Vous pouvez utiliser le **bouton Œil** pour visualiser les modèles de mails ;
(b) Sélectionnez le **modèle de mail** ;
(c) Cliquez sur **Valider**.
\- Cliquez sur le **bouton Gomme** pour supprimer le modèle de mail sélectionné.
4. Cliquez sur **Valider**.
[](https://documentation.xperteam.net/uploads/images/gallery/2024-05/njAimage.png)
---
De retour sur l'écran principal, vous pouvez :
1. **Modifier** les cours sélectionnés ;
2. **Valider** l'action lorsque vous êtes satisfait de la sélection des cours.
[](https://documentation.xperteam.net/uploads/images/gallery/2024-05/83Vimage.png)
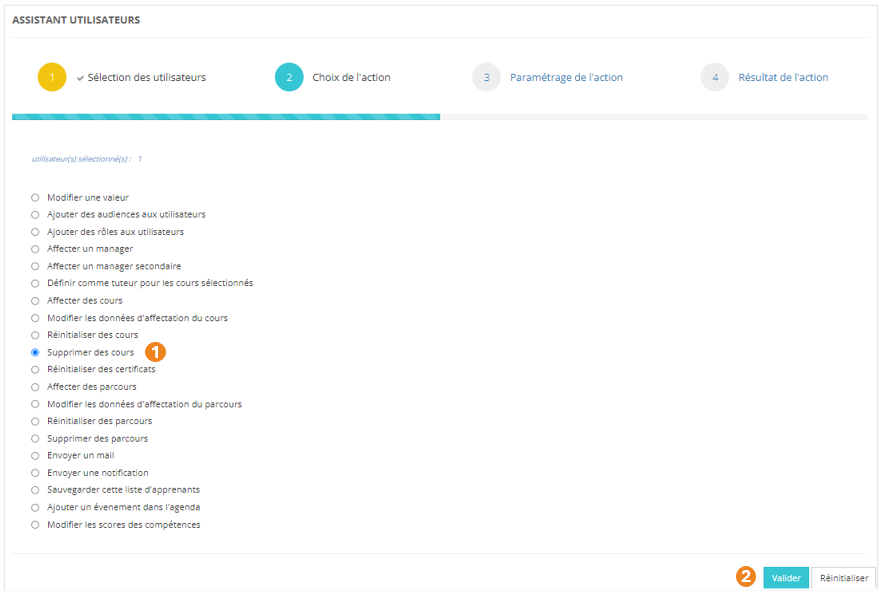
Supprimer des cours
1. Sélectionnez l'action **Supprimer des cours** ;
2. Cliquez sur **Valider**.
[](https://documentation.xperteam.net/uploads/images/gallery/2024-05/vhqimage.png)
#### **Paramétrage de l'action**
Cliquez sur **SÉLECTIONNER DES COURS**.
[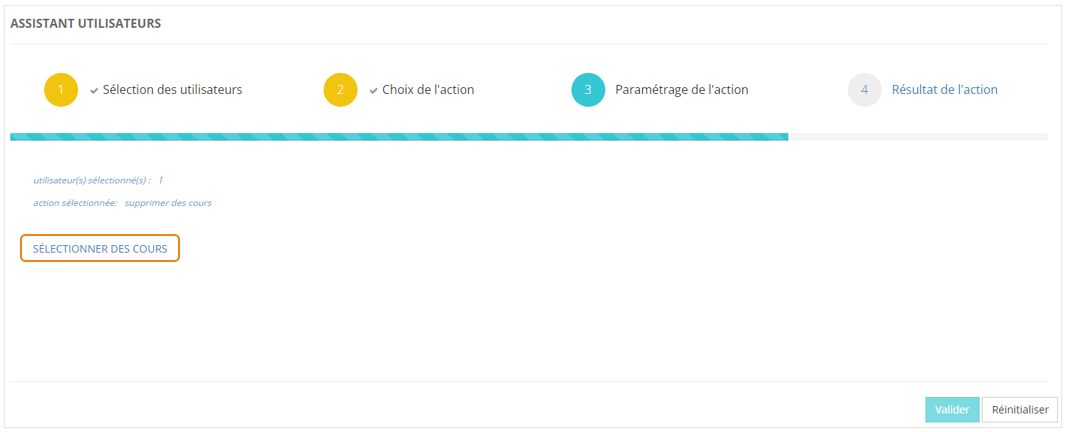](https://documentation.xperteam.net/uploads/images/gallery/2024-05/Kswimage.png)
Dans la pop-up qui s'ouvre :
1. Sélectionnez le ou les **cours** à supprimer ;
2. Cliquez sur le **chariot** ;
3. Cliquez sur **Suivant**.
[](https://documentation.xperteam.net/uploads/images/gallery/2024-05/TKoimage.png)
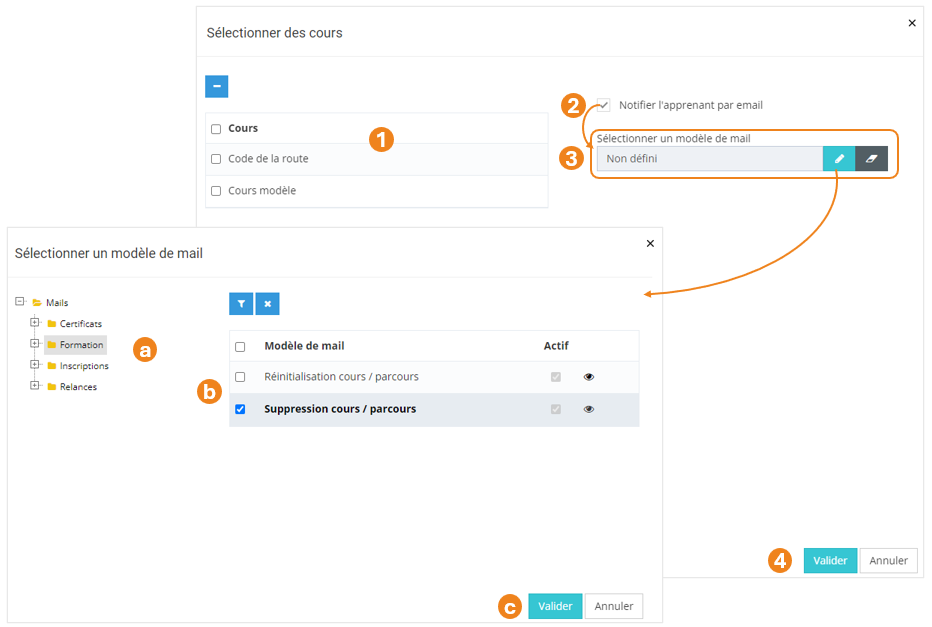
Dans la nouvelle pop-up :
1. Retrouvez le **récapitulatif des cours** que vous avez sélectionnés ; À ce niveau, vous pouvez supprimer des cours en les sélectionnant dans le tableau puis en cliquant sur le **bouton \[x\]**.
2. Cochez cette case si vous souhaitez **informer les apprenants qu'un cours leur a été supprimé** ; Ici, il s'agit de la **suppression de l'affectation d'un cours à un apprenant** et non la suppression d'un cours au catalogue.
3. Si la case est cochée, un nouveau champ apparaît pour renseigner le **modèle de mail** qui sera envoyé ;
\- Cliquez sur le **bouton Crayon** pour sélectionner un modèle de mail ;
Une nouvelle pop-up s'ouvre :
(a) Vous pouvez utiliser le **bouton Œil** pour visualiser les modèles de mails ;
(b) Sélectionnez le **modèle de mail** ;
(c) Cliquez sur **Valider**.
\- Cliquez sur le **bouton Gomme** pour supprimer le modèle de mail sélectionné.
4. Cliquez sur **Valider**.
[](https://documentation.xperteam.net/uploads/images/gallery/2024-05/bBjimage.png)
---
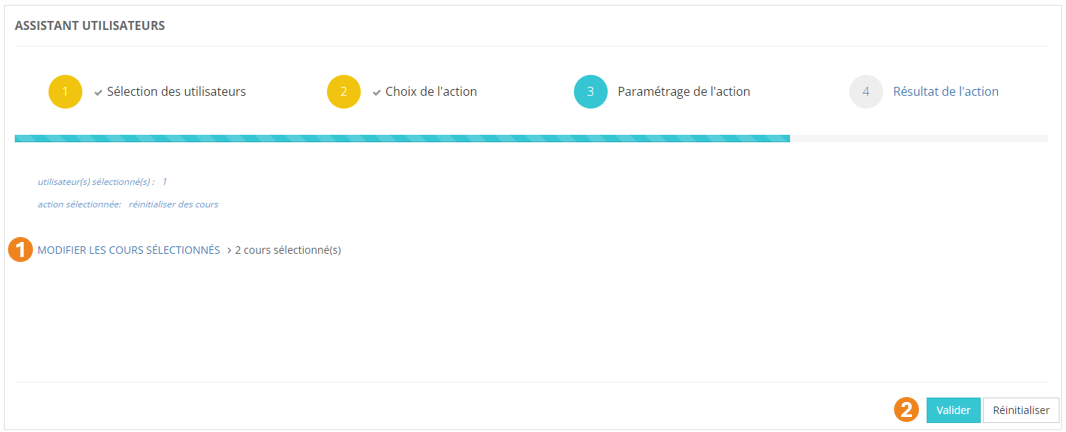
De retour sur l'écran principal, vous pouvez :
1. **Modifier** les cours sélectionnés ;
2. **Valider** l'action lorsque vous êtes satisfait de la sélection des cours.
[](https://documentation.xperteam.net/uploads/images/gallery/2024-05/uF8image.png)
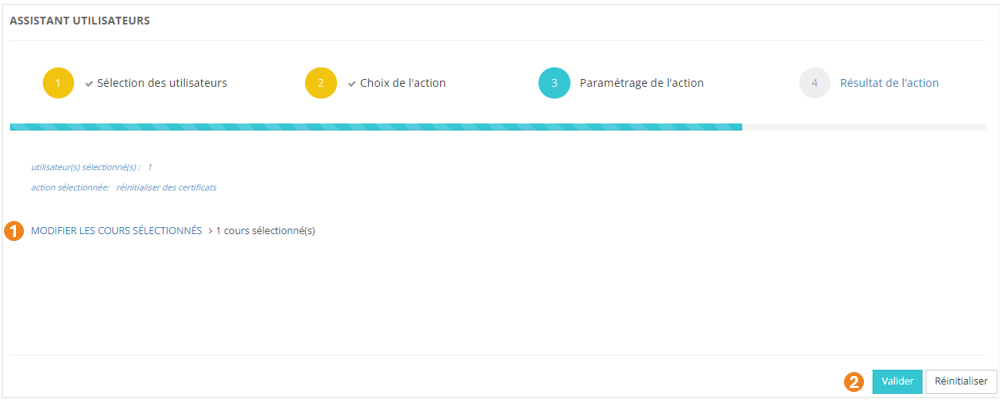
Réinitialiser des certificats
La réinitialisation des certificats a pour but de remettre à jour un certificat dont le modèle a été modifié dans les réglages du cours.
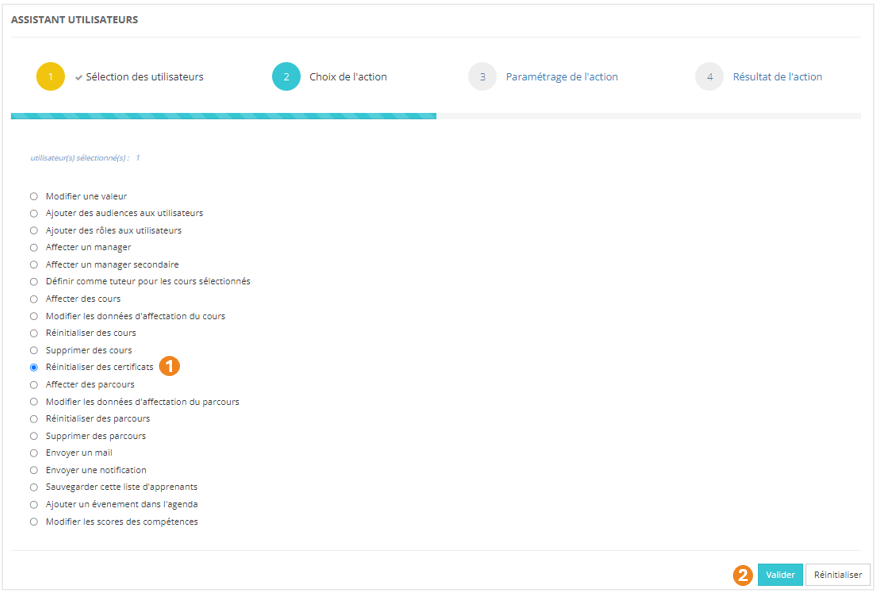
1. Sélectionnez l'action **Réinitialiser des certificats** ;
2. Cliquez sur **Valider**.
[](https://documentation.xperteam.net/uploads/images/gallery/2024-05/AQ7image.png)
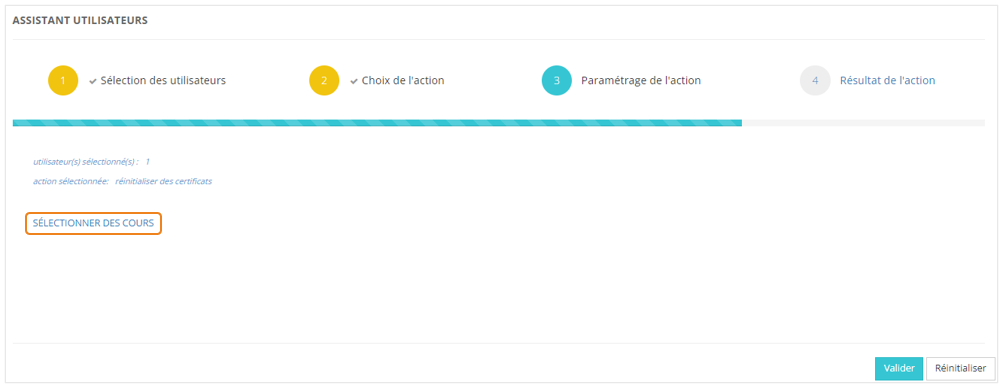
#### **Paramétrage de l'action**
Cliquez sur **SÉLECTIONNER DES COURS**.
[](https://documentation.xperteam.net/uploads/images/gallery/2024-05/SpXimage.png)
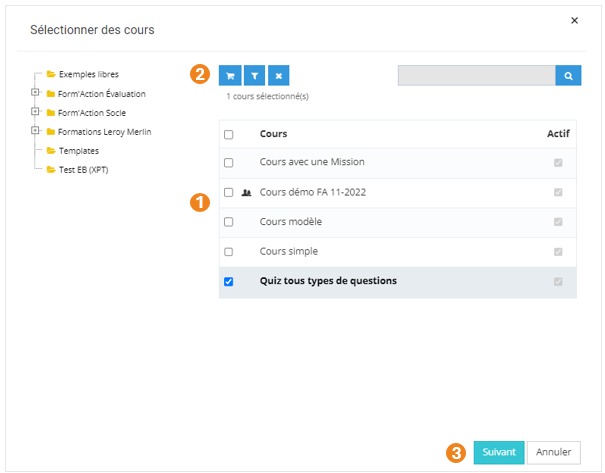
Dans la pop-up qui s'ouvre :
1. Sélectionnez le ou les **cours** dont le certificat doit être réinitialisé pour les utilisateurs sélectionnés à l'étape précédente ;
2. Cliquez sur le **chariot** ;
3. Cliquez sur **Suivant**.
[](https://documentation.xperteam.net/uploads/images/gallery/2024-05/POximage.png)
Dans la nouvelle pop-up :
1. Retrouvez le **récapitulatif des cours** que vous avez sélectionnés ; À ce niveau, vous pouvez supprimer des cours en les sélectionnant dans le tableau puis en cliquant sur le **bouton \[x\]**.
2. Cochez cette case si vous souhaitez **informer les apprenants que leur certificat a été mis à jour** ;
3. Si la case est cochée, un nouveau champ apparaît pour renseigner le **modèle de mail** qui sera envoyé ;
\- Cliquez sur le **bouton Crayon** pour sélectionner un modèle de mail ;
Une nouvelle pop-up s'ouvre :
(a) Vous pouvez utiliser le **bouton Œil** pour visualiser les modèles de mails ;
(b) Sélectionnez le **modèle de mail** ;
(c) Cliquez sur **Valider**.
\- Cliquez sur le **bouton Gomme** pour supprimer le modèle de mail sélectionné.
4. Cliquez sur **Valider**.
[](https://documentation.xperteam.net/uploads/images/gallery/2024-05/bi8image.png)
---
De retour sur l'écran principal, vous pouvez :
1. **Modifier** les cours sélectionnés ;
2. **Valider** l'action lorsque vous êtes satisfait de la sélection des cours.
[](https://documentation.xperteam.net/uploads/images/gallery/2024-05/hmgimage.png)
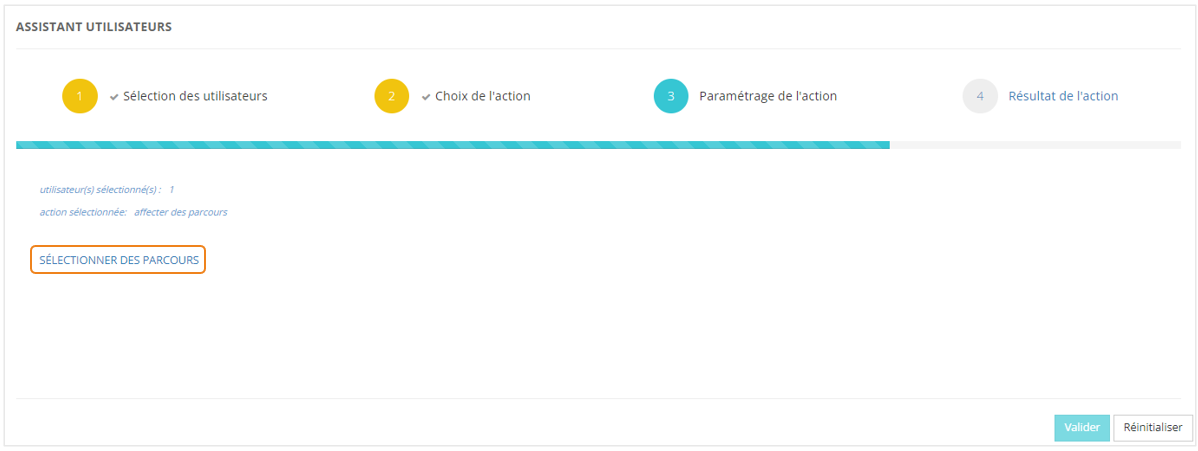
Affecter des parcours
1. Sélectionnez l'action **Affecter des parcours** ;
2. Cliquez sur **Valider**.
[](https://documentation.xperteam.net/uploads/images/gallery/2024-05/fkPimage.png)
#### **Paramétrage de l'action**
Cliquez sur **SÉLECTIONNER DES PARCOURS**.
[](https://documentation.xperteam.net/uploads/images/gallery/2024-05/FSKimage.png)
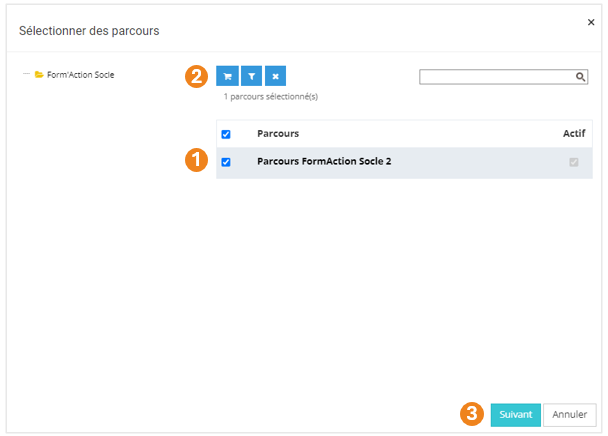
Dans la pop-up qui s'ouvre :
1. Sélectionnez le ou les **parcours** à ajouter aux utilisateurs ;
2. Cliquez sur le **chariot** ;
3. Cliquez sur **Suivant**.
[](https://documentation.xperteam.net/uploads/images/gallery/2024-05/jRHimage.png)
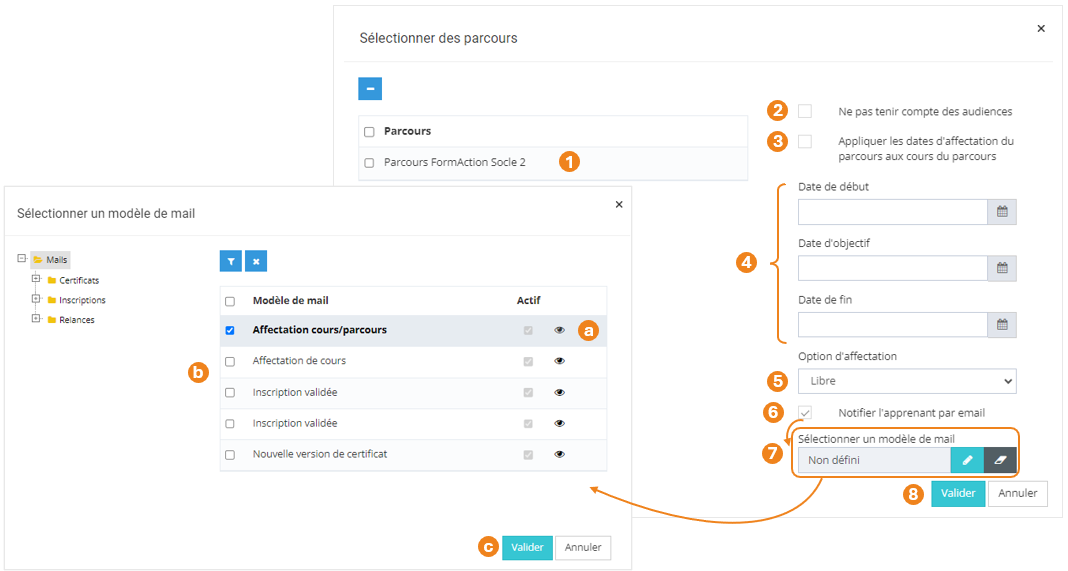
Dans la nouvelle pop-up :
1. Retrouvez le **récapitulatif des parcours** que vous avez sélectionnés ; À ce niveau, vous pouvez supprimer des parcours en les sélectionnant dans le tableau puis en cliquant sur le **bouton \[x\]**.
2. Cochez cette case si vous souhaitez affecter le parcours aux apprenants **même s'ils n'appartiennent pas aux éventuelles audiences** rattachées au parcours ;
3. Cochez cette case si vous souhaitez que les dates d'affectation du parcours soient reportées sur les affectations des cours appartenant au parcours ;
4. Renseignez éventuellement une date de début, une date d'objectif et une date de fin d'affectation du parcours ;
5. Choisissez l'**option d'affectation** du cours (Libre / Recommandé / Obligatoire) ;
6. Si la case est cochée, un nouveau champ apparaît pour renseigner le **modèle de mail** qui sera envoyé ;
\- Cliquez sur le **bouton Crayon** pour sélectionner un modèle de mail ;
Une nouvelle pop-up s'ouvre :
(a) Vous pouvez utiliser le **bouton Œil** pour visualiser les modèles de mails ;
(b) Sélectionnez le **modèle de mail** ;
(c) Cliquez sur **Valider**.
\- Cliquez sur le **bouton Gomme** pour supprimer le modèle de mail sélectionné.
7. Cliquez sur **Valider**.
[](https://documentation.xperteam.net/uploads/images/gallery/2024-05/9k5image.png)
---
De retour sur l'écran principal, vous pouvez :
1. **Modifier** les parcours sélectionnés ;
2. **Valider** l'action lorsque vous êtes satisfait de la sélection des parcours.
[](https://documentation.xperteam.net/uploads/images/gallery/2024-05/zX0image.png)
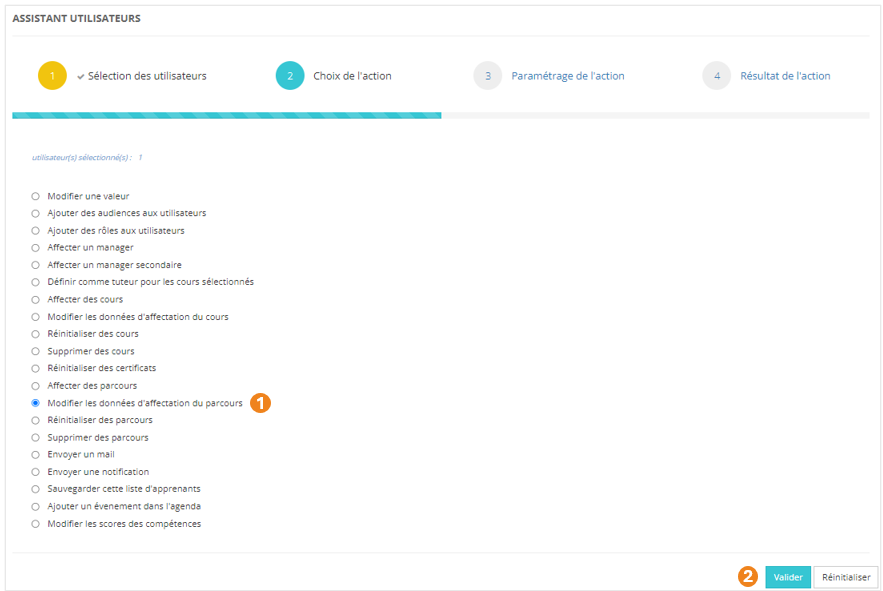
Modifier les données d'affectation du parcours
1. Sélectionnez l'action **Modifier les données d'affectation du parcours** ;
2. Cliquez sur **Valider**.
[](https://documentation.xperteam.net/uploads/images/gallery/2024-05/Rxoimage.png)
#### **Paramétrage de l'action**
La suite se déroule exactement comme pour l'option « **Affecter des parcours** » : rendez-vous à cette section pour plus d'informations.
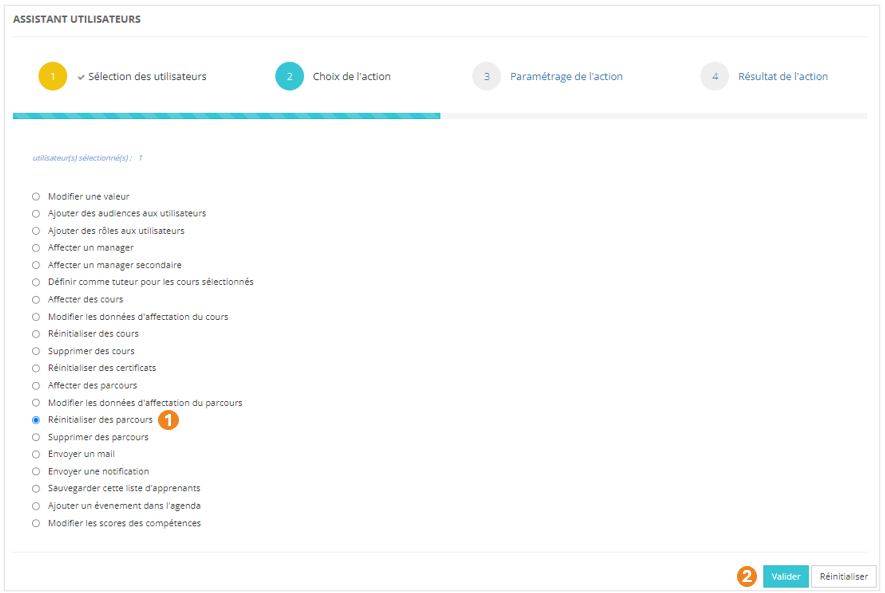
Réinitialiser des parcours
1. Sélectionnez l'action **Réinitialiser des parcours** ;
2. Cliquez sur **Valider**.
[](https://documentation.xperteam.net/uploads/images/gallery/2024-05/Rmtimage.png)
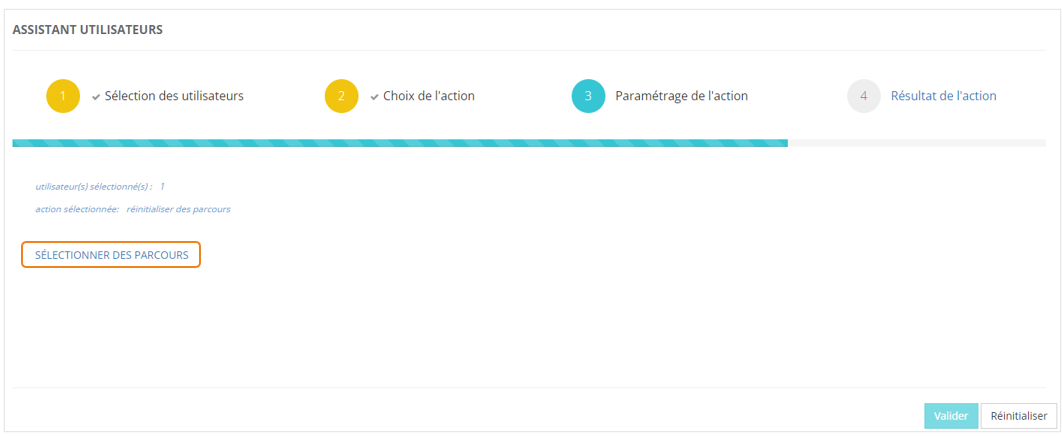
#### **Paramétrage de l'action**
Cliquez sur **SÉLECTIONNER DES PARCOURS**.
[](https://documentation.xperteam.net/uploads/images/gallery/2024-05/yTkimage.png)
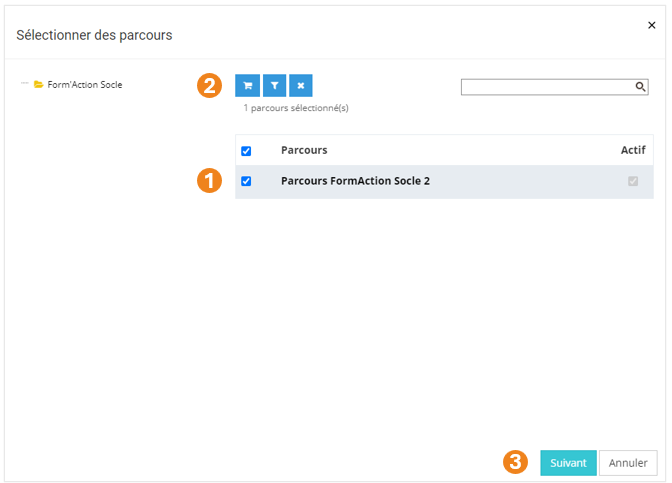
Dans la pop-up qui s'ouvre :
1. Sélectionnez le ou les **parcours** à réinitialiser ;
2. Cliquez sur le **chariot** ;
3. Cliquez sur **Suivant**.
[](https://documentation.xperteam.net/uploads/images/gallery/2024-05/jRHimage.png)
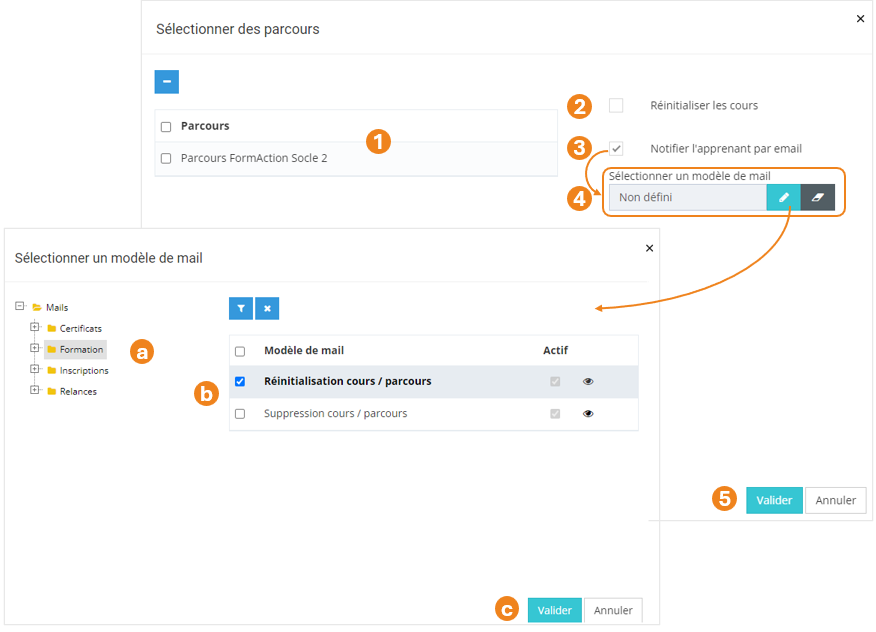
Dans la nouvelle pop-up :
1. Retrouvez le **récapitulatif des parcours** que vous avez sélectionnés ; À ce niveau, vous pouvez supprimer des parcours en les sélectionnant dans le tableau puis en cliquant sur le **bouton \[x\]**.
2. Cochez cette case si vous souhaitez que les **cours composant le parcours soient également réinitialisés** ;
3. Cochez cette case si vous souhaitez **informer les apprenants qu'un parcours a été réinitialisé** ;
4. Si la case est cochée, un nouveau champ apparaît pour renseigner le **modèle de mail** qui sera envoyé ;
\- Cliquez sur le **bouton Crayon** pour sélectionner un modèle de mail ;
Une nouvelle pop-up s'ouvre :
(a) Vous pouvez utiliser le **bouton Œil** pour visualiser les modèles de mails ;
(b) Sélectionnez le **modèle de mail** ;
(c) Cliquez sur **Valider**.
\- Cliquez sur le **bouton Gomme** pour supprimer le modèle de mail sélectionné.
5. Cliquez sur **Valider**.
[](https://documentation.xperteam.net/uploads/images/gallery/2024-05/s7Limage.png)
---
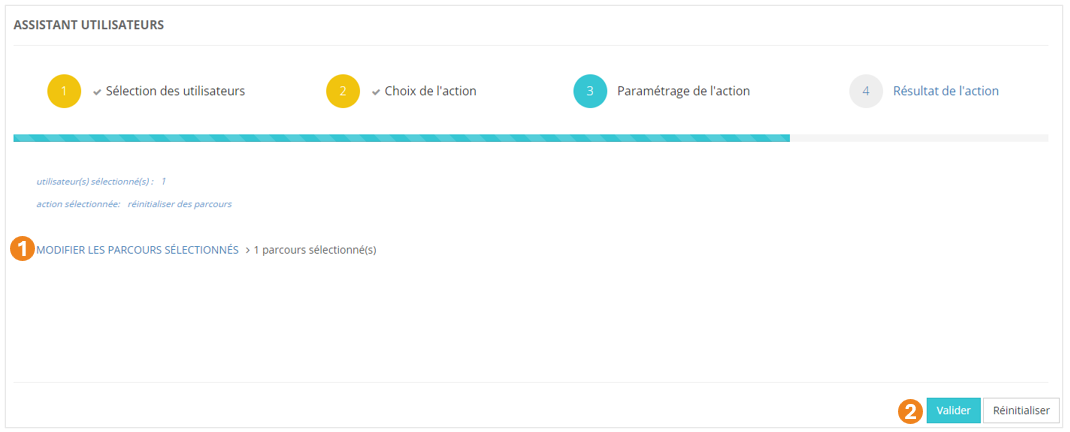
De retour sur l'écran principal, vous pouvez :
1. **Modifier** les parcours sélectionnés ;
2. **Valider** l'action lorsque vous êtes satisfait de la sélection des parcours.
[](https://documentation.xperteam.net/uploads/images/gallery/2024-05/8H6image.png)
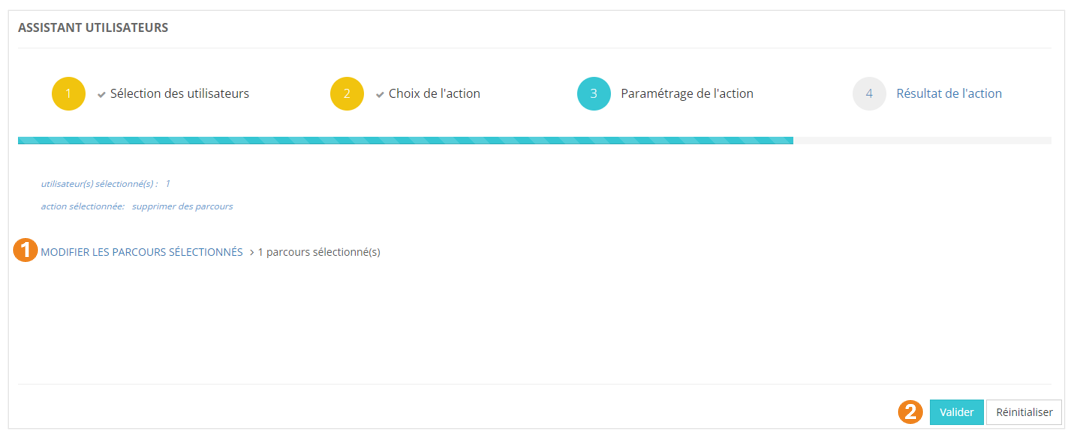
Supprimer des parcours
1. Sélectionnez l'action **Supprimer des parcours** ;
2. Cliquez sur **Valider**.
[](https://documentation.xperteam.net/uploads/images/gallery/2024-05/tN1image.png)
#### **Paramétrage de l'action**
Cliquez sur **SÉLECTIONNER DES PARCOURS**.
[](https://documentation.xperteam.net/uploads/images/gallery/2024-05/VV8image.png)
Dans la pop-up qui s'ouvre :
1. Sélectionnez le ou les **parcours** à supprimer ;
2. Cliquez sur le **chariot** ;
3. Cliquez sur **Suivant**.
[](https://documentation.xperteam.net/uploads/images/gallery/2024-05/DJhimage.png)
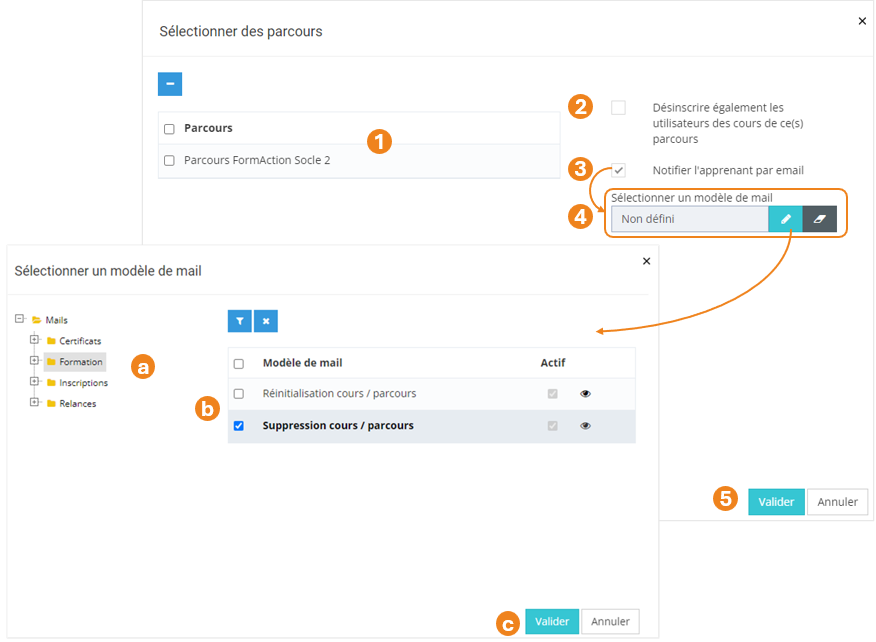
Dans la nouvelle pop-up :
1. Retrouvez le **récapitulatif des parcours** que vous avez sélectionnés ; À ce niveau, vous pouvez supprimer des parcours en les sélectionnant dans le tableau puis en cliquant sur le **bouton \[x\]**.
2. Cochez cette case si vous souhaitez que **les cours qui composent ce parcours soient aussi retirés** aux apprenants.
3. Cochez cette case si vous souhaitez **informer les apprenants qu'un parcours leur a été supprimé** ; Ici, il s'agit de la **suppression de l'affectation d'un parcours à un apprenant** et non la suppression d'un parcours au catalogue.
4. Si la case est cochée, un nouveau champ apparaît pour renseigner le **modèle de mail** qui sera envoyé ;
\- Cliquez sur le **bouton Crayon** pour sélectionner un modèle de mail ;
Une nouvelle pop-up s'ouvre :
(a) Vous pouvez utiliser le **bouton Œil** pour visualiser les modèles de mails ;
(b) Sélectionnez le **modèle de mail** ;
(c) Cliquez sur **Valider**.
\- Cliquez sur le **bouton Gomme** pour supprimer le modèle de mail sélectionné.
5. Cliquez sur **Valider**.
[](https://documentation.xperteam.net/uploads/images/gallery/2024-05/u2Pimage.png)
---
De retour sur l'écran principal, vous pouvez :
1. **Modifier** les parcours sélectionnés ;
2. **Valider** l'action lorsque vous êtes satisfait de la sélection des parcours.
[](https://documentation.xperteam.net/uploads/images/gallery/2024-05/LKYimage.png)
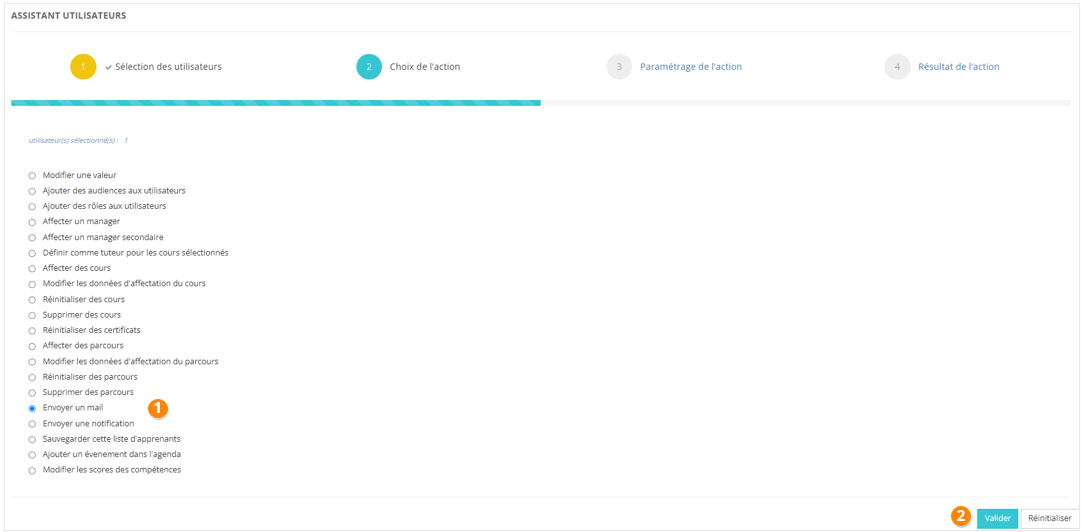
Envoyer un mail
1. Sélectionnez l'action **Envoyer un mail** ;
2. Cliquez sur **Valider**.
[](https://documentation.xperteam.net/uploads/images/gallery/2024-05/Rp1image.png)
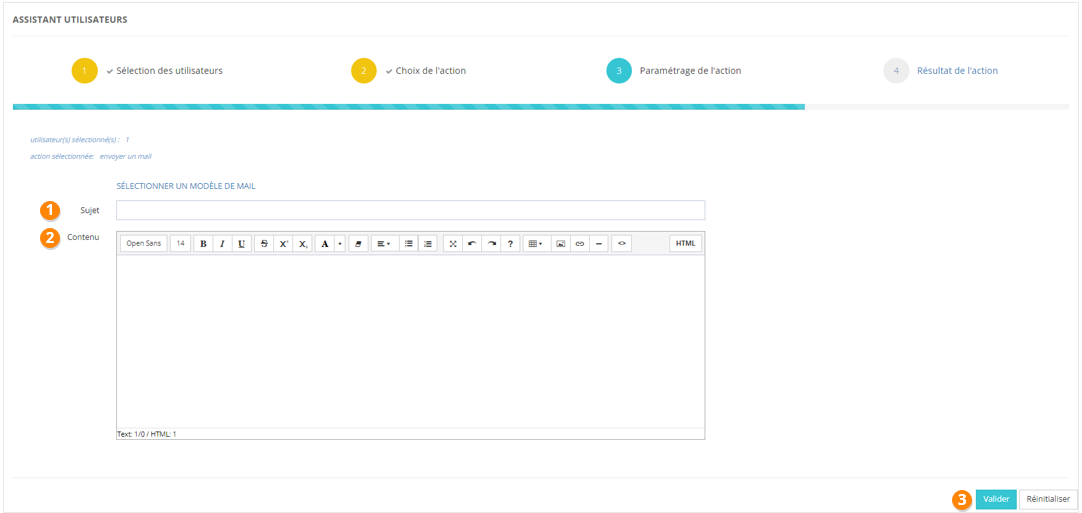
#### **Paramétrage de l'action**
Vous avez la possibilité d’envoyer un mail unique ou un mail à partir d'un modèle.
##### **Mail unique **
1. Remplissez le sujet et le contenu.
2. Vous pouvez insérer des champs dynamiques dans le contenu du mail.
3. Cliquez sur Valider.
**Attention !** Les champs dynamiques doivent pouvoir être interprétés. Par exemple, si vous utilisez le champ dynamique "Nom du cours", le mail envoyé étant totalement décorrélé des cours, ne pourra pas contenir le nom du cours auquel vous pensez.
[](https://documentation.xperteam.net/uploads/images/gallery/2024-05/Aj5image.png)
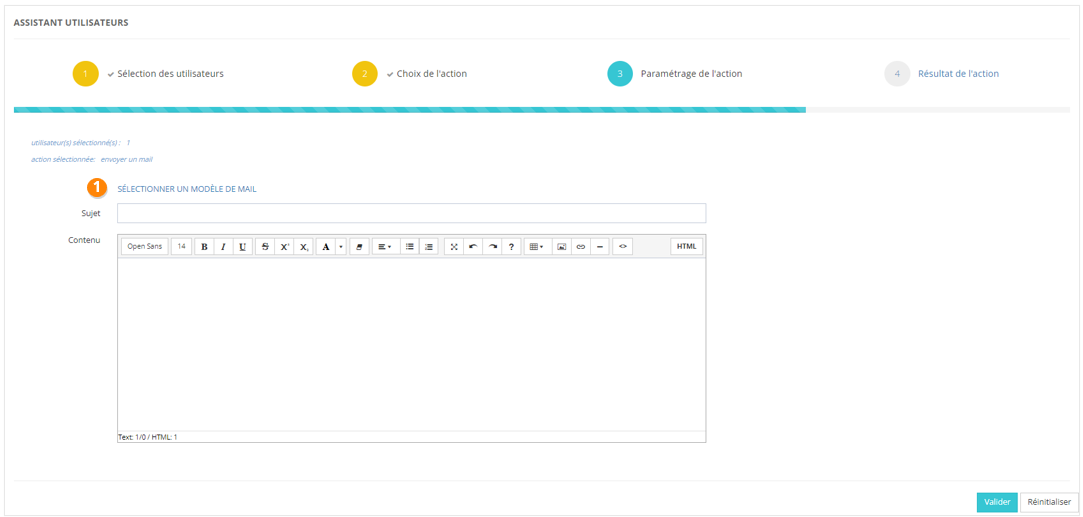
##### **Modèle de mail **
1. Cliquez sur Sélectionner un modèle de mail.
2. Choisissez parmi la liste des modèles de mails.
3. À la validation de votre choix, vous retournez à l'affichage précédent, avec le sujet et le contenu préremplis, que vous pouvez encore modifier à votre guise.
4. Lorsque vous avez paramétré entièrement l'envoi de votre mail, cliquez sur Valider.
[](https://documentation.xperteam.net/uploads/images/gallery/2024-05/dk3image.png)
**Le filtre de mails**
Le filtre de mails fonctionne sur le même principe que le filtre d'utilisateurs (voir plus haut).
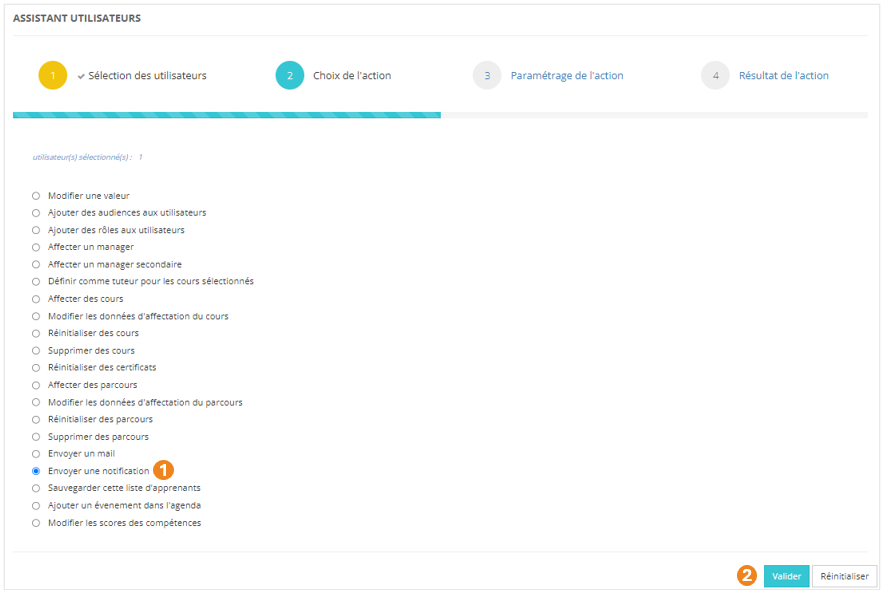
Envoyer une notification
1. Sélectionnez l'action **Envoyer une notification** ;
2. Cliquez sur **Valider**.
[](https://documentation.xperteam.net/uploads/images/gallery/2024-05/1rPimage.png)
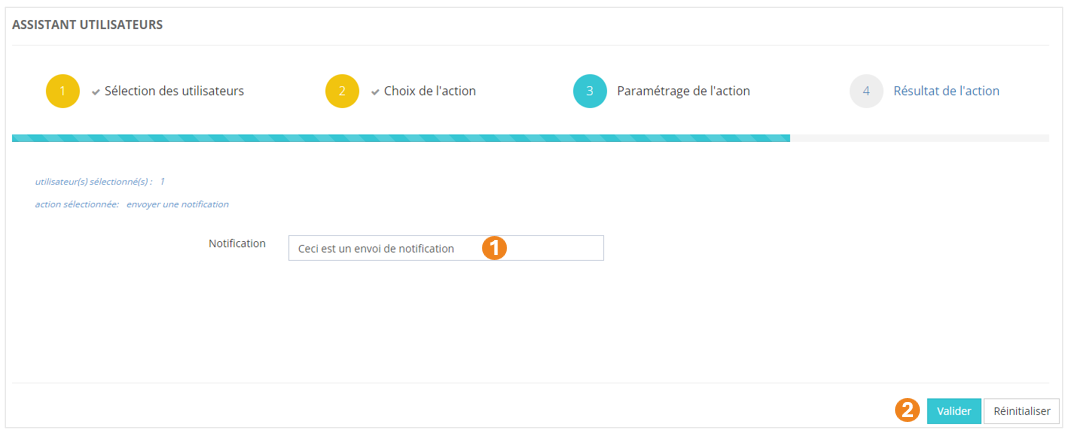
#### **Paramétrage de l'action**
1. Écrivez le **texte de la notification** dans le champ texte prévu à cet effet ; Depuis l'assistant utilisateurs, une notification est un texte court sans mise en forme.
2. Cliquez sur **Valider**.
[](https://documentation.xperteam.net/uploads/images/gallery/2024-05/IPAimage.png)
##### **Résultat en Front-Office**
En cliquant sur la **cloche**, vous pouvez visualiser toutes vos notifications.
[](https://documentation.xperteam.net/uploads/images/gallery/2024-05/aXgimage.png)
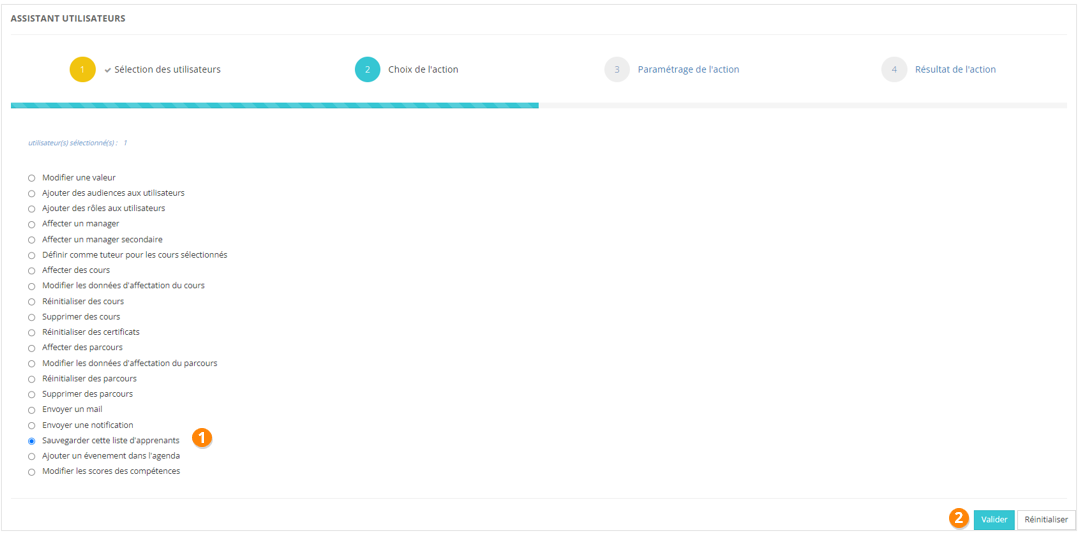
Sauvegarder cette liste d'apprenants
1. Sélectionnez l'action **Sauvegarder cette liste d'apprenants** ;
2. Cliquez sur **Valider**.
[](https://documentation.xperteam.net/uploads/images/gallery/2024-05/4EZimage.png)
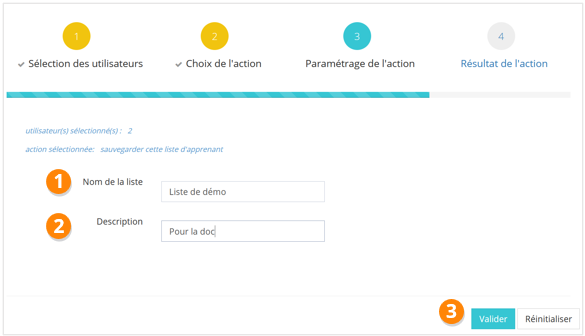
#### **Paramétrage de l'action**
1. Nommez votre liste
2. Vous pouvez ajouter une description.
3. Cliquer sur Valider.
[](https://documentation.xperteam.net/uploads/images/gallery/2024-05/D75image.png)
Cette liste sera obligatoirement une liste statique, puisqu'elle est créée à partir d'utilisateurs que vous avez choisis et non à partir de critères.
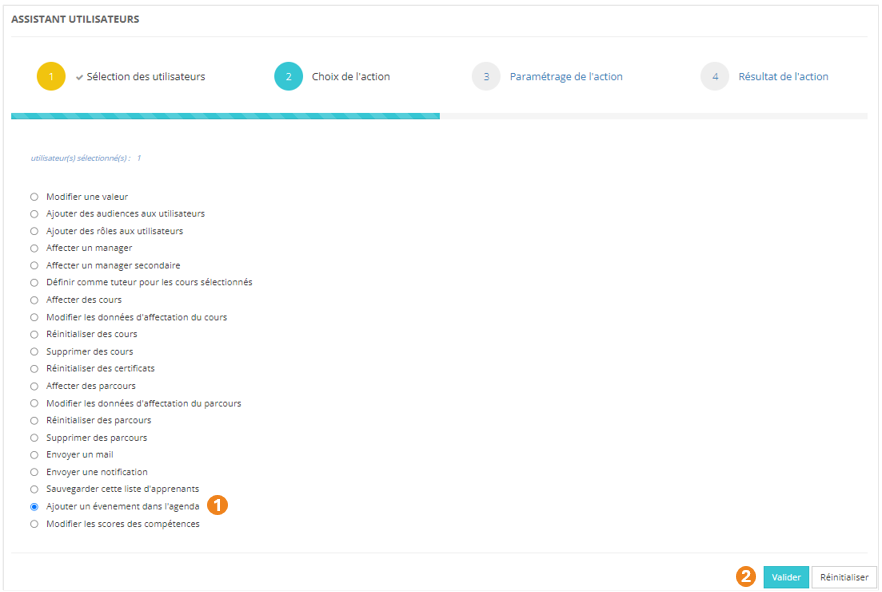
Ajouter un événement dans l'agenda
1. Sélectionnez l'action **Ajouter un événement dans l'agenda** ;
2. Cliquez sur **Valider**.
[](https://documentation.xperteam.net/uploads/images/gallery/2024-05/8brimage.png)
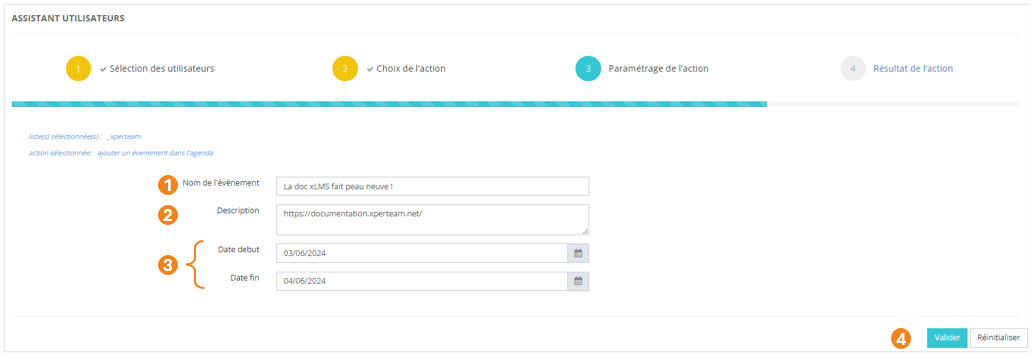
#### **Paramétrage de l'action**
1. **Nommez** l'événement ;
2. Ajoutez éventuellement une **description** de l'événement ;
3. Ajoutez une **date de début** et une **date de fin** pour l'événement ;
4. Cliquez sur **Valider**.
[](https://documentation.xperteam.net/uploads/images/gallery/2024-05/q70image.png)
#### **Inscription de l'événement à l'agenda de l'utilisateur**
En cliquant sur l'icône de calendrier dans la barre de navigation, l'utilisateur pourra retrouver l'événement inscrit dans son agenda.
[](https://documentation.xperteam.net/uploads/images/gallery/2024-05/P4bimage.png)
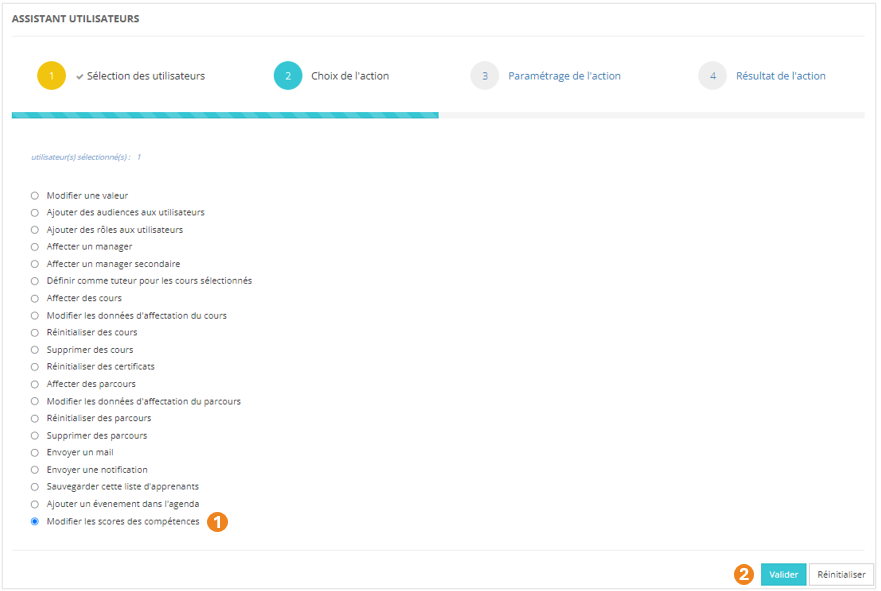
Modifier les scores des compétences
1. Sélectionnez l'action **Modifier les scores des compétences** ;
2. Cliquez sur **Valider**.
[](https://documentation.xperteam.net/uploads/images/gallery/2024-05/teIimage.png)
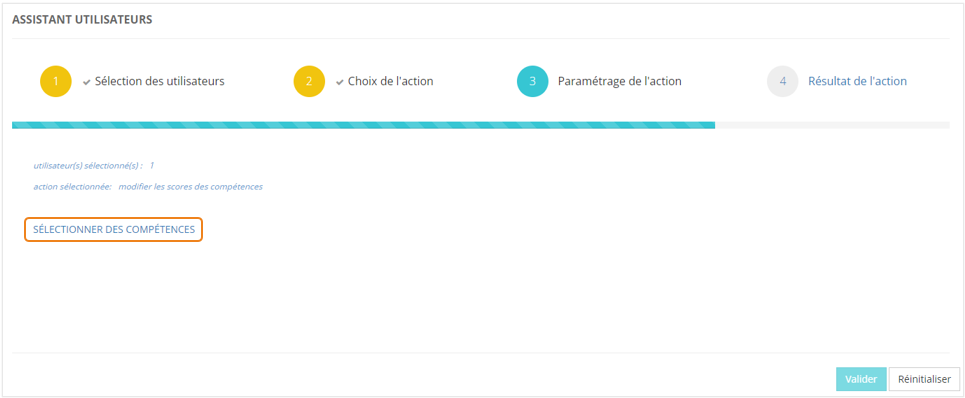
#### **Paramétrage de l'action**
Cliquez sur **SÉLECTIONNER DES COMPÉTENCES**.
[](https://documentation.xperteam.net/uploads/images/gallery/2024-05/lIkimage.png)
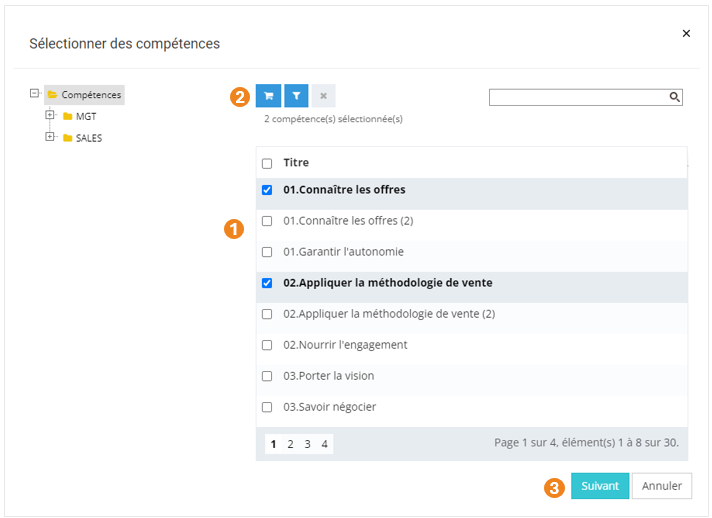
Dans la pop-up qui s'ouvre :
1. Sélectionnez la ou les **compétences** dont les scores vont être modifiés ;
2. Cliquez sur le **chariot** ;
3. Cliquez sur **Suivant**.
[](https://documentation.xperteam.net/uploads/images/gallery/2024-05/Nb0image.png)
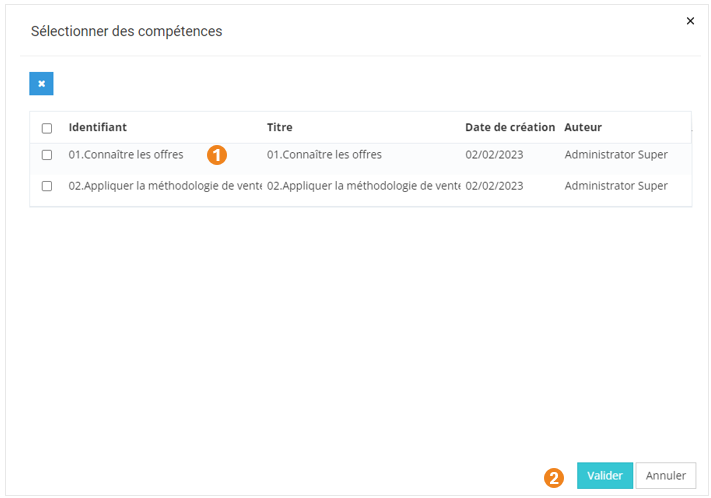
Dans la nouvelle pop-up :
1. Retrouvez le **récapitulatif des compétences** que vous avez sélectionnées ;
À ce niveau, vous pouvez supprimer des compétences en les sélectionnant dans le tableau puis en cliquant sur le **bouton \[x\]**.
2. Cliquez sur **Valider**.
[](https://documentation.xperteam.net/uploads/images/gallery/2024-05/sCPimage.png)
**Le filtre de compétences**
Le filtre de compétences fonctionne sur le même principe que le filtre d'utilisateurs (voir plus haut).
---
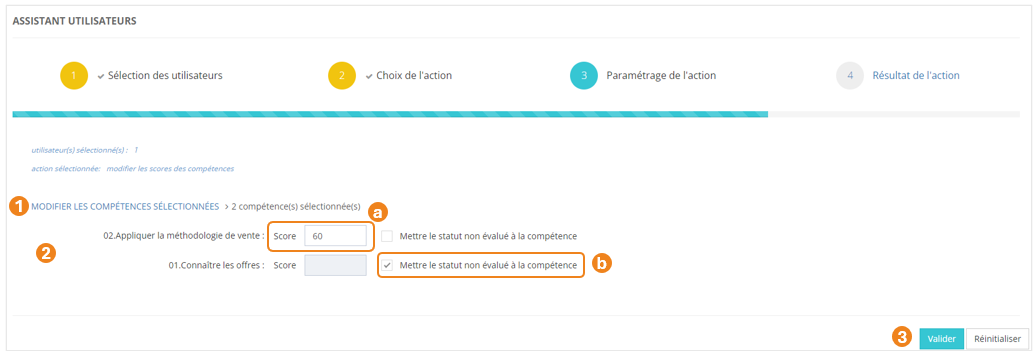
De retour sur l'écran principal, vous pouvez :
1. **Modifier** les compétences sélectionnées ;
2. (a) **Mettre un score** sur les compétences sélectionnées à l'étape précédente
OU
(b) Mettre un **statut Non évalué** sur les compétences sélectionnées à l'étape précédente ;
Lorsque vous cochez cette case, la zone de score devient alors grisée car non utilisable.
3. **Valider** l'action lorsque vous êtes satisfait de la modification des scores de compétences.
[](https://documentation.xperteam.net/uploads/images/gallery/2024-05/MPgimage.png)
Le bouton **Réinitialiser** n’annule pas la dernière action.
# L'Assistant Cours
L'assistant **Cours** vous permet d'effectuer, après avoir sélectionné des cours, un certains nombre de tâches d'administration. Vous trouverez la liste de toutes les actions possibles plus loin dans la fiche.
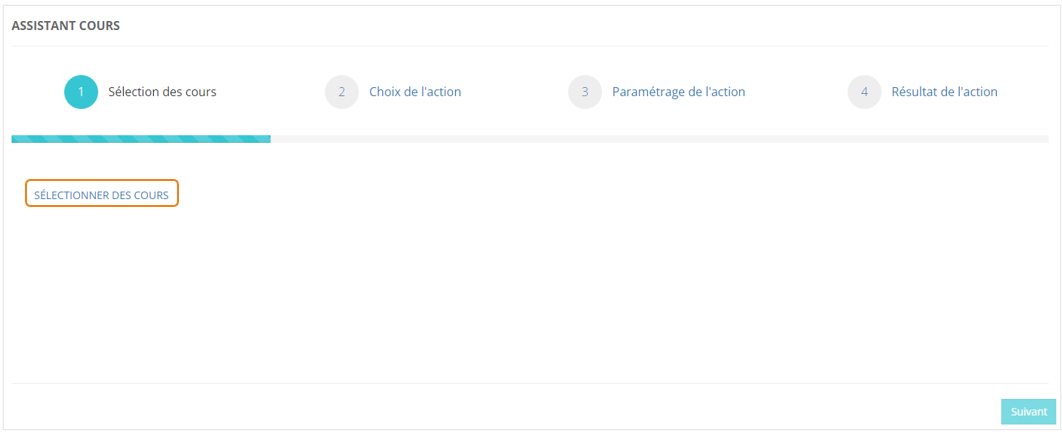
### **Sélection des cours**
Dans le menu **Assistants > Assistant cours**, cliquez sur **SÉLECTIONNER DES COURS**.
[](https://documentation.xperteam.net/uploads/images/gallery/2024-05/wNIimage.png)
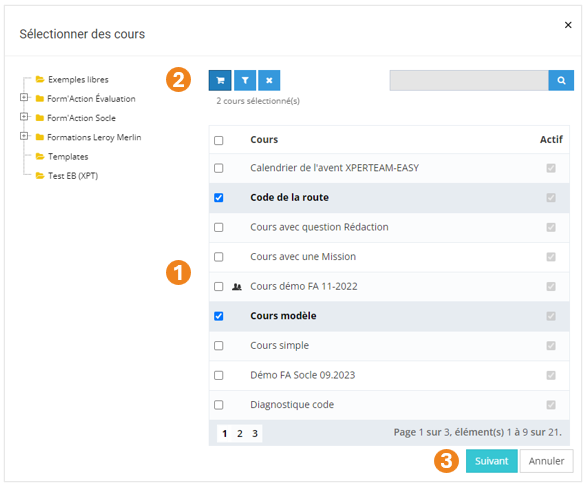
Dans la pop-up qui s'ouvre :
1. Sélectionnez les **cours** à modifier ;
2. Cliquez sur le **chariot** ;
3. Cliquez sur **Suivant**.
[](https://documentation.xperteam.net/uploads/images/gallery/2024-05/f7oimage.png)
Le filtre de cours
1. Vous pouvez **filtrer** votre recherche grâce : au **nom** du cours, son **identifiant unique**, sa **description**, son **audience**, son **fournisseur**, sa **modalité**.
2. Si vous cherchez parmi les **cours désactivés**, cochez cette case.
3. Vous pouvez également filtrer votre recherche à l'aide des **champs personnalisés** des cours.
4. Choisissez si les **critères** doivent tous être valides ou s'il suffit qu'un des critères soit valide pour proposer un résultat.Dans l'exemple ci-dessous, si vous choisissez :
**-** **Tous les critères :** vous obtiendrez toutes les cours dont le nom contient la chaîne de caractères 'DUP' et le champ personnalisé 1 contient la chaîne de caractères '2024' ;
**-** **Au moins un critère :** vous obtiendrez l'ensemble de tous les cours dont le nom contient la chaîne de caractères 'DUP', ainsi que tous les utilisateurs dont le champ personnalisé 1 contient la chaîne de caractères '2024'.
5. Cliquez sur **Valider**.
6. Sélectionnez les **cours** qui vous intéressent parmi les cours trouvés par filtrage.
**//Image en attente de correction de la fenêtre de filtre**
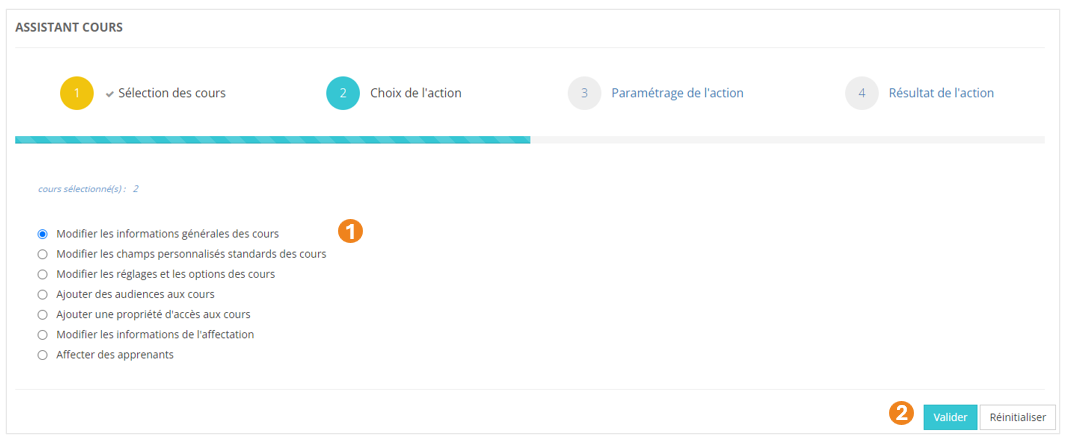
Modifier les informations générales des cours
1. Sélectionnez l'action **Modifiez les informatiques générales des cours** ;
2. Cliquez sur **Valider**.
[](https://documentation.xperteam.net/uploads/images/gallery/2024-05/NX9image.png)
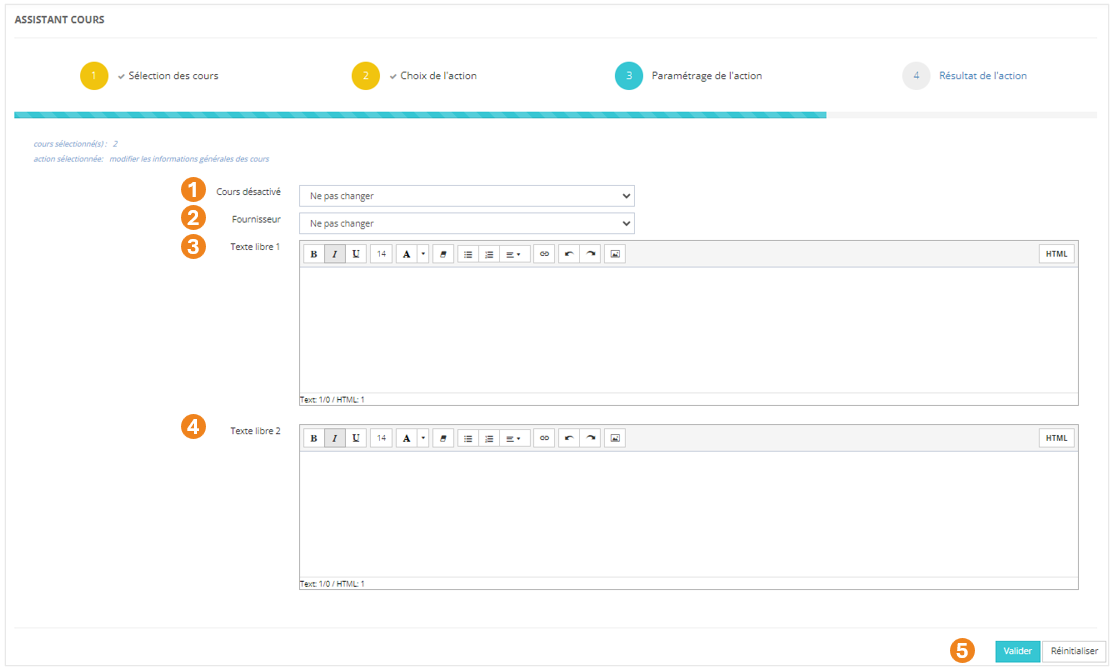
#### **Paramétrage de l'action**
Vous avez la possibilité de modifier une ou plusieurs des valeurs ci-dessous :
1. Le **statut** du cours : désactivé ou non (*Ne pas changer / Oui / Non*) ;
2. Le **fournisseur** du cours ;
3. Le **texte libre 1** du cours ;
4. Le **texte libre 2** du cours ;
5. Lorsque vous avez effectué les modifications souhaitées, cliquez sur **Valider**.
[](https://documentation.xperteam.net/uploads/images/gallery/2024-05/2VNimage.png)
Pour plus d'informations sur les informations générales du cours, voir la page ***//Créer un cours***.
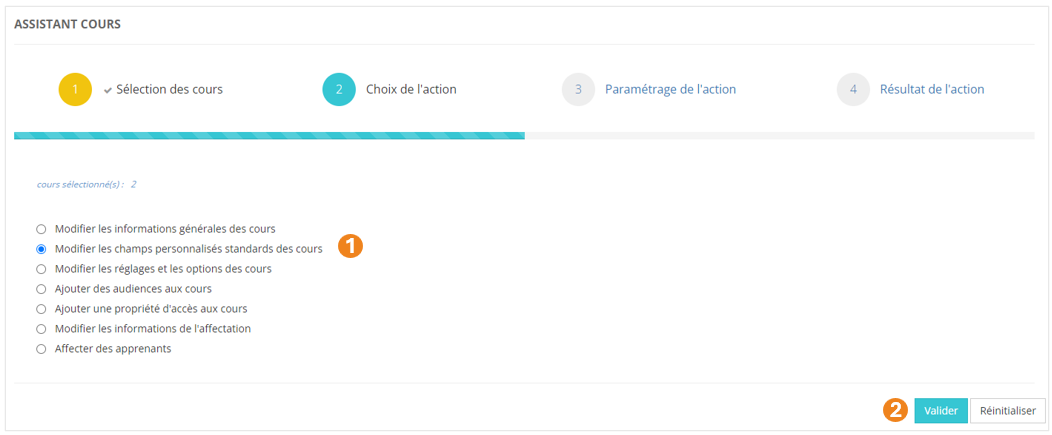
Modifier les champs personnalisés standards des cours
1. Sélectionnez l'action **Modifiez les champs personnalisés standards des cours** ;
2. Cliquez sur **Valider**.
[](https://documentation.xperteam.net/uploads/images/gallery/2024-05/7oUimage.png)
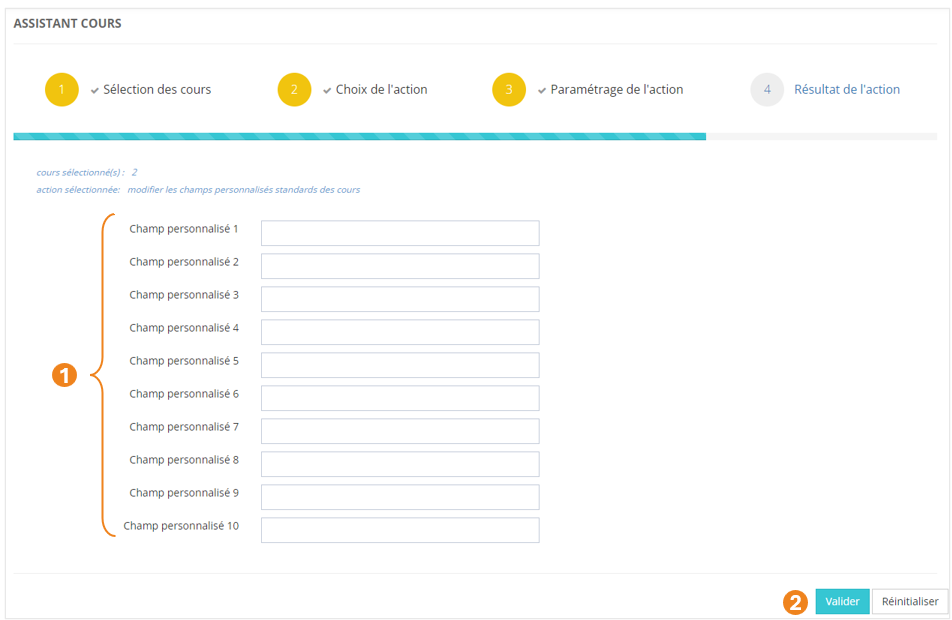
#### **Paramétrage de l'action**
1. Vous avez la possibilité de modifier un ou plusieurs **champs personnalisés** des cours sélectionnés ;
2. Lorsque vous avez effectué les modifications souhaitées, cliquez sur **Valider**.
[](https://documentation.xperteam.net/uploads/images/gallery/2024-05/Urrimage.png)
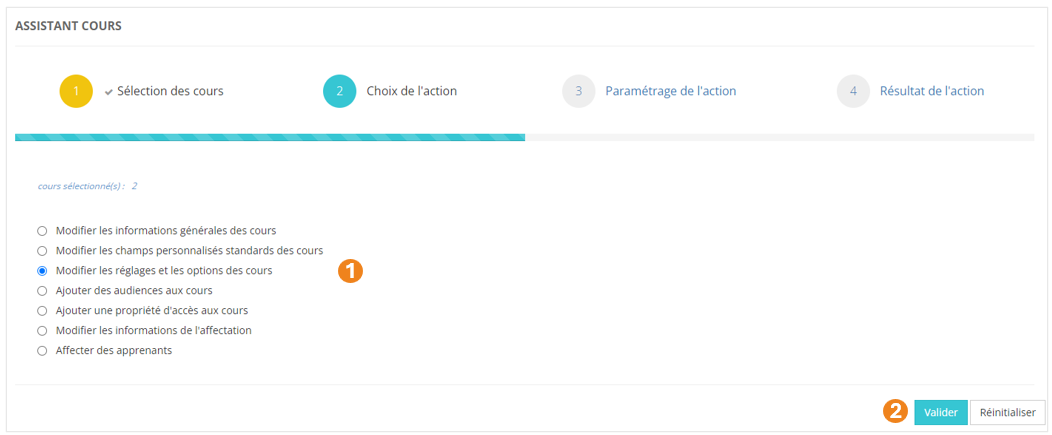
Modifier les réglages et les options de cours
1. Sélectionnez l'action **Modifiez les réglages et les options des cours** ;
2. Cliquez sur **Valider**.
[](https://documentation.xperteam.net/uploads/images/gallery/2024-05/mh6image.png)
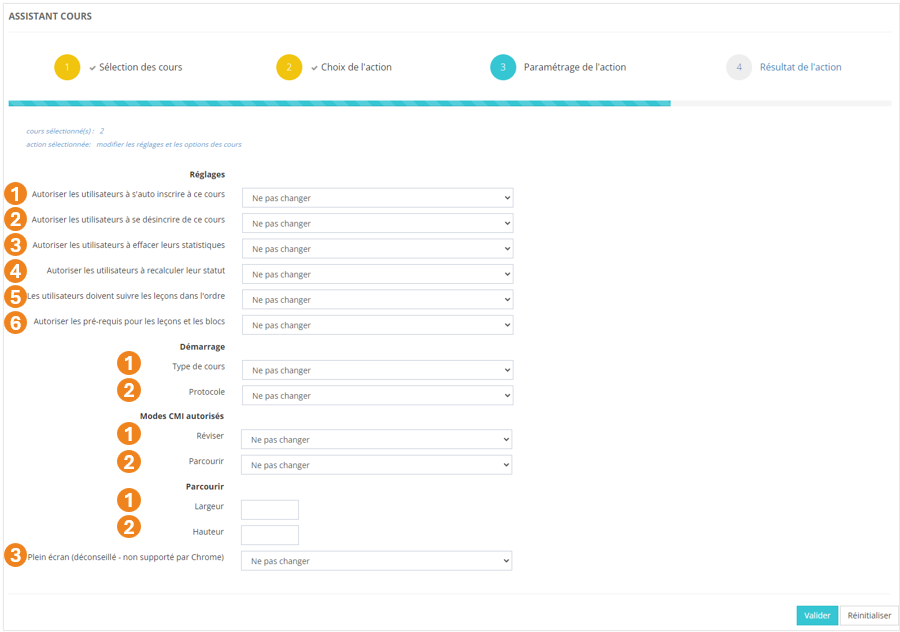
#### **Paramétrage de l'action**
Vous avez la possibilité de modifier une ou plusieurs des options ci-dessous :
- **Réglages :**
1. L'autorisation pour les utilisateurs de **s'auto-inscrire** au cours : *Ne pas changer / Oui / Non* ;
2. L'autorisation pour les utilisateurs de **se désinscrire** du cours : *Ne pas changer / Oui / Non *;
3. L'autorisation pour les utilisateurs d'**effacer leurs statistiques** de cours : *Ne pas changer / Oui / Non* ;
4. L'autorisation pour les utilisateurs de **recalculer leur statut** du cours : *Ne pas changer / Oui / Non *;
5. Le **suivi séquentiel** des leçons du cours : *Ne pas changer / Oui / Non ;*
6. L'autorisation pour les administrateurs d'**ajouter des prérequis pour les leçons et les blocs** du cours : *Ne pas changer / Oui / Non ;* *Les options « **Suivi séquentiel** » et « **Ajout de prérequis** » sont **incompatibles** : vous ne pouvez pas mettre Oui à chacune de ces options, ni mettre Non à chacune de ces options.*
- **Démarrage** :
1. Le **type de cours** : *Ne pas changer / Compatible AICC / SCORM / AICC uniquement / Présentiel ;*
2. Le **protocole** utilisé :* Ne pas changer / AICC (HACP) / SCORM (API) ;*
- **Modes CMI autorisés :**
1. **Réviser** : *Ne pas changer / Autorisé / Non autorisé / Suspendre ;*
2. **Parcourir** : *Ne pas changer / Autorisé / Non autorisé / Suspendre ;*
- **Parcourir** :
1. Définissez la **largeur** de la fenêtre d'affichage du cours (en pixels) ;
2. Définissez la **hauteur** de la fenêtre d'affichage du cours (en pixels) ;
3. Choisissez d'ouvrir ou non le cours en **plein écran** : *Ne pas changer / Oui / Non *;
[](https://documentation.xperteam.net/uploads/images/gallery/2024-05/08Aimage.png)
Terminez l'action en cliquant sur le bouton **Valider**.
Pour plus d'informations sur les réglages et les options du cours, voir la page ***//Créer un cours***.
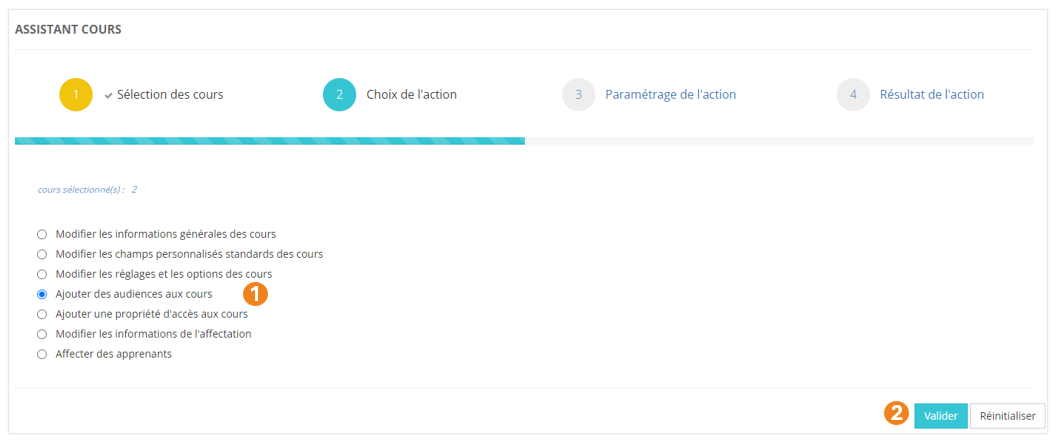
Ajouter des audiences aux cours
1. Sélectionnez l'action **Ajouter des audiences aux cours** ;
2. Cliquez sur **Valider**.
[](https://documentation.xperteam.net/uploads/images/gallery/2024-05/GvRimage.png)
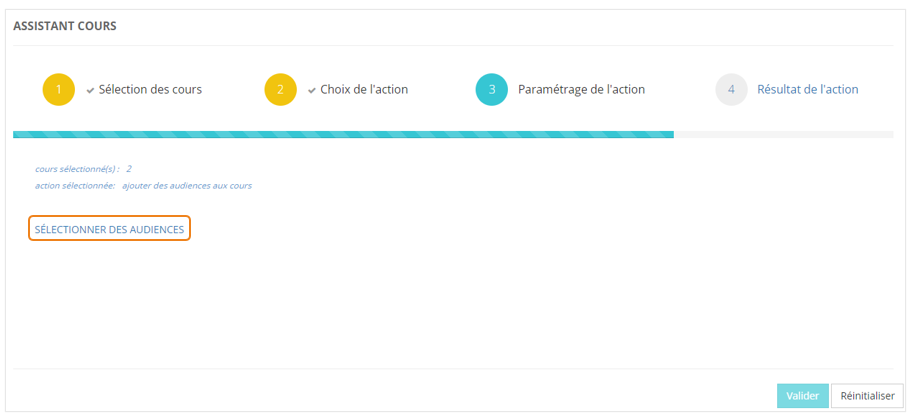
#### **Paramétrage de l'action**
Cliquez sur **SÉLECTIONNER DES AUDIENCES**.
[](https://documentation.xperteam.net/uploads/images/gallery/2024-05/XrXimage.png)
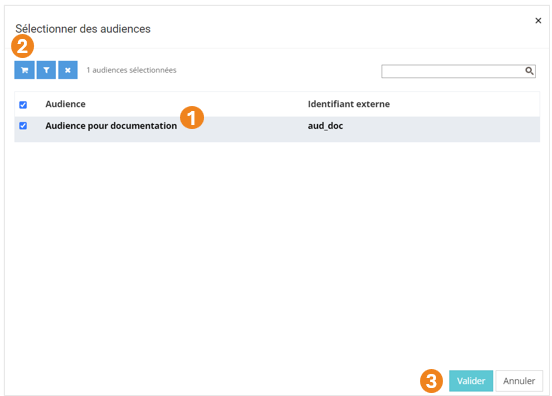
Dans la pop-up qui s'ouvre :
1. Sélectionnez les **audiences** à jouter aux cours ;
2. Cliquez sur le **chariot** ;
3. Cliquez sur **Valider**.
[](https://documentation.xperteam.net/uploads/images/gallery/2024-05/3bGimage.png)
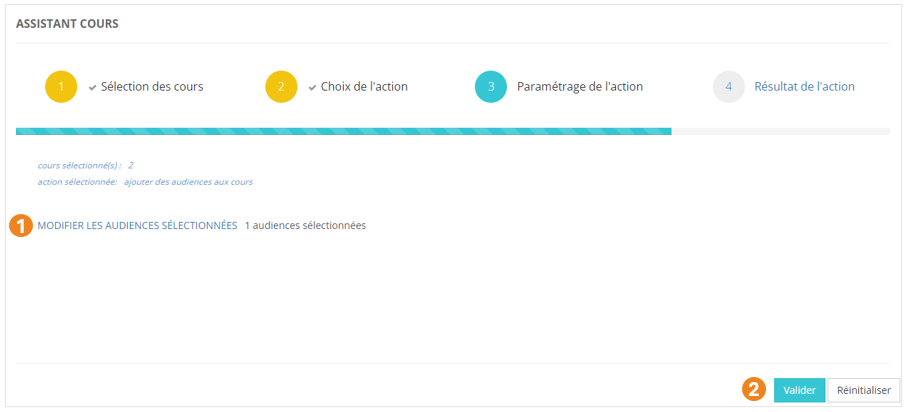
---
De retour sur l'écran principal, vous pouvez :
1. **Modifier** les audiences sélectionnées ;
2. Cliquer sur **Valider** lorsque vous êtes satisfait de la sélection des audiences.
[](https://documentation.xperteam.net/uploads/images/gallery/2024-05/GWlimage.png)
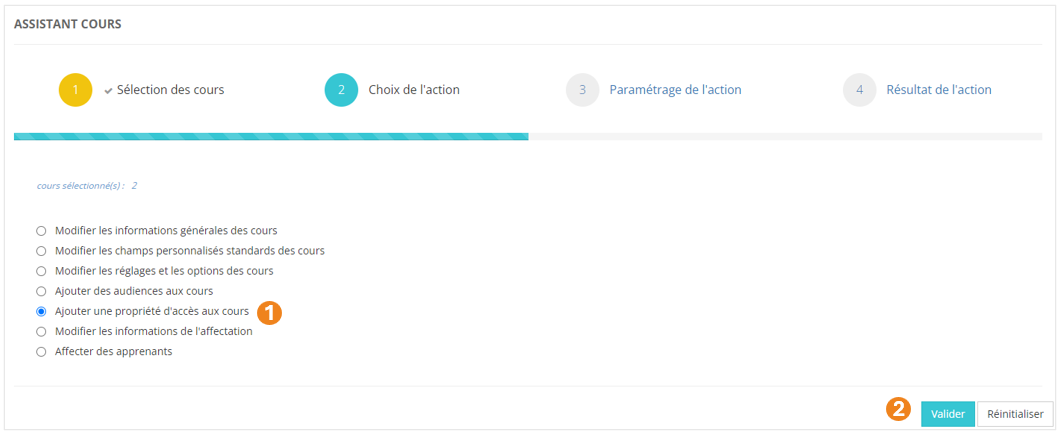
Ajouter une propriété d'accès aux cours
1. Sélectionnez l'action **Ajouter une propriété d'accès aux cours** ;
2. Cliquez sur **Valider**.
[](https://documentation.xperteam.net/uploads/images/gallery/2024-05/tqNimage.png)
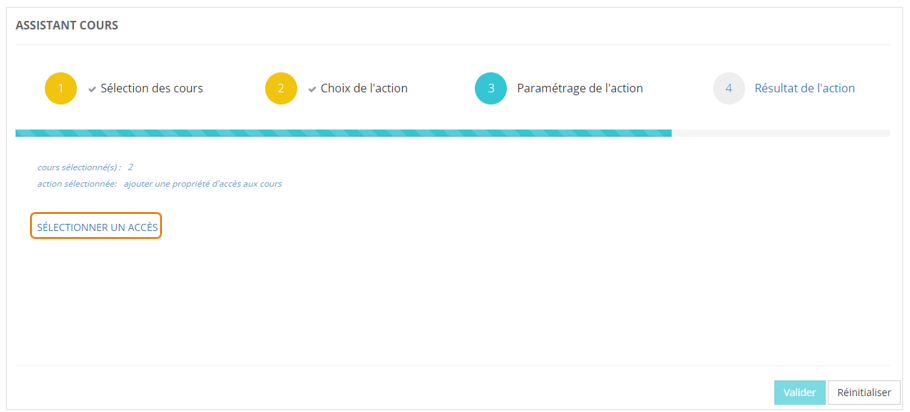
#### **Paramétrage de l'action**
Cliquez sur **SÉLECTIONNER UN ACCÈS**.
[](https://documentation.xperteam.net/uploads/images/gallery/2024-05/TOUimage.png)
Dans la pop-up qui s'ouvre :
1. Sélectionnez des **listes** ;
2. Cliquez sur **Valider**.
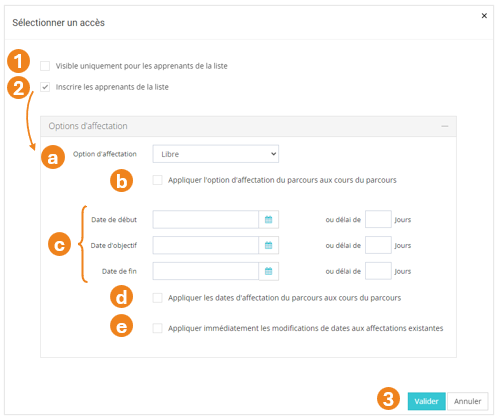
Dans la nouvelle pop-up, vous pouvez choisir de :
1. Restreindre ou non la **visibilité du cours** à ces listes d'utilisateurs ;
2. **Inscrire** ou non les utilisateurs de la liste à ce cours.
Si vous cochez cette case, vous pouvez modifier :
(a) l'**option d'affectation** : *Libre / Recommandé / Obligatoire* ;
(b) les **dates de début**, **d'objectif** et **de fin** : soit par **date fixée**, soit par **délai** à partir du moment où les utilisateurs sont entrés dans la liste ;
(c) lorsque des dates ont été renseignées, cochez cette case si vous souhaitez que les modifications soient **effectives immédiatement**.
3. Cliquez sur **Valider**.
[](https://documentation.xperteam.net/uploads/images/gallery/2024-05/El1image.png)
Pour plus d'informations sur les propriétés d'accès, voir la page ***//Droits d'accès***.
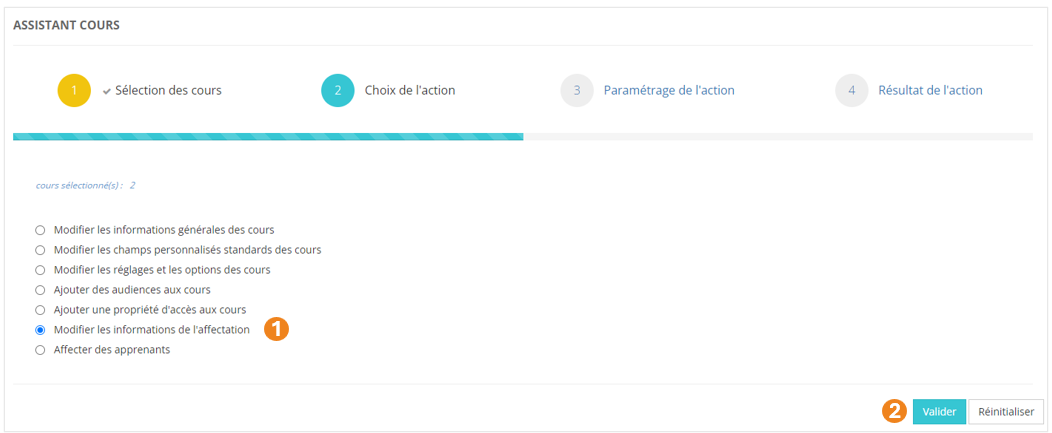
Modifier les informations de l'affectation
1. Sélectionnez l'action **Modifiez les informations de l'affectation** ;
2. Cliquez sur **Valider**.
[](https://documentation.xperteam.net/uploads/images/gallery/2024-05/HH5image.png)
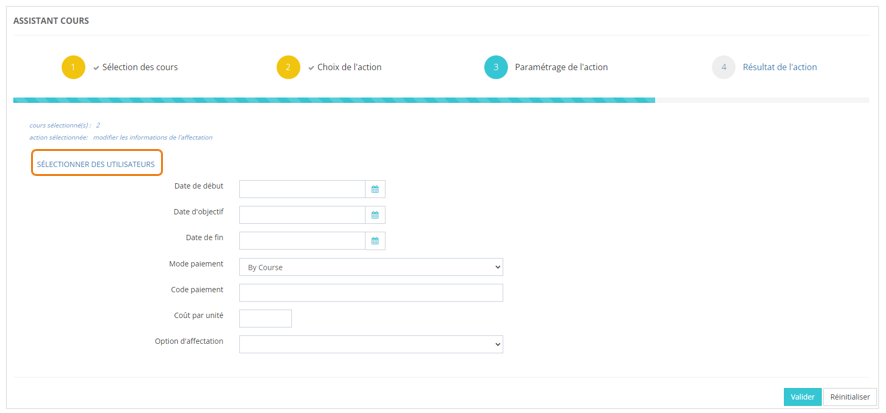
#### **Paramétrage de l'action**
Cliquez sur **SÉLECTIONNER DES UTILISATEURS**.
[](https://documentation.xperteam.net/uploads/images/gallery/2024-05/HoLimage.png)
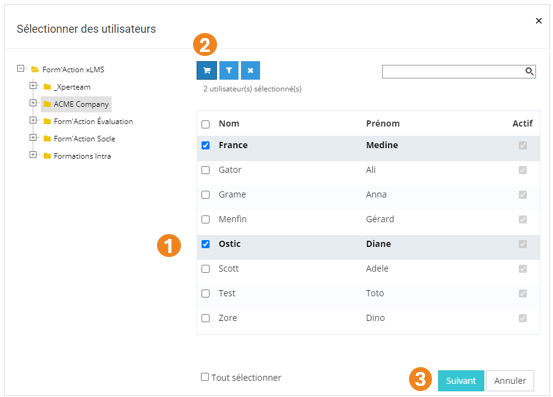
Dans la pop-up qui s'ouvre :
1. Sélectionnez des **utilisateurs** ;
2. Cliquez sur le **chariot** ;
3. Cliquez sur **Suivant**.
[](https://documentation.xperteam.net/uploads/images/gallery/2024-05/ejvimage.png)
Dans la nouvelle pop-up :
1. Retrouvez le **récapitulatif des utilisateurs** que vous avez sélectionnés ; À ce niveau, vous pouvez supprimer des utilisateurs en les sélectionnant dans le tableau puis en cliquant sur le **bouton \[x\]**.
2. Cliquez sur **Valider**.
[](https://documentation.xperteam.net/uploads/images/gallery/2024-05/wAXimage.png)
---
De retour sur la page principale, vous pouvez modifier :
1. Les **dates de début**, **d'objectif** et **de fin** d'affectation du cours ;
2. Les renseignements inhérents à la facturation du cours : **Mode de paiement** (By Course / By Hour / Not Billed / Prepaid Account) , **Code paiement** et **Coût par unité** ;
3. L'**option d'affectation** : Libre / Recommandé / Obligatoire.
4. Cliquez sur **Valider** lorsque vous êtes satisfait de vos modifications.
[](https://documentation.xperteam.net/uploads/images/gallery/2024-05/SwBimage.png)
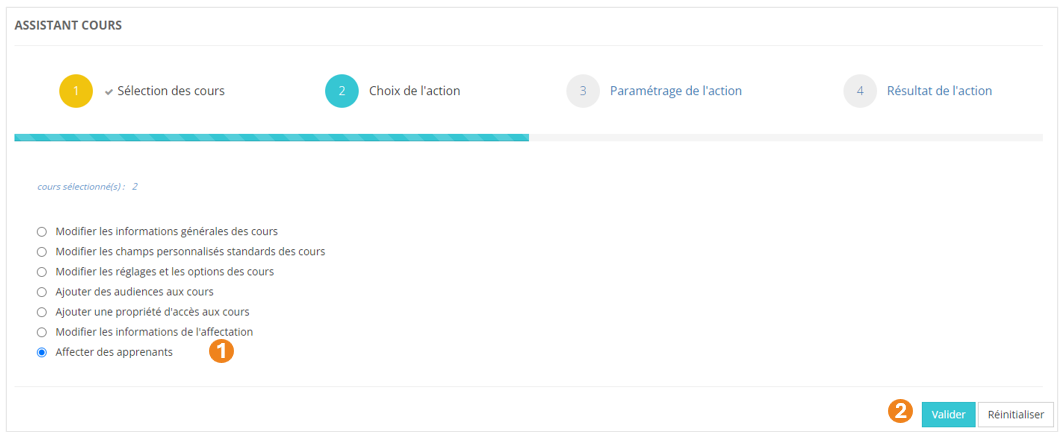
Affecter des apprenants
1. Sélectionnez l'action **Affecter des apprenants** ;
2. Cliquez sur **Valider**.
[](https://documentation.xperteam.net/uploads/images/gallery/2024-05/jTIimage.png)
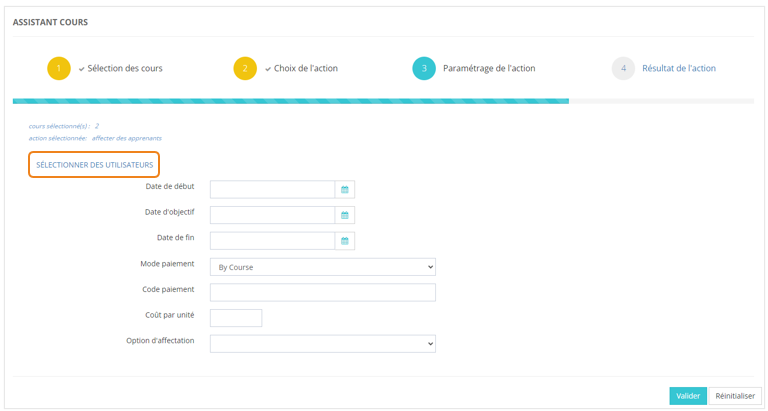
#### **Paramétrage de l'action**
Cliquez sur **SÉLECTIONNER DES UTILISATEURS**.
[](https://documentation.xperteam.net/uploads/images/gallery/2024-05/Hu6image.png)
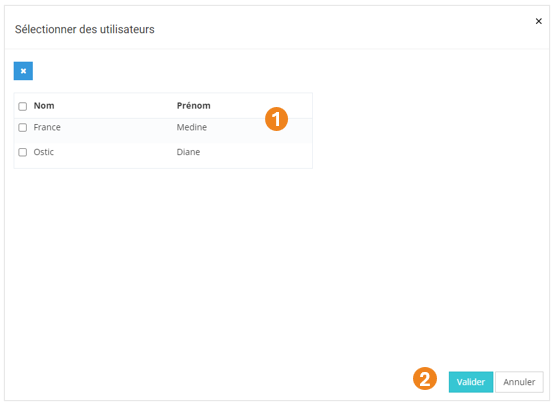
Dans la pop-up qui s'ouvre :
1. Sélectionnez des **utilisateurs** ;
2. Cliquez sur le **chariot** ;
3. Cliquez sur **Suivant**.
[](https://documentation.xperteam.net/uploads/images/gallery/2024-05/ejvimage.png)
Dans la nouvelle pop-up :
1. Retrouvez le **récapitulatif des utilisateurs** que vous avez sélectionnés ; À ce niveau, vous pouvez supprimer des utilisateurs en les sélectionnant dans le tableau puis en cliquant sur le **bouton \[x\]**.
2. Cliquez sur **Valider**.
[](https://documentation.xperteam.net/uploads/images/gallery/2024-05/wAXimage.png)
---
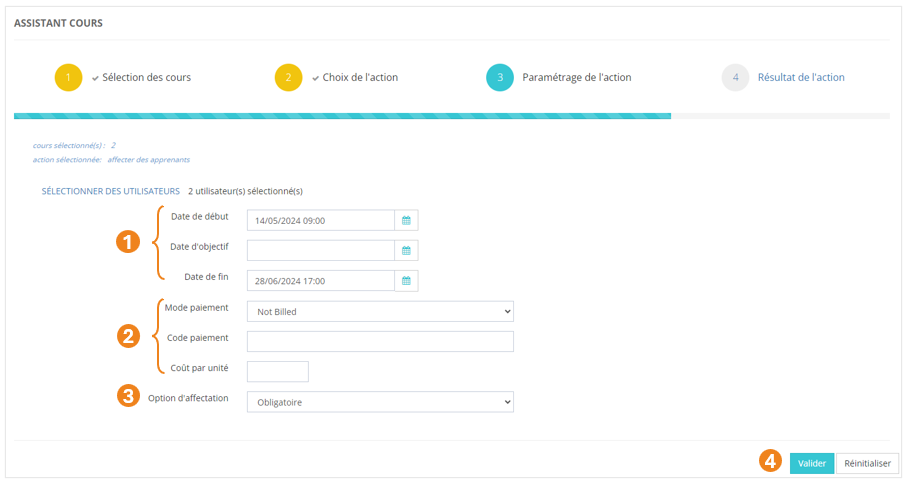
De retour sur la page principale, vous pouvez modifier :
1. Les **dates de début**, **d'objectif** et **de fin** d'affectation du cours ;
2. Les renseignements inhérents à la facturation du cours : **Mode de paiement** (By Course / By Hour / Not Billed / Prepaid Account) , **Code paiement** et **Coût par unité** ;
3. L'**option d'affectation** : Libre / Recommandé / Obligatoire.
4. Cliquez sur **Valider** lorsque vous êtes satisfait de vos modifications.
[](https://documentation.xperteam.net/uploads/images/gallery/2024-05/NjFimage.png)
Le bouton **Réinitialiser** n’annule pas la dernière action.
# L'Assistant Parcours
L'assistant **Parcours** vous permet d'effectuer, après avoir sélectionné des parcours, un certains nombre de tâches d'administration. Vous trouverez la liste de toutes les actions possibles plus loin dans la fiche.
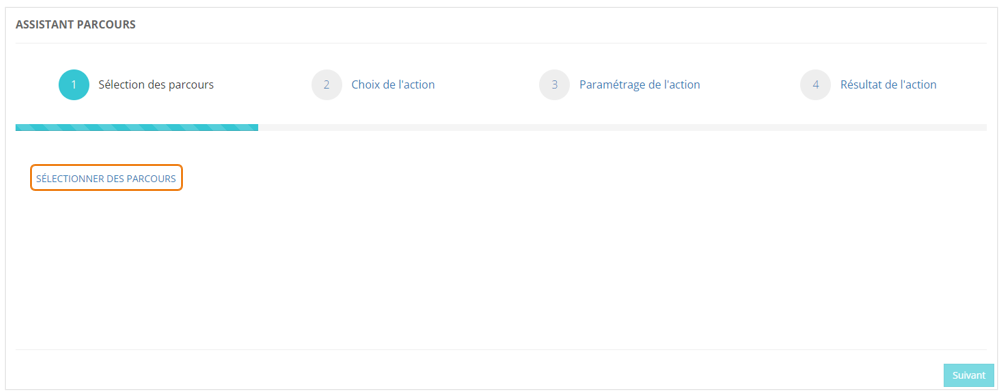
### **Sélection des parcours**
Dans le menu **Assistants > Assistant parcours**, cliquez sur **SÉLECTIONNER DES PARCOURS**.
[](https://documentation.xperteam.net/uploads/images/gallery/2024-05/3tFimage.png)
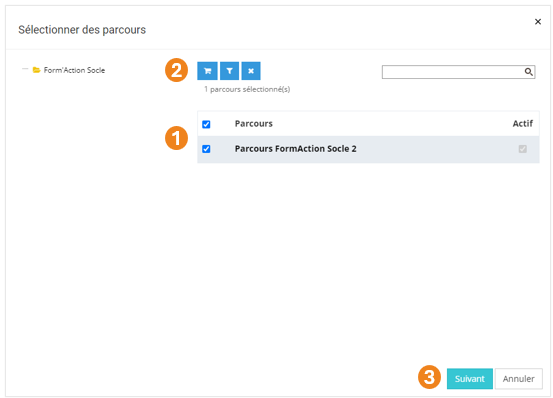
Dans la pop-up qui s'ouvre :
1. Sélectionnez les **parcours** à modifier ;
2. Cliquez sur le **chariot** ;
3. Cliquez sur **Suivant**.
[](https://documentation.xperteam.net/uploads/images/gallery/2024-05/6d7image.png)
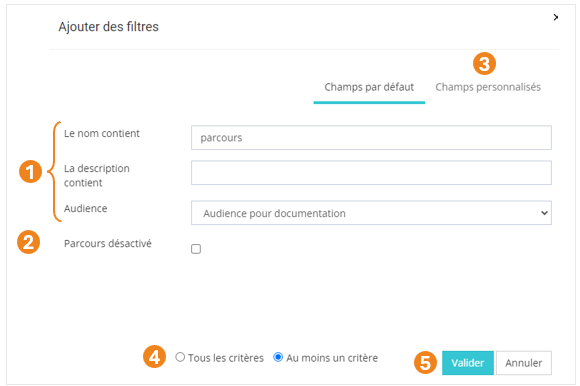
Le filtre de parcours
1. Vous pouvez **filtrer** votre recherche grâce : au **nom** du parcours, sa **description**, son **audience**.
2. Si vous cherchez parmi les **parcours désactivés**, cochez cette case.
3. Vous pouvez également filtrer votre recherche à l'aide des **champs personnalisés** des parcours.
4. Choisissez si les **critères** doivent tous être valides ou s'il suffit qu'un des critères soit valide pour proposer un résultat.Dans l'exemple ci-dessous, si vous choisissez :
**-** **Tous les critères :** vous obtiendrez tous les parcours dont le nom contient la chaîne de caractères 'parcours' avec l'audience "Audience pour documentation" ;
**-** **Au moins un critère :** vous obtiendrez l'ensemble de tous les parcours dont le nom contient la chaîne de caractères 'parcours', ainsi que tous les parcours sur lesquels est positionnée l'audience "Audience pour documentation".
5. Cliquez sur **Valider**.
[](https://documentation.xperteam.net/uploads/images/gallery/2024-05/15Nimage.png)
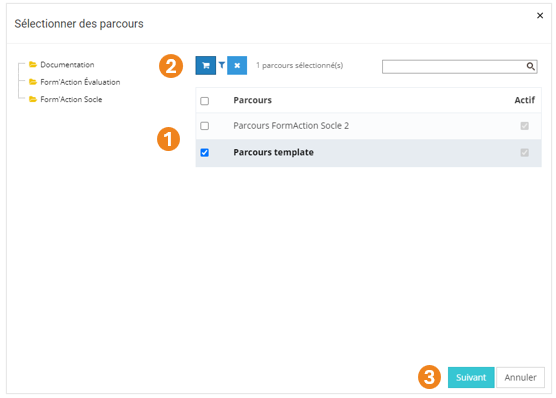
Dans la nouvelle pop-up :
1. Sélectionnez les **parcours** qui vous intéressent parmi les cours trouvés par filtrage ;
2. Cliquez sur le **chariot** ;
3. Cliquez sur **Valider**.
[](https://documentation.xperteam.net/uploads/images/gallery/2024-05/cTRimage.png)
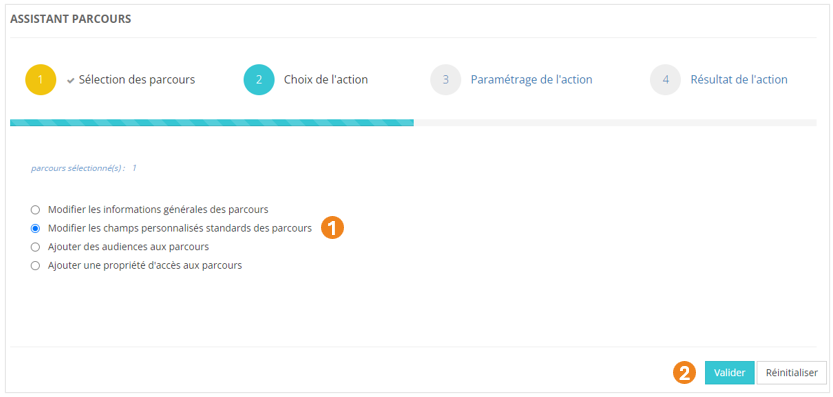
Modifier les informations générales des parcours
1. Sélectionnez l'action **Modifiez les informatiques générales des parcours** ;
2. Cliquez sur **Valider**.
[](https://documentation.xperteam.net/uploads/images/gallery/2024-05/77limage.png)
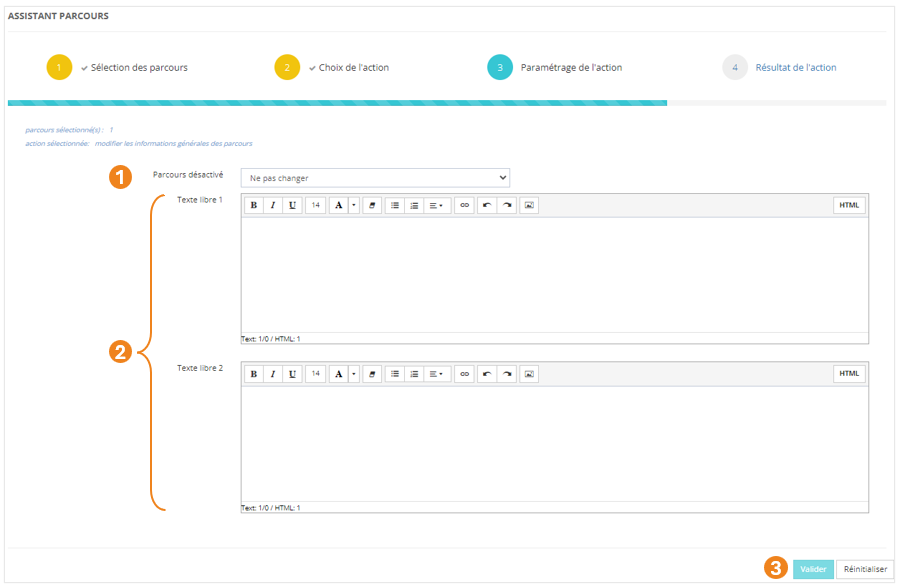
#### **Paramétrage de l'action**
Vous avez la possibilité de modifier une ou plusieurs des valeurs ci-dessous :
1. Le **statut** du parcours : désactivé ou non (*Ne pas changer / Oui / Non*) ;
2. Le **texte libre 1** et le **texte libre 2** du parcours ;
3. Lorsque vous avez effectué les modifications souhaitées, cliquez sur **Valider**.
[](https://documentation.xperteam.net/uploads/images/gallery/2024-05/cvOimage.png)
Pour plus d'informations sur les informations générales du cours, voir la page ***//Créer un parcours***.
Modifier les champs personnalisés standards des parcours
1. Sélectionnez l'action **Modifiez les champs personnalisés standards des parcours** ;
2. Cliquez sur **Valider**.
[](https://documentation.xperteam.net/uploads/images/gallery/2024-05/Sr2image.png)
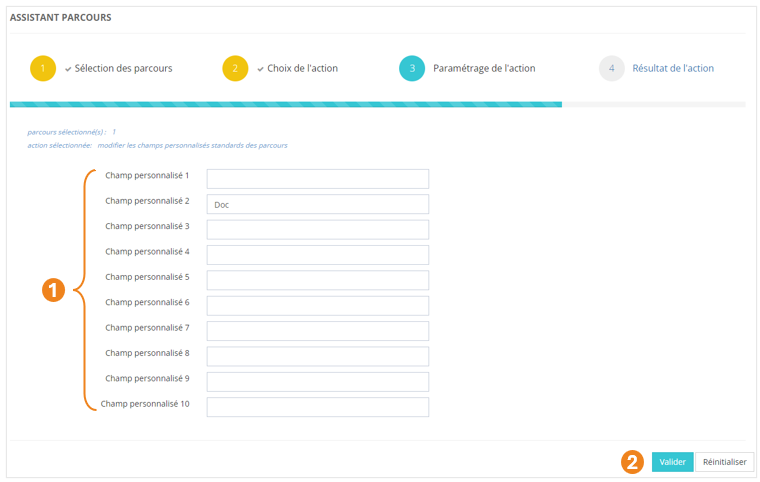
#### **Paramétrage de l'action**
1. Vous avez la possibilité de modifier un ou plusieurs **champs personnalisés** des parcours sélectionnés ;
2. Lorsque vous avez effectué les modifications souhaitées, cliquez sur **Valider**.
[](https://documentation.xperteam.net/uploads/images/gallery/2024-05/7qUimage.png)
Ajouter des audiences aux cours
1. Sélectionnez l'action **Ajouter des audiences aux parcours** ;
2. Cliquez sur **Valider**.
[](https://documentation.xperteam.net/uploads/images/gallery/2024-05/4peimage.png)
#### **Paramétrage de l'action**
Cliquez sur **SÉLECTIONNER DES AUDIENCES**.
[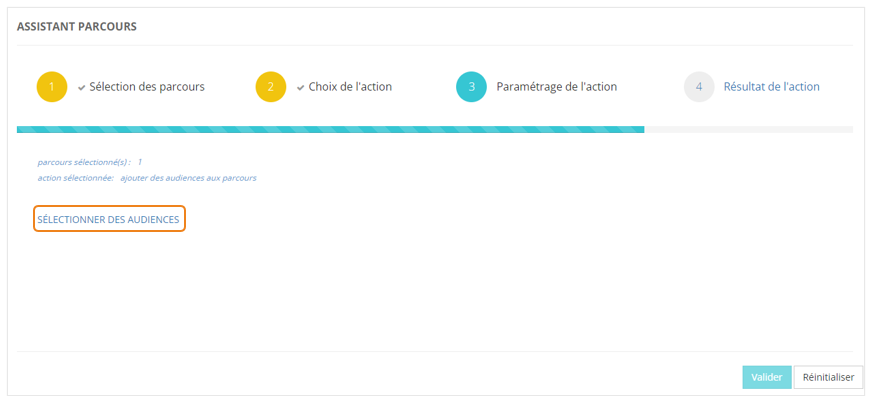](https://documentation.xperteam.net/uploads/images/gallery/2024-05/V1Yimage.png)
Dans la pop-up qui s'ouvre :
1. Sélectionnez les **audiences** à jouter aux parcours ;
2. Cliquez sur le **chariot** ;
3. Cliquez sur **Valider**.
[](https://documentation.xperteam.net/uploads/images/gallery/2024-05/3bGimage.png)
---
De retour sur l'écran principal, vous pouvez :
1. **Modifier** les audiences sélectionnées ;
2. Cliquer sur **Valider** lorsque vous êtes satisfait de la sélection des audiences.
[](https://documentation.xperteam.net/uploads/images/gallery/2024-05/VMtimage.png)
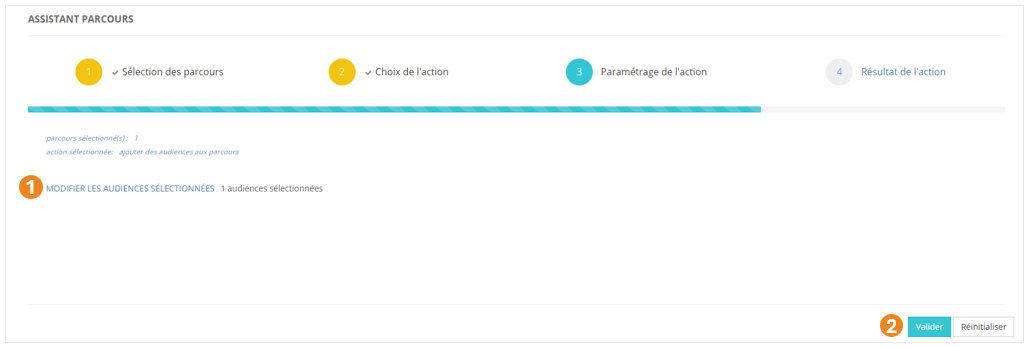
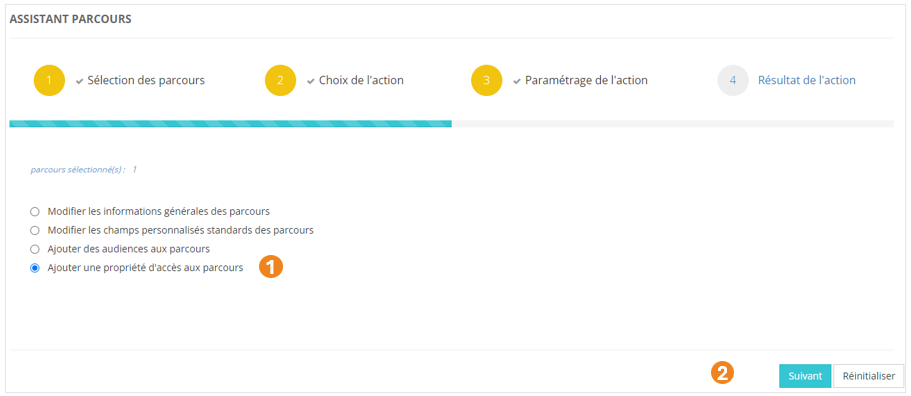
Ajouter une propriété d'accès aux parcours
1. Sélectionnez l'action **Ajouter une propriété d'accès aux parcours** ;
2. Cliquez sur **Valider**.
[](https://documentation.xperteam.net/uploads/images/gallery/2024-05/LSnimage.png)
#### **Paramétrage de l'action**
Cliquez sur **SÉLECTIONNER UN ACCÈS**.
[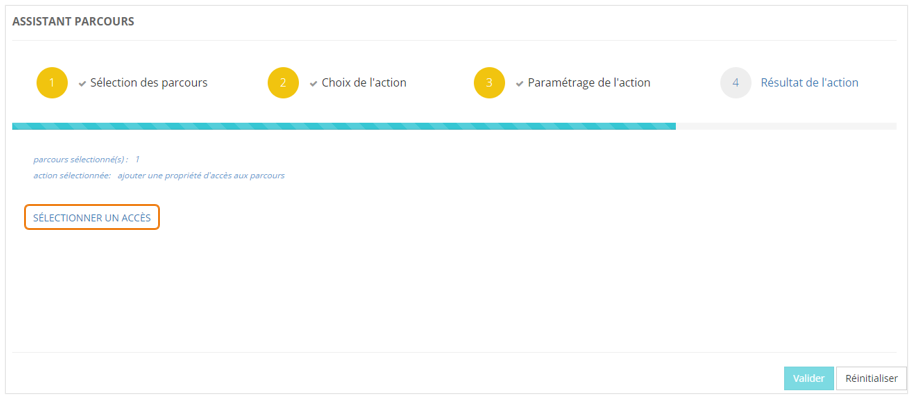](https://documentation.xperteam.net/uploads/images/gallery/2024-05/cZoimage.png)
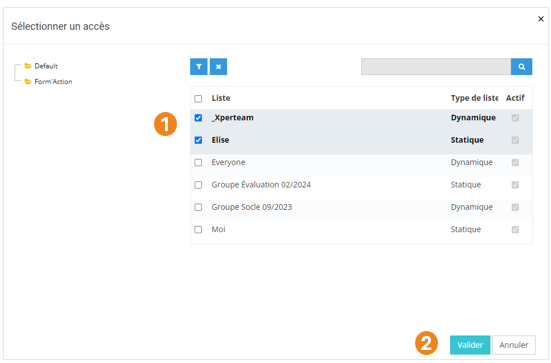
Dans la pop-up qui s'ouvre :
1. Sélectionnez une **liste** ;
2. Cliquez sur **Valider**.
[](https://documentation.xperteam.net/uploads/images/gallery/2024-05/BEuimage.png)
Dans la nouvelle pop-up, vous pouvez choisir de :
1. Restreindre ou non la **visibilité du parcours** à cette liste d'utilisateurs ;
2. **Inscrire** ou non les utilisateurs de la liste à ce parcours.
Si vous cochez cette case, vous pouvez modifier :
(a) l'**option d'affectation** : *Libre / Recommandé / Obligatoire* ;
(b) cochez cette case si vous souhaitez que l'**option d'affectation des parcours soient appliquées sur les cours** qui les composent ;
(c) les **dates de début**, **d'objectif** et **de fin** : soit par **date fixée**, soit par **délai** à partir du moment où les utilisateurs sont entrés dans la liste ;
(d) lorsque des dates ont été renseignées, cochez cette case si vous souhaitez que **ces dates soient répercutées sur les cours** qui composent les parcours ;
(e) cochez cette case si vous souhaitez que les modifications de dates soient **effectives immédiatement**.
3. Cliquez sur **Valider**.
[](https://documentation.xperteam.net/uploads/images/gallery/2024-05/AwOimage.png)
---
De retour sur l'écran principal, vous pouvez :
1. **Modifier** la liste sélectionnée ;
2. Cliquer sur **Valider** lorsque vous êtes satisfait de la sélection de la liste d'accès.
[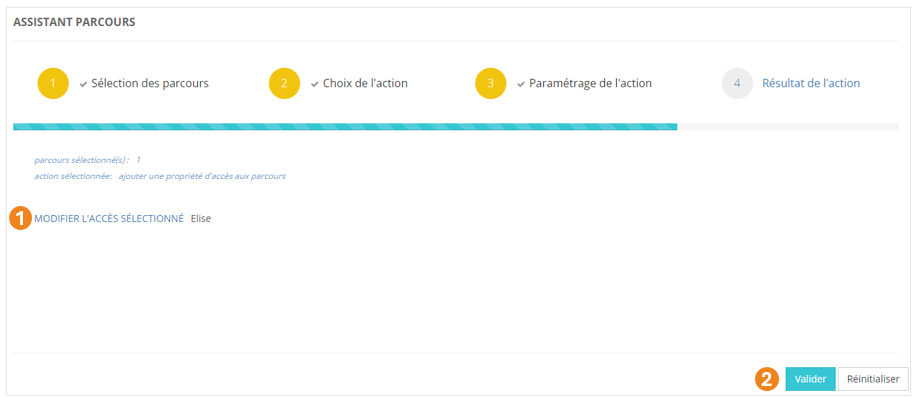](https://documentation.xperteam.net/uploads/images/gallery/2024-05/05Oimage.png)
Pour plus d'informations sur les propriétés d'accès, voir la page ***//Droits d'accès***.
Le bouton **Réinitialiser** n’annule pas la dernière action.
# L'Assistant Épreuves
L'assistant **Épreuves** vous permet d'effectuer, après avoir sélectionné une épreuve, un certains nombre de tâches d'administration. Vous trouverez la liste de toutes les actions possibles plus loin dans la fiche.
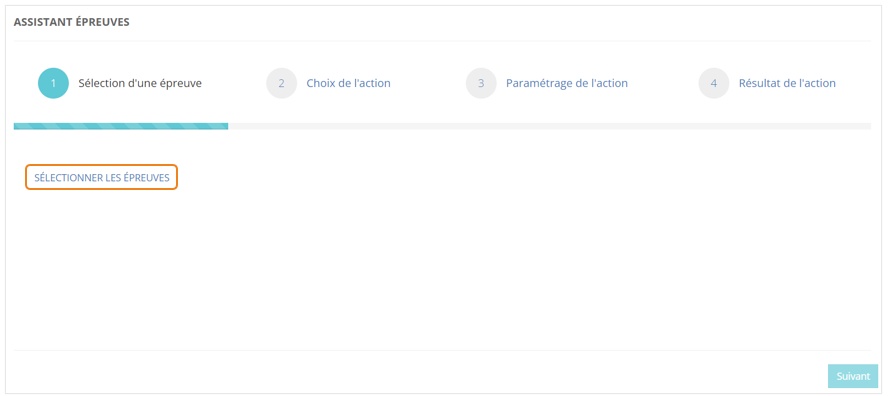
### **Sélection des épreuves**
Dans le menu **Assistants > Assistant épreuves**, cliquez sur **SÉLECTIONNER LES ÉPREUVES**.
[](https://documentation.xperteam.net/uploads/images/gallery/2024-05/WXUimage.png)
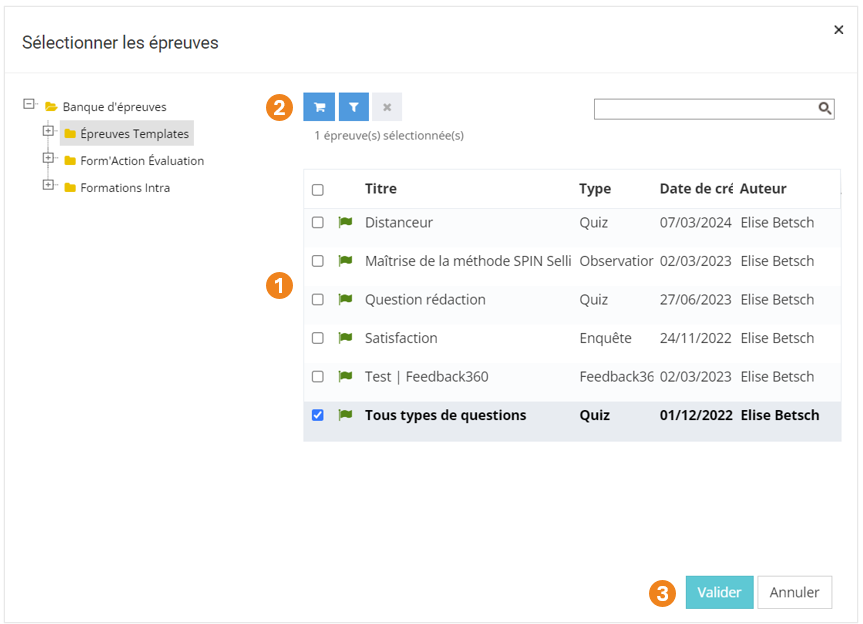
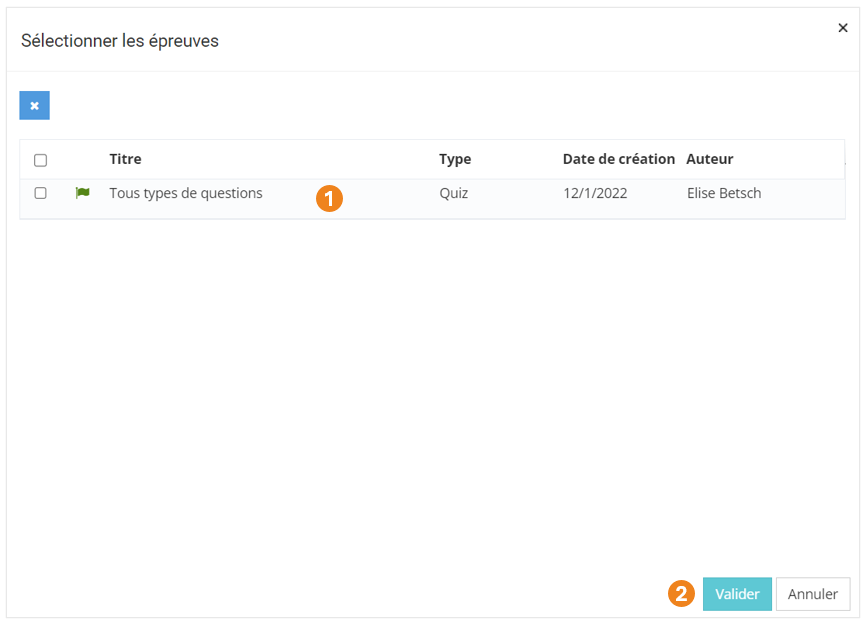
Dans la pop-up qui s'ouvre :
1. Sélectionnez les **épreuves** à modifier ; **Attention !** Selon l'action que vous sélectionnerez ensuite, vous ne pouvez pas toujours sélectionner plusieurs épreuves :
| **Édition des scores** | **Suppression des résultats** | **Impression** | **Publication LMS** | **Export Mobiteach** |
| Une épreuve | Une épreuve | Plusieurs épreuves | Plusieurs épreuves | Une épreuve |
2. Cliquez sur le **chariot** ;
3. Cliquez sur **Suivant**.
[](https://documentation.xperteam.net/uploads/images/gallery/2024-06/image.png)
Dans la nouvelle pop-up :
1. Retrouvez le **r****écapitulatif des épreuves** que vous avez sélectionnés ;À ce niveau, vous pouvez supprimer des épreuves en les sélectionnant dans le tableau puis en cliquant sur le **bouton \[x\]**.
2. Cliquez sur **Valider** lorsque vous êtes satisfait de la sélection des épreuves.
[](https://documentation.xperteam.net/uploads/images/gallery/2024-06/FqVimage.png)
---
De retour sur l'écran principal, vous pouvez :
1. **Modifier** les épreuves sélectionnées ;
2. Cliquer sur **Suivant** lorsque vous êtes satisfait de la sélection des épreuves.
[](https://documentation.xperteam.net/uploads/images/gallery/2024-06/w7simage.png)
---
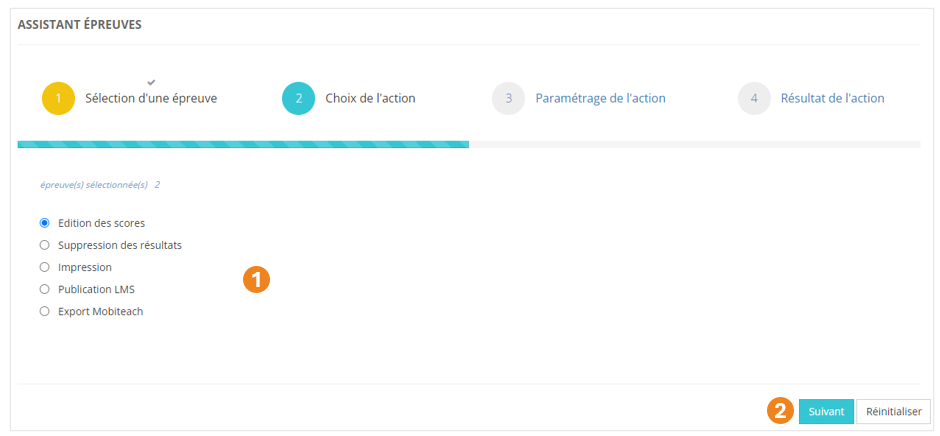
### **Sélection et paramétrage de l'action**
Édition des scores
1. Sélectionnez l'action **Édition des scores** ;
2. Cliquez sur **Suivant**.
[](https://documentation.xperteam.net/uploads/images/gallery/2024-06/oahimage.png)
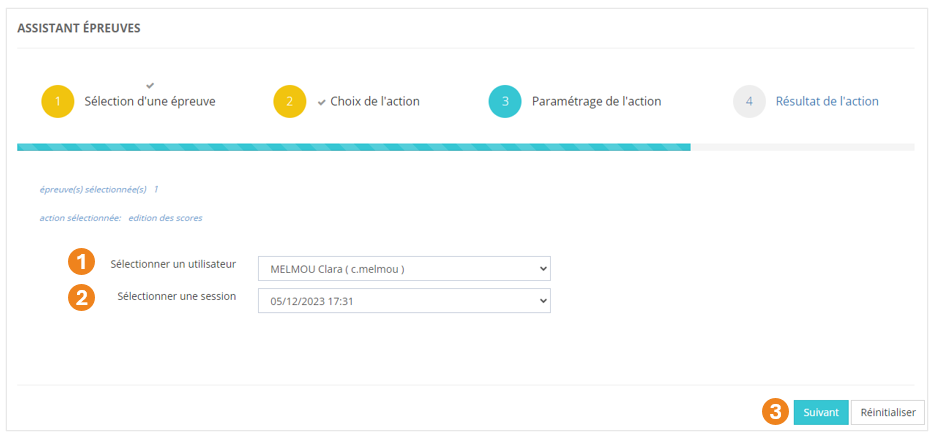
#### **Paramétrage de l'action**
1. Sélectionnez un **utilisateur** ;
2. Sélectionnez une **session** ;
3. Cliquez sur **Suivant**.
[](https://documentation.xperteam.net/uploads/images/gallery/2024-06/qPdimage.png)
---
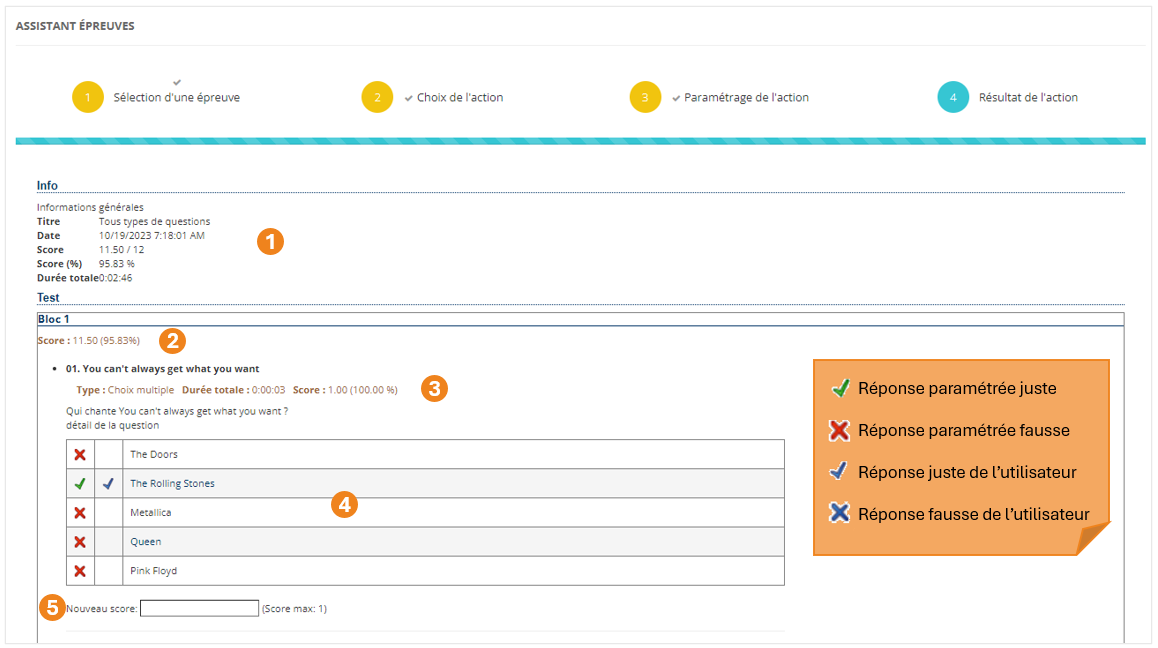
Sur le nouvel écran, vous trouverez :
1. les **informations générales** du passage de l'épreuve par l'utilisateur (titre, date, score en points et en pourcentage, durée) ;
2. le s**core obtenu à chaque bloc** ;
3. les **informations de chaque question** (type, durée, score) ;
4. les **réponses justes et fausses** telles que paramétrées sur la plateforme et les **réponses données par l'utilisateur** pour chaque question ;
5. le champ dans lequel vous pouvez **entrer un nouveau score**, avec le **score maximal** autorisé.
Vous ne pouvez pas modifier les réponses cochées par l'apprenant dans le tableau récapitulatif des réponses.
[](https://documentation.xperteam.net/uploads/images/gallery/2024-06/lxOimage.png)
Lorsque vous avez modifié les scores, cliquez sur **Valider** tout en bas de la page.
Suppression des résultats
1. Sélectionnez l'action **Suppression des résultats** ;
2. Cliquez sur **Suivant**.
[](https://documentation.xperteam.net/uploads/images/gallery/2024-06/A30image.png)
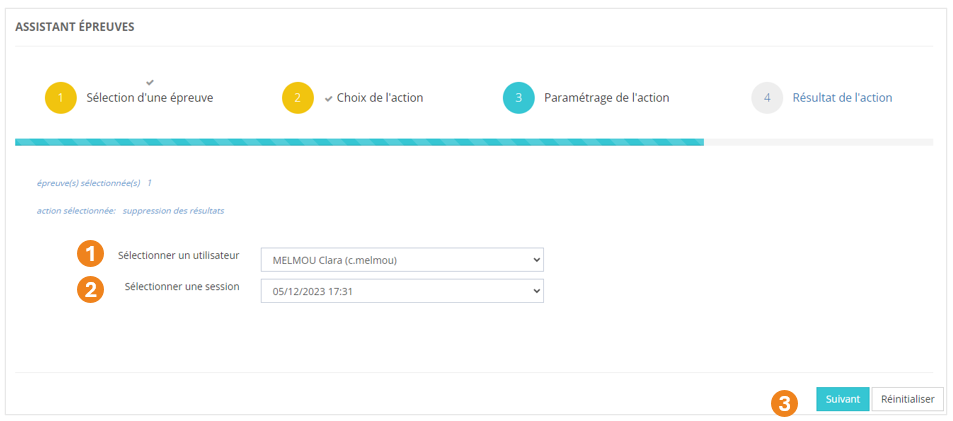
#### **Paramétrage de l'action**
1. Sélectionnez un **utilisateur** ;
2. Sélectionnez une **session** ;
3. Cliquez sur **Suivant**.
[](https://documentation.xperteam.net/uploads/images/gallery/2024-06/7Yyimage.png)
---
Sur l'écran suivant :
1. Vérifiez que vous avez sélectionné **le bon utilisateur et la bonne session** ;
2. Cliquez sur **Valider** lorsque vous êtes satisfait de votre sélection.
[](https://documentation.xperteam.net/uploads/images/gallery/2024-06/S3limage.png)
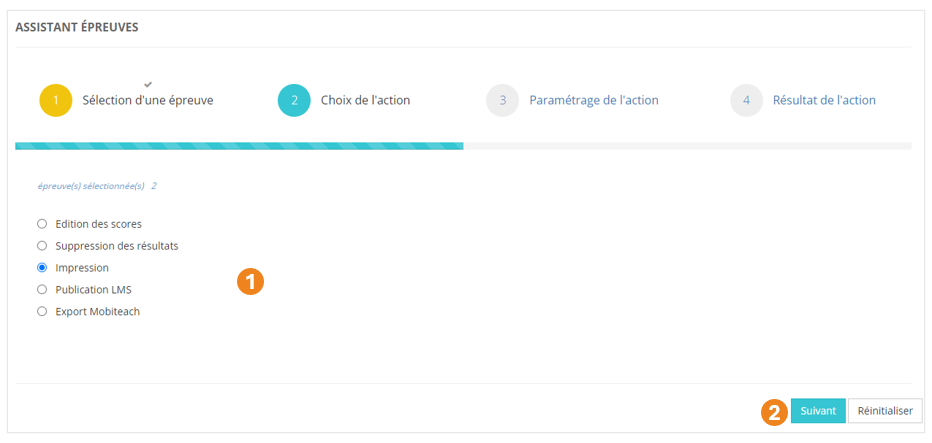
Impression
1. Sélectionnez l'action **Impression** ;
2. Cliquez sur **Suivant**.
[](https://documentation.xperteam.net/uploads/images/gallery/2024-06/RLlimage.png)
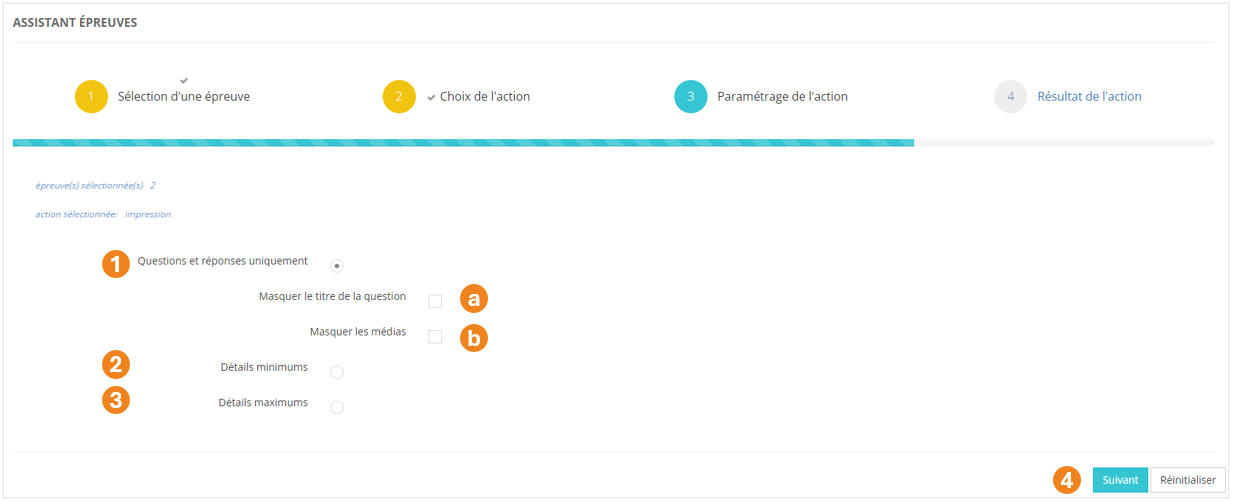
#### **Paramétrage de l'action**
Pour votre impression, vous pouvez choisir de faire apparaître :
1. Les **questions et réponses uniquement** ;
Si vous choisissez cette option, vous pouvez décider de **masquer** ou non :
(a) le **titre des questions** ;
(b) les **médias** illustrant les questions.
2. Le **minimum de détails** ;
3. Le **maximum de détails** ;
4. Cliquez sur **Suivant** lorsque vous avez sélectionné le type d'impression qui vous intéresse.
**Bon à savoir :** L'option **"Questions et réponses uniquement" sans masquer ni le titre des questions ni les médias** et l'option **"Détails minimums"** donnent le même résultat.
[](https://documentation.xperteam.net/uploads/images/gallery/2024-06/ExIimage.png)
Après avoir cliqué sur **Suivant**, un nouvel onglet s'ouvre avec le document demandé.
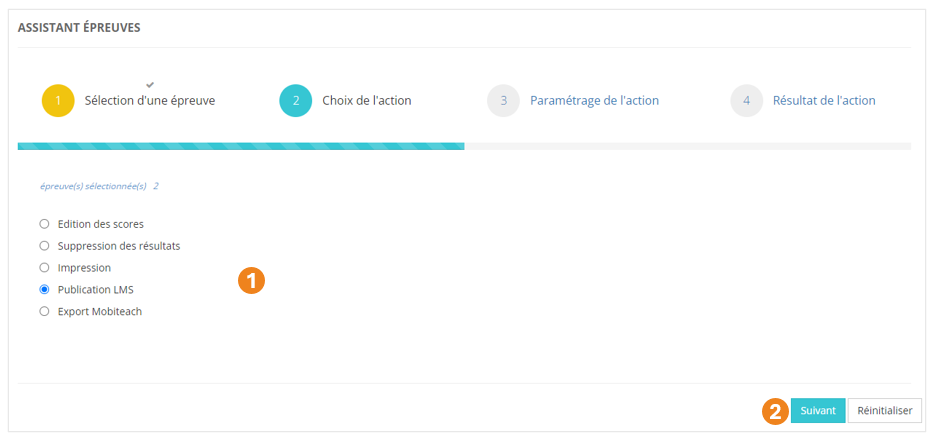
Publication LMS
1. Sélectionnez l'action **Publication LMS** ;
2. Cliquez sur **Suivant**.
[](https://documentation.xperteam.net/uploads/images/gallery/2024-06/A1Himage.png)
#### **Paramétrage de l'action**
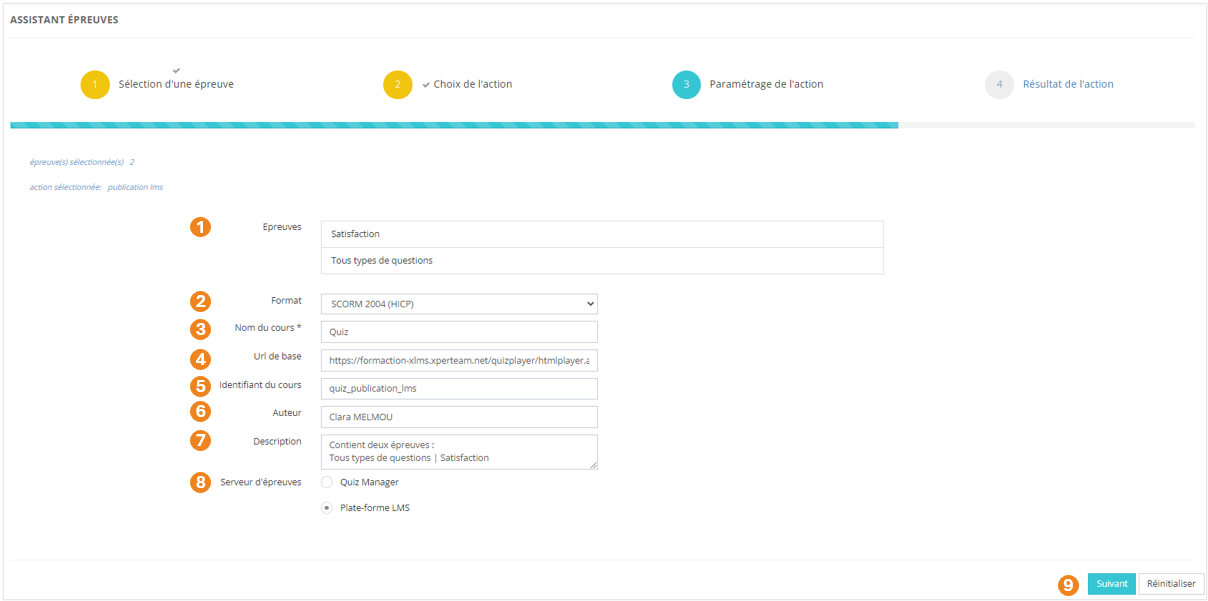
Sur l'écran suivant, vous pouvez :
1. Visualiser le **nom des épreuves** sélectionnées ;
2. Choisir un **format d'export** (SCORM 1.2 (HICP) / SCORM 2004 (HICP) / TinCan) ;
3. **Nommer** le cours qui contiendra ces épreuves **(obligatoire)** ;
4. Visualiser l'**url** correspondant au cours ;
5. Utiliser l'**identifiant externe** qui est généré automatiquement ou en choisir un autre ;
6. Utiliser l'**auteur** déjà renseigné ou le modifier ;
7. Ajouter une **description** ;
8. Choisir le **serveur d'épreuves** sur lequel vous importerez ce cours (Quiz Manager / Plateforme LMS);
9. Cliquer sur **Suivant** lorsque tous les renseignements sont corrects.
[](https://documentation.xperteam.net/uploads/images/gallery/2024-06/Kurimage.png)
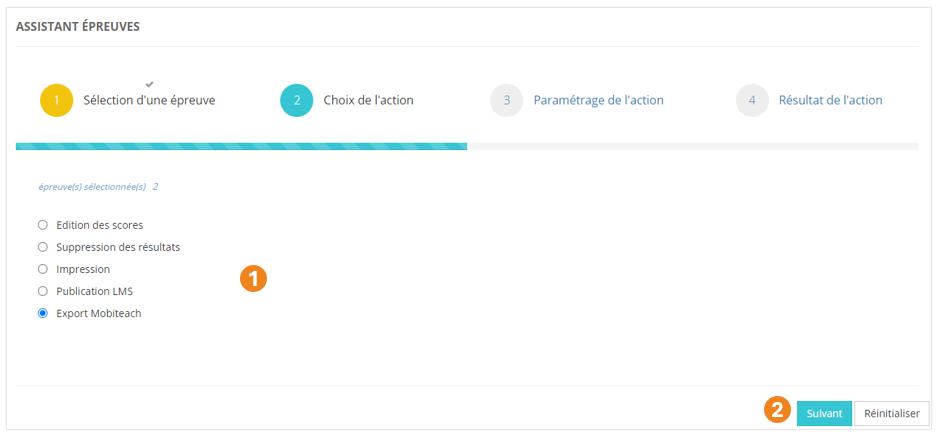
Export Mobiteach
1. Sélectionnez l'action **Export Mobiteach** ;
2. Cliquez sur **Suivant**.
[](https://documentation.xperteam.net/uploads/images/gallery/2024-06/DcLimage.png)
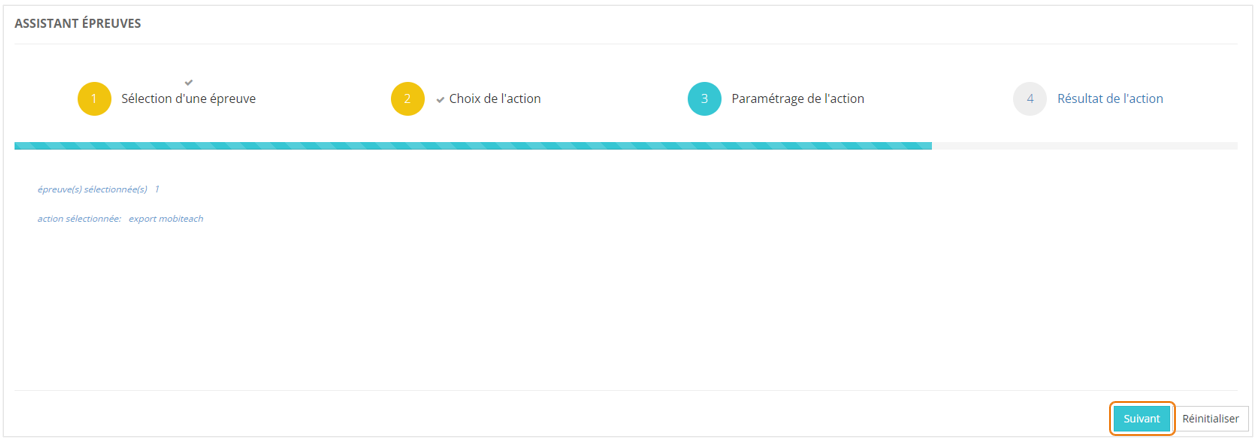
#### **Paramétrage de l'action**
Aucun paramétrage n'est demandé pour l'export Mobiteach : cliquez sur **Suivant**.
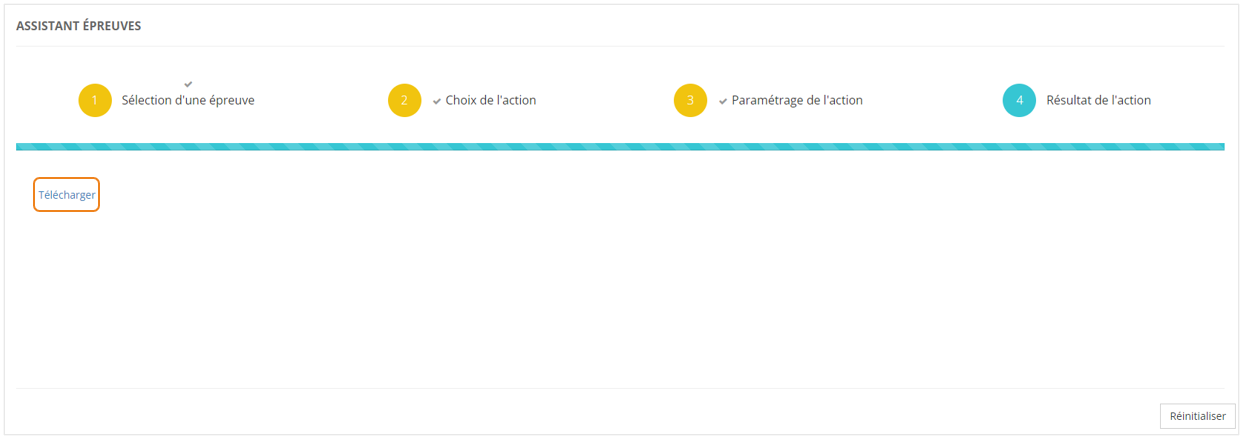
[](https://documentation.xperteam.net/uploads/images/gallery/2024-06/VMLimage.png)
Cliquez sur **Télécharger** pour obtenir le fichier à importer sur Mobiteach.
[](https://documentation.xperteam.net/uploads/images/gallery/2024-06/Tmhimage.png)
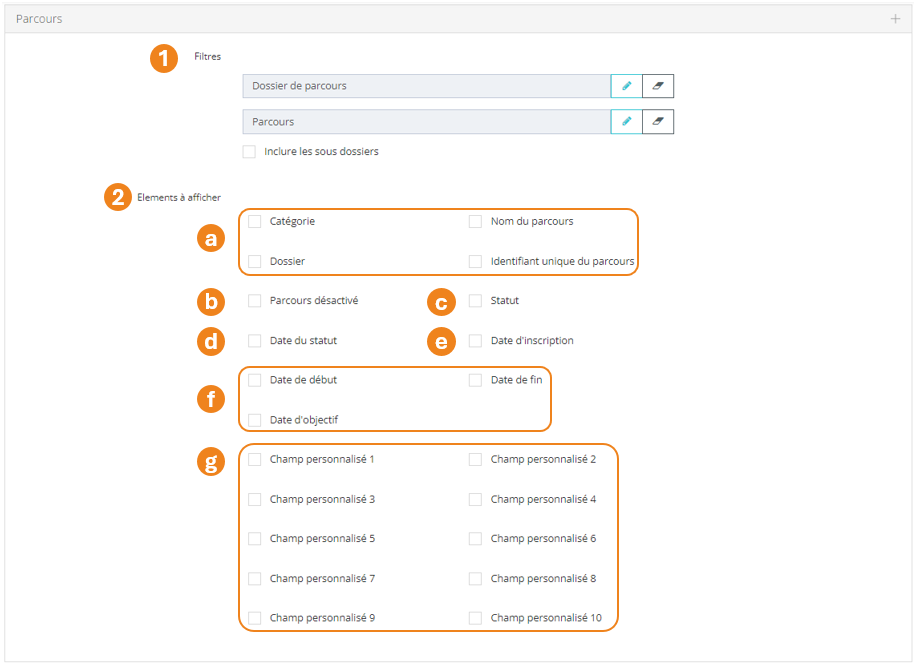
Cochez la case **« Inclure les sous-dossiers »** si vous souhaitez un export sur les parcours d'un dossier et de tous ses sous-dossiers.
2. Vous pouvez décider de faire afficher ou non les informations suivantes :
a. La **catégorie**, le **nom**, le **dossier** et l'**identifiant unique** des parcours ;
b. Le caractère **désactivé** ou non des parcours ;
c. Le **statut** des utilisateurs sur les parcours ;
d. La **date** à laquelle ils ont obtenu ce statut ;
e. La **date** à laquelle les utilisateurs ont été inscrits sur les parcours ;
f. Les **dates de début, d'objectif et de fin d'affectation** des parcours aux utilisateurs ;
g. Les **champs personnalisés** des parcours.
[](https://documentation.xperteam.net/uploads/images/gallery/2024-06/2Z2image.png)
---
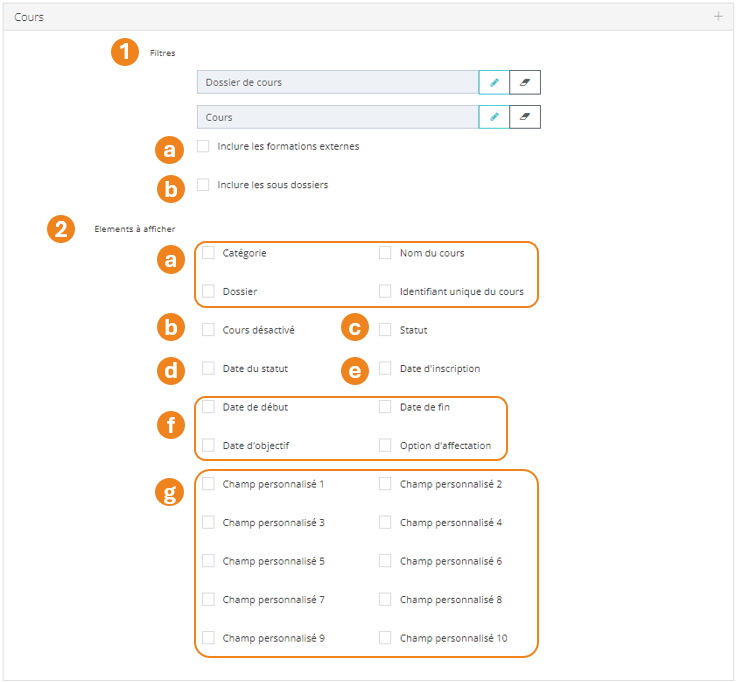
- **Cours** :
1. Vous pouvez filtrer votre export sur **un dossier de cours** ou même **un cours en particulier** ;
a. Cochez la case **« Inclure les formations externes »** si vous souhaitez faire apparaître les cours qui sont estampillés « externes » dans les informations générales du cours.
b. Cochez la case **« Inclure les sous-dossiers »** si vous souhaitez un export sur les cours d'un dossier et de tous ses sous-dossiers.
2. Vous pouvez décider de faire afficher ou non les informations suivantes :
a. La **catégorie**, le **nom**, le **dossier** et l'**identifiant unique** des cours ;
b. Le caractère **désactivé** ou non des cours ;
c. Le **statut** des utilisateurs sur les cours ;
d. La **date** à laquelle ils ont obtenu ce statut ;
e. La **date** à laquelle les utilisateurs ont été inscrits sur les cours ;
f. Les **dates de début, d'objectif, de fin d'affectation** ainsi que l'**option d'affectation** des cours aux utilisateurs ;
g. Les **champs personnalisés** des cours.
[](https://documentation.xperteam.net/uploads/images/gallery/2024-06/GqGimage.png)
---
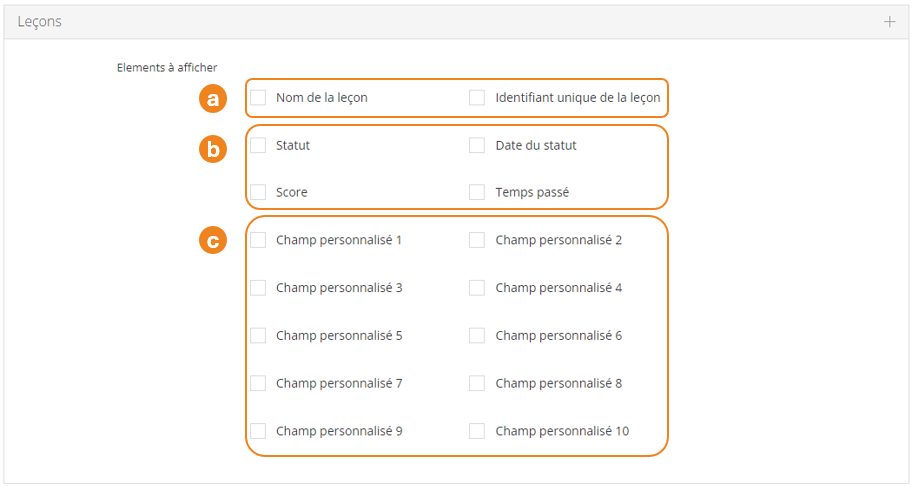
- **Leçons** :
Vous pouvez décider de faire afficher ou non les informations suivantes :
a. Le **nom** et l'**identifiant unique** des leçons ;
b. Le **statut**, la **date de statut**, le **score** et le **temps passé** des utilisateurs sur les leçons ;
c. Les **champs personnalisés** de leçons.
[](https://documentation.xperteam.net/uploads/images/gallery/2024-06/0Yuimage.png)
---
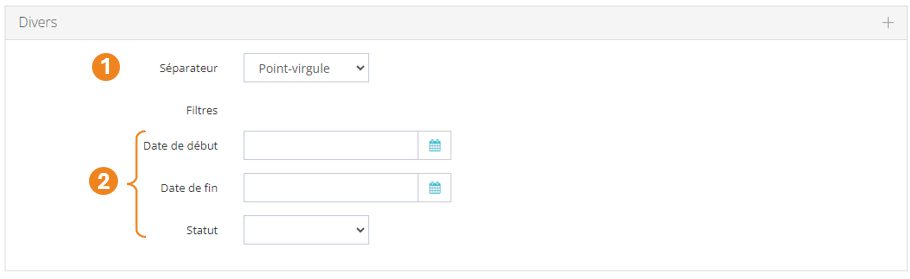
- **Divers** :
1. Vous pouvez sélectionner un **séparateur **(point-virgule / virgule) ;
2. Vous pouvez filtrer vos résultats sur les **dates de début et de fin d'affectation** de cours ou de parcours, ainsi que sur le **statut** des utilisateurs sur **le plus haut niveau de formation** pour lequel vous avez demandé des informations (Niveau Parcours / Cours / Leçon - Statut Non commencé / En cours / Terminé)
[](https://documentation.xperteam.net/uploads/images/gallery/2024-06/k2Yimage.png)
# L'Assistant Fusion utilisateur
L'Assistant Fusion vous permet de fusionner deux utilisateurs en conservant les meilleures statistiques de chacun.
### **Distinction des utilisateurs à fusionner**
Dans un premier temps, nous vous recommandons de vous rendre sur la fiche utilisateurs des deux comptes à fusionner et de repérer un caractère distinctif afin de bien définir quel compte sera à conserver, et quel compte devra être supprimé.
Ce caractère distinctif peut être son patronyme, son adresse email, son identifiant externe unique, un champ personnalisé.
Dans cette fiche, nous nommerons :
- **User A** l'utilisateur à garder ;
- **User Z** l'utilisateur à supprimer.
### **Principe de l'Assistant Fusion**
En théorie, si la fusion est faite correctement, les **données liées aux cours et parcours** de l’utilisateur à supprimer *(User Z)* **apparaitront dans les statistiques de l’utilisateur à conserver** *(User A)*.
Si un même cours a été réalisé par les deux utilisateurs, ce sont **les meilleurs résultats** qui seront conservés.
Nous vous recommandons tout de même de faire une **sauvegarde des données** de chaque utilisateur.
Pour ce faire, vous pouvez éditer un **rapport détaillé 0303 ou 0304** pour chacun d'eux. Dans le paramétrage du rapport, sélectionnez l'utilisateur dans l'onglet « Critères » afin de générer des rapports moins lourds et plus facilement exploitables.
### **Fusion des comptes**
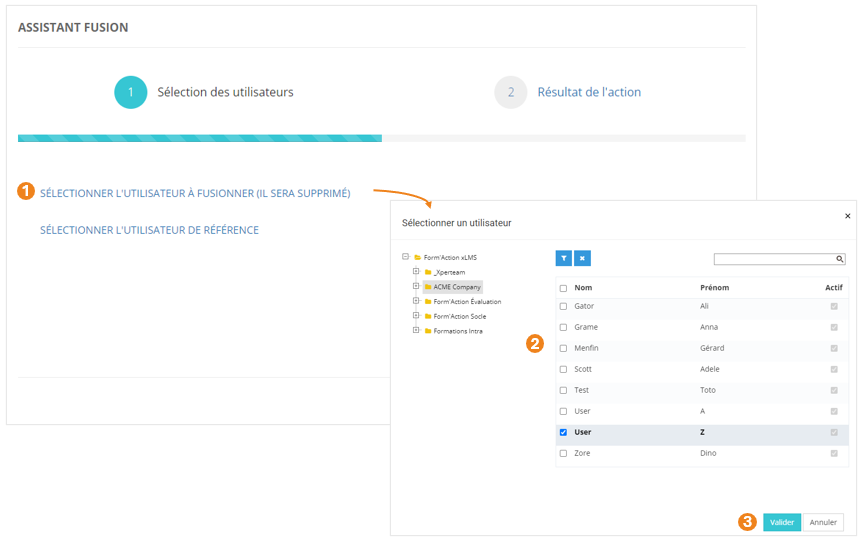
#### **Sélection de l'utilisateur à supprimer**
Dans le menu **Assistants > Assistant fusion** :
1. Cliquez sur **SÉLECTIONNER L'UTILISATEUR À FUSIONNER (IL SERA SUPPRIMÉ)** ;
2. Dans la pop-up qui s'ouvre, sélectionnez l'**utilisateur** (ici, *User Z*) ;
3. Cliquez sur **Valider** ;
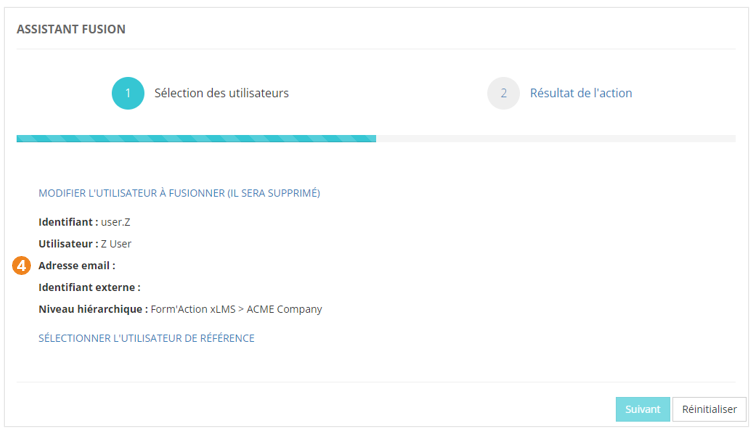
4. De retour sur l'écran principal, vous obtenez un **récapitulatif des **i**nformations** sur l'utilisateur à supprimer. À ce stade, vous pouvez modifier l'utilisateur sélectionné en cas d'erreur.
[](https://documentation.xperteam.net/uploads/images/gallery/2024-06/NWzimage.png)
[](https://documentation.xperteam.net/uploads/images/gallery/2024-06/2Jlimage.png)
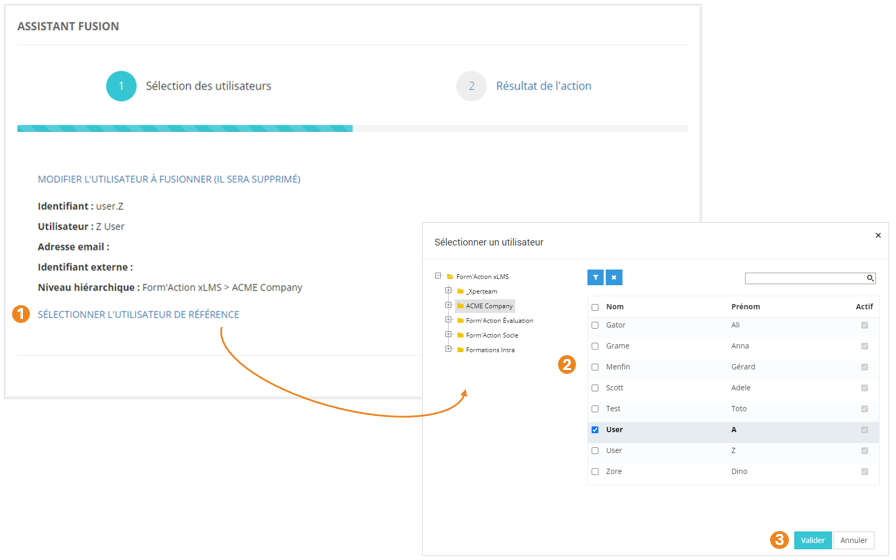
#### **Sélection de l'utilisateur à conserver**
1. Cliquez sur **SÉLECTIONNER L'UTILISATEUR DE RÉFÉRENCE** ;
2. Dans la pop-up qui s'ouvre, sélectionnez l'**utilisateur** (ici, *User A*) ;
3. Cliquez sur **Valider** ;
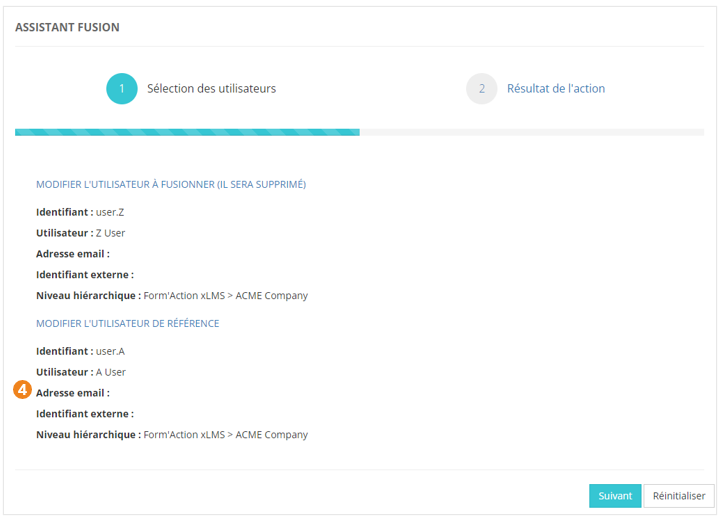
4. De retour sur l'écran principal, vous obtenez un **récapitulatif des **i**nformations** sur l'utilisateur à conserver. À ce stade, vous pouvez modifier chacun des utilisateurs sélectionnés en cas d'erreur.
[](https://documentation.xperteam.net/uploads/images/gallery/2024-06/3cdimage.png)
[](https://documentation.xperteam.net/uploads/images/gallery/2024-06/3VNimage.png)
#### **Fusion**
Lorsque vous êtes satisfait des utilisateurs sélectionnés :
1. Cliquez sur **Suivant **;
2. Dans la pop-up qui s'ouvre, cliquez sur **Oui**.
[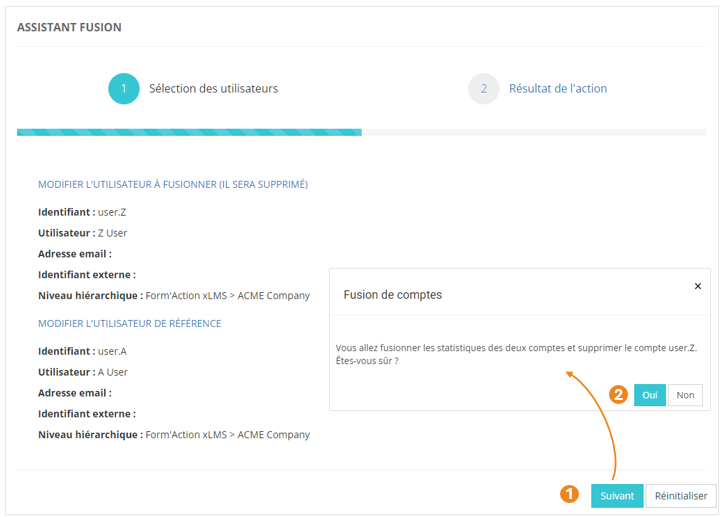](https://documentation.xperteam.net/uploads/images/gallery/2024-06/csjimage.png)
#### **Résultat de l'action**
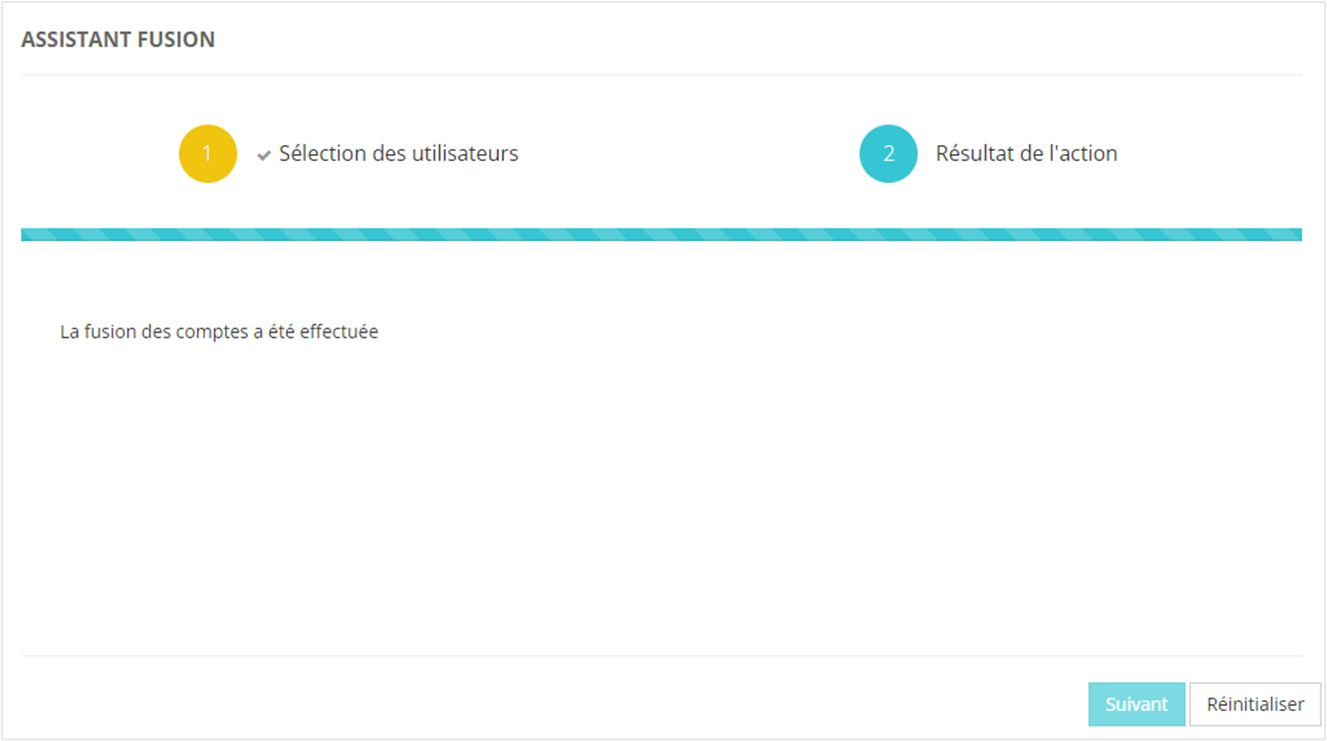
Cet écran vous indique si la fusion a été **correctement effectuée ou non**.
Le bouton **Réinitialiser** ramène à l’écran de sélection des utilisateurs de l’assistant, afin de procéder à une nouvelle fusion, via l’assistant.
Le bouton **Réinitialiser** n’annule pas la dernière action.
# Les différents imports
Ce chapitre détaille comment faire des imports, entre autres :
- d'organisations ;
- d'utilisateurs ;
- de statistiques ;
- de fichiers SCORMS...
# L'Assistant Import Utilisateurs
L'Assistant Import Utilisateurs vous permet de faire des imports en masse :
- d'organisations ;
- d'utilisateurs.
Import d'organisations
Rendez-vous dans **Assistants > Import > Utilisateurs > Organisation**.
#### **Le fichier d'import**
Le fichier d'import doit respecter certaines règles. Afin d'avoir un fichier valide, il est recommandé dans un premier temps de **télécharger un fichier d'exemple**.
[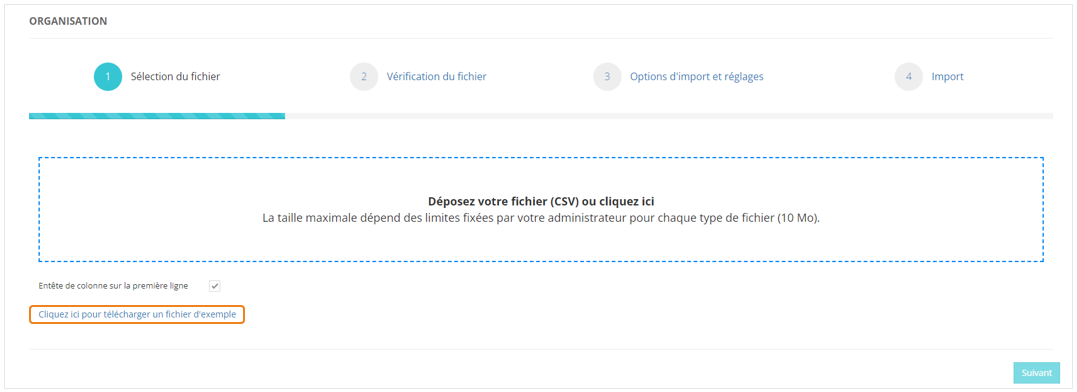](https://documentation.xperteam.net/uploads/images/gallery/2024-06/MMbimage.png)
Ce fichier d'exemple devra remplir les conditions suivantes :
- être enregistré au format **csv (séparateur point-virgule)** ;
- comporter **14 colonnes** exactement ;
- pour chaque ligne, les informations dans les 2 premières colonnes sont **obligatoires** (*org\_label* et *org\_extid*)
Liste des informations du fichier :
1. **Nom** de l'organisation ;
2. **Identifiant externe** de l'organisation ;
3. **Identifiant externe** de l'**organisation parente** ;
4. Organisation **désactivée ou non** (1 = désactivée ; 0 ou vide = active) ;
5. **Description** de l'organisation ;
6. **Langue** de l'organisation ;
7. **Adresse** de l'organisation (*ligne 1*, *ligne 2*, *code postal*, *ville*, *pays*) ;
8. **Code** de l'organisation ;
9. **Budget** de l'organisation ;
10. **Identifiant externe** du **superviseur** de l'organisation.
[](https://documentation.xperteam.net/uploads/images/gallery/2024-06/jc7image.png)
Ce sont ces mêmes informations que vous retrouvez en back-office sur une** fiche d'organisation** :
[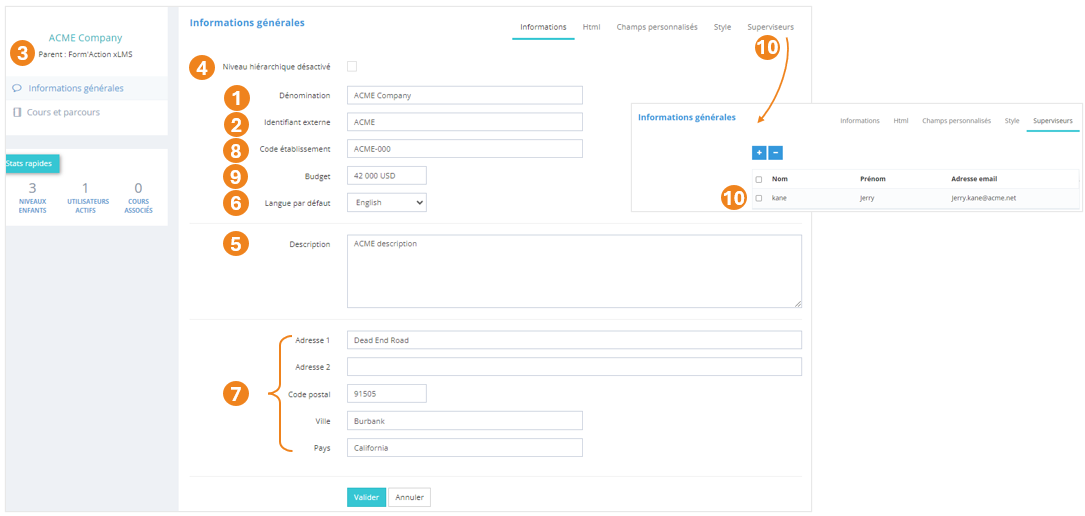](https://documentation.xperteam.net/uploads/images/gallery/2024-06/5Tmimage.png)
#### **Vérification du fichier**
Une fois votre fichier d'import déposé sur la plateforme, vous obtenez un récapitulatif de la façon dont va être interprétée la première ligne de votre fichier.
[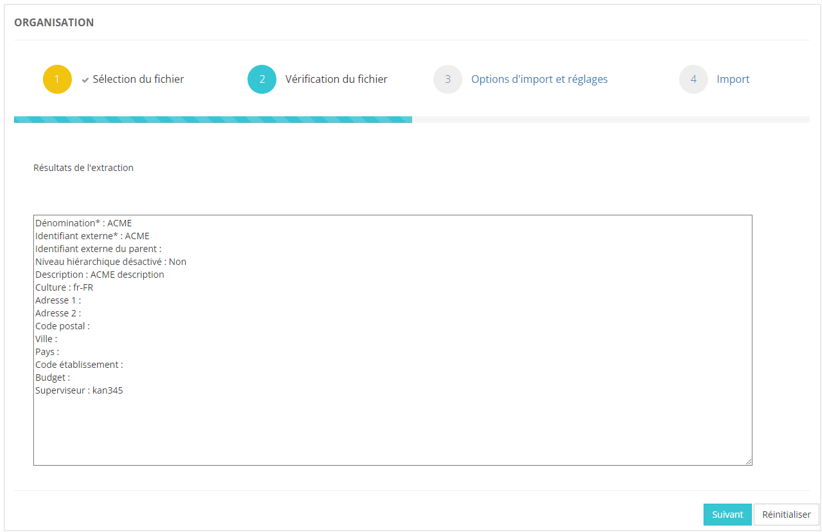](https://documentation.xperteam.net/uploads/images/gallery/2024-07/image.png)
Cliquez sur le bouton **Suivant**.
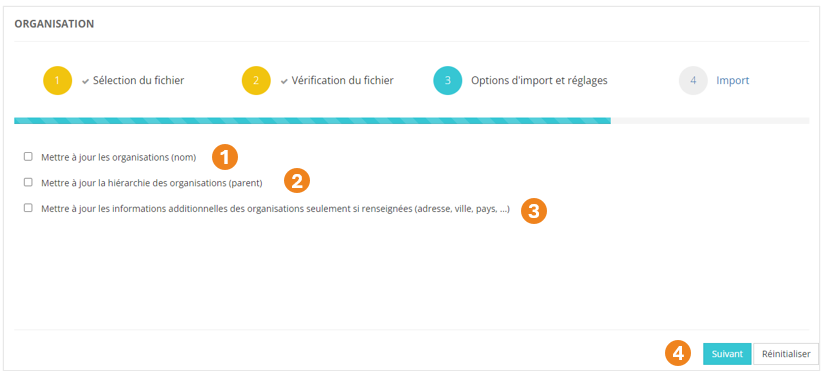
#### **Options d'import et réglages**
C'est à cette étape que vous définissez si l'import doit ou non :
1. **Mettre à jour le nom** des organisations : la correspondance se fait sur l'**identifiant externe** de l'organisation ;
2. **Mettre à jour la hiérarchie** des organisations ;
3. **Mettre à jour les informations additionnelles** uniquement dans le cas où celles-ci sont présentes dans le fichier d'import. En particulier, si une information existe déjà sur une organisation et que la cellule est vide dans le fichier d'import, l'information initiale ne sera pas écrasée.
4. Cliquez sur **Suivant** lorsque vous avez fait vos choix.
[](https://documentation.xperteam.net/uploads/images/gallery/2024-07/eWZimage.png)
Explication des champs du fichier d'import apprenants
Le fichier exemple d'import apprenants comporte 37 de colonnes.
Seules 5 sont obligatoires

#### Les colonnes obligatoires
**user\_lname** = Nom
**user\_fname** = Prénom
**user\_login** = Login
**user\_password** = Mot de passe (à moins de choisir que la plateforme génère le mot de passe lors de l’import)
**org\_extid** = Identifiant de l'organisation à laquelle sera rattachée l'apprenant
#### Les colonnes expliquées
| user\_lname\*
| nom de famille |
| user\_fname\* | prénom |
| user\_tname | M.,Mme,Mlle,Dr.,Pr. |
| user\_login\* | Identifiant unique de l’apprenant |
| user\_password\* | Mot de passe de l’apprenant. |
| org\_extid\* | identifiant de l’organisation dans laquelle l’apprenant doit être affecté. |
| user\_email | mail de l’apprenant |
| user\_extid | second identifiant unique, facultatif |
| user\_disable
| 1 si l’apprenant doit être inactif, 0 ou vide pour les apprenants actifs |
| user\_culture
| Langue de l’apprenant (en-EN, fr-FR, es-ES) |
| birth\_date
| date de naissance de l’apprenant au format YYYY/MM/DD |
| user\_activation\_date
| date d’activation du compte au format YYYY/MM/DD |
| user\_expiration\_date
| date d’expiration du compte au format YYYY/MM/DD |
| user\_manager\_extid | User extid du manager de l’apprenant |
| user\_alternate\_manager\_extid | User extid du manager alternatif (mêmes droits que le manager direct) |
| user\_address1
| Adresse de l’apprenant |
| user\_address2
| Complément d’adresse |
| user\_zip | Code postal |
| user\_city | Ville |
| user\_country | Pays |
| user\_phone | Téléphone fixe |
| user\_cellphone | Téléphone portable |
| user\_hourly\_cost
| Coût horaire |
| user\_udtf1 | champ texte libre 1 |
| user\_udtf2 | champ texte libre 2 |
| user\_udtf3 | champ texte libre 3 |
| user\_udtf4 | champ texte libre 4 |
| user\_udtf5
| champ texte libre 5 |
| user\_udtf6 | champ texte libre 6 |
| user\_udtf7 | champ texte libre 7 |
| user\_udtf8 | champ texte libre 8 |
| user\_udtf9
| champ texte libre 9 |
| user\_udtf10
| champ texte libre 10 |
| user\_audiences
| audience(s) de l’apprenant. Il est possible mettre plusieurs audiences séparées par || |
| user\_roles | identifiant(s) du/ des role(s) de l’apprenant. Il est possible mettre plusieurs rôles séparées par ||. Pour définir le périmètre du rôle, mettre : puis l’identifiant de l’organisation.
Exemple : Role1:Org1||Role2:Org2) |
| job\_position\_id | ID de l'emploi de l'apprenant |
| List\_name | Noms de la liste ou des listes statiques auxquels l'apprenant doit être inscrit. S'il y'a plusieurs listes, elles seront séparées par ||.
Exemple groupeA||groupeB
|
Import d'utilisateurs
#### Accéder à l'import
L'import des apprenants se fait dans Assistants/ Imports/ Import Utilisateur/ Utilisateur
[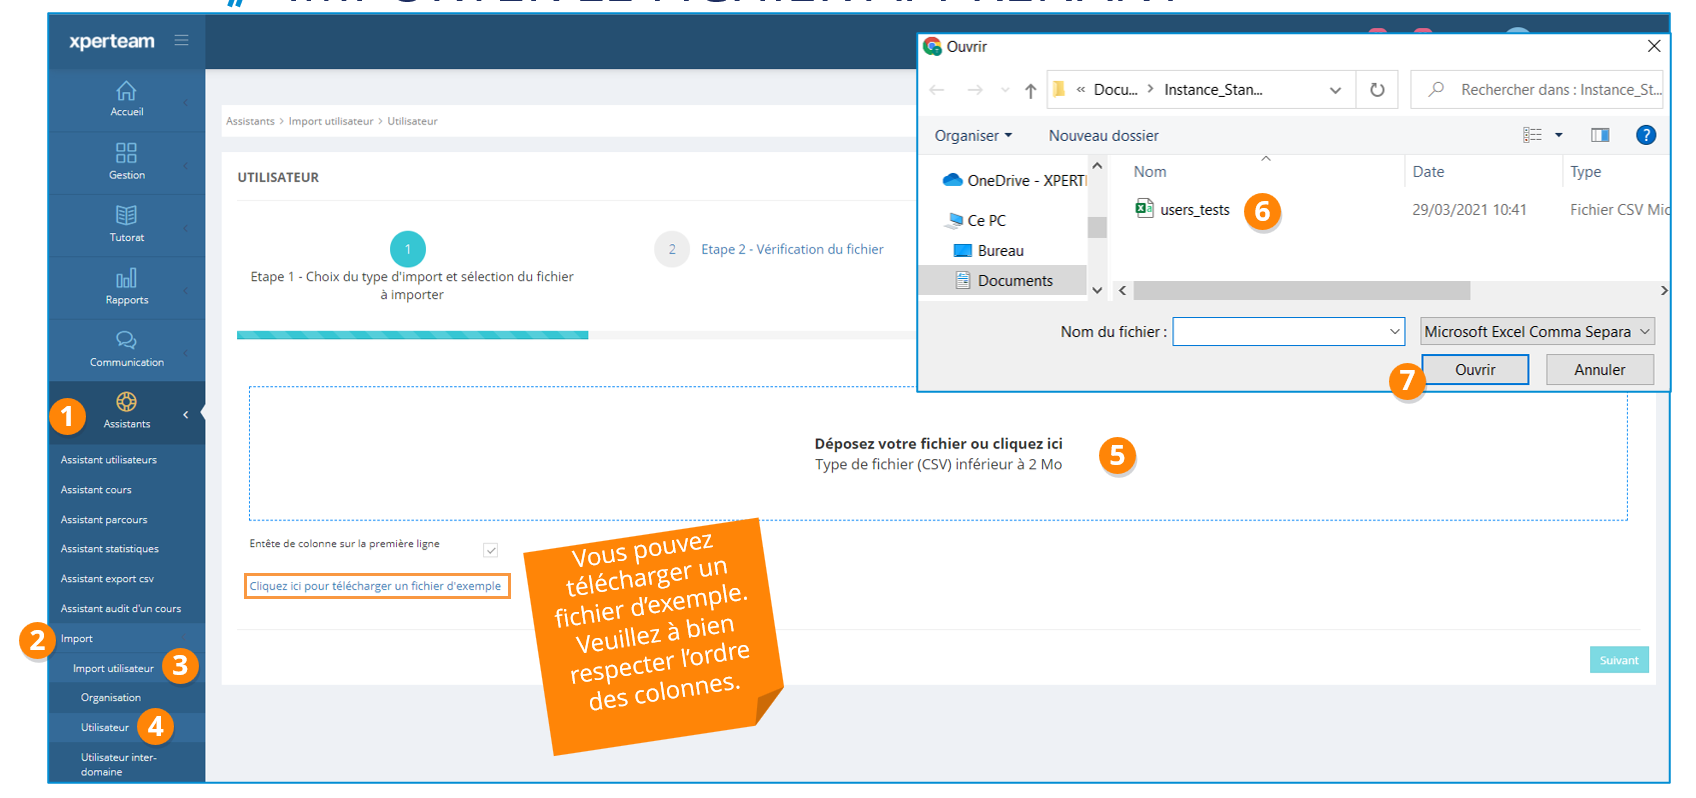](https://documentation.xperteam.net/uploads/images/gallery/2025-10/JzKimage.png)
#### Import du fichier
A près avoir télécharger et modifier le fichier Exemple, on le dépose dans la zone prévue à cette effet.
[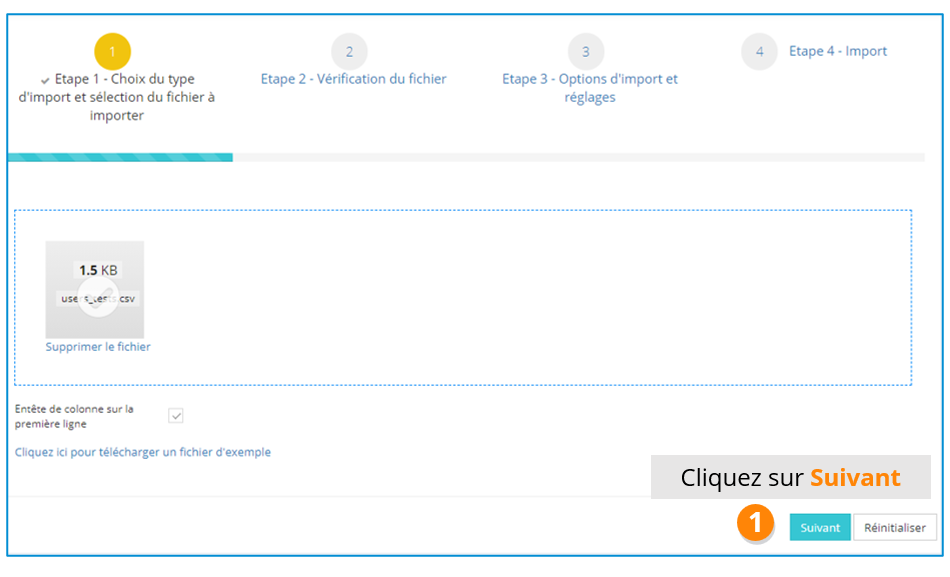](https://documentation.xperteam.net/uploads/images/gallery/2025-10/ORzimage.png)
Lors de l'import, un écran affiche la première ligne et permet de contrôler que les informations sont dans les bonnes colonnes
[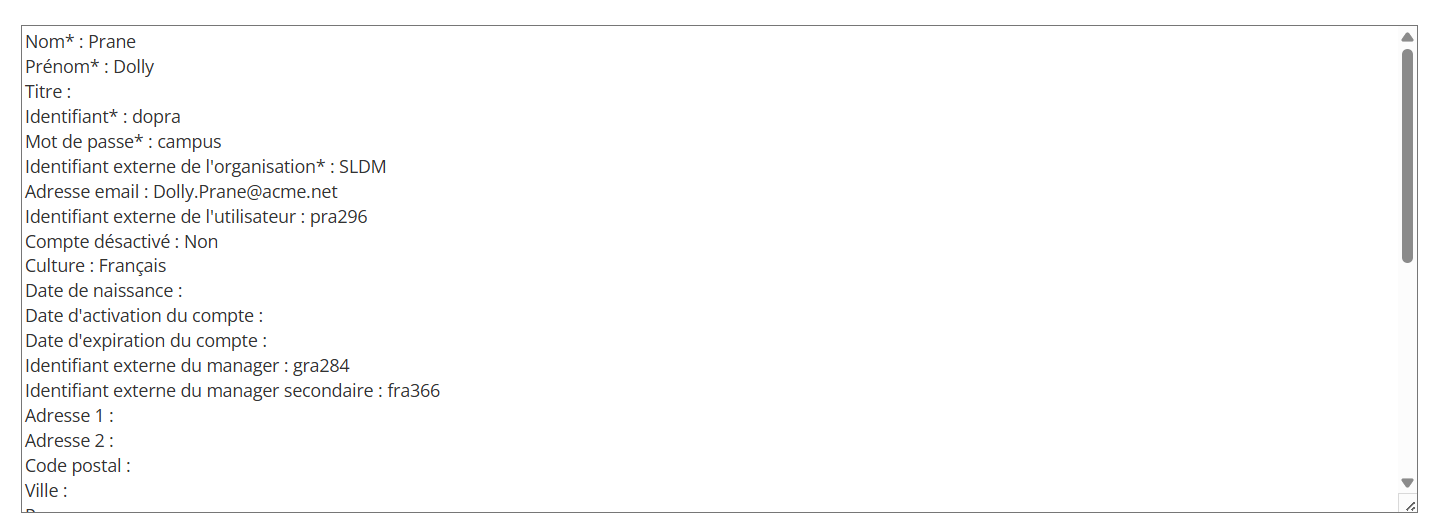](https://documentation.xperteam.net/uploads/images/gallery/2025-10/UAbimage.png)
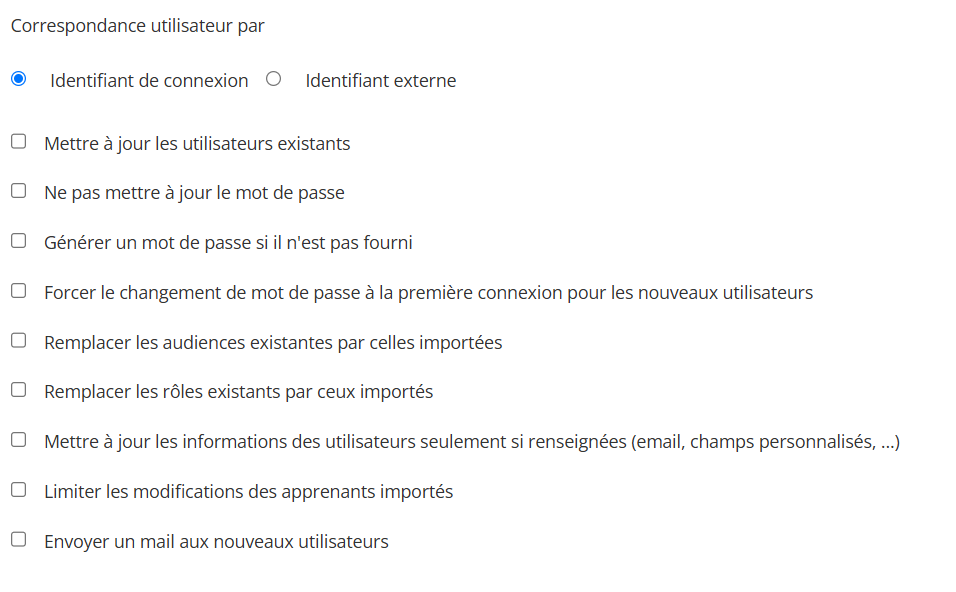
L'écran suivant permet de préciser les actions lors de l'import
[](https://documentation.xperteam.net/uploads/images/gallery/2025-10/v1fimage.png)
Lors de cette étape, on définit les règles qui vont s’appliquer lors de l’import du fichier apprenant.
Par défaut, l’import se base sur l’**identifiant de l’apprenant** (qui est unique) pour effectuer les mises à jour. Il est possible de se baser sur l’**identifiant externe** de l’apprenant (également unique), notamment si on souhaite modifier les identifiants.
Vous pouvez ensuite cocher :
- **Mettre à jour les utilisateurs existants**. Si non coché, alors l’import ne fera que créer de nouveaux utilisateurs.
- **Ne pas mettre à jour le mot de passe**. Si décoché, vous pourrez indiquer un nouveau mot de passe.
- **Générer un mot de passe si il n'est pas fourni**. Cela vous permet d’importer un fichier sans mot de passe. Il sera généré automatiquement.
- **Forcer le changement de mot de passe à la première connexion pour les nouveaux utilisateurs.**
- **Remplacer les audiences existantes par celles importées**
- **Remplacer les rôles existants par ceux importés**
- **Mettre à jour les informations des utilisateurs seulement si renseignées** (email, champs personnalisés, ...). Cela concerne les 10 champs personnalisés des utilisateurs.
- **Limiter les modifications des apprenants importés**. Dans ce cas, pour modifier les informations, il sera nécessaire d'avoir la permission de modification des utilisateurs gérés en externe (voir la fiche apprenant). Cela est utilisé notamment lorsque l'import des apprenants est automatisé, afin de ne pas permettre de modifier les apprenants qui seront mis à jour lors du prochain import automatique.
- **Envoyer un mail aux nouveaux utilisateurs**. Un mail standard sera envoyé avec les informations de login et de mot de passe.
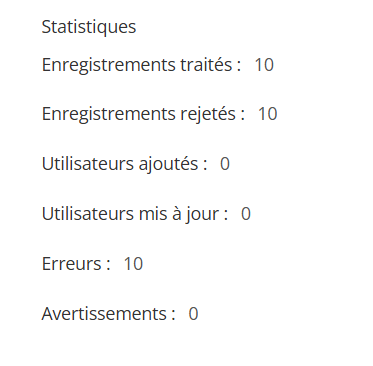
#### Analyse du résultat de l'import
**Si l’import est réussi**, le nombre d’enregistrement sera à 0 et le nombre d’utilisateurs ajoutés et mis à jour seront indiqués.
Les erreurs seront à 0.
**Si l’import n’est pas complétement réussi**, le nombre d’erreurs et d’avertissements seront indiqués. Les erreurs empêche l’import de l’apprenant (exemple Organisation de l’apprenant non trouvé), l’avertissement n’est pas bloquant (exemple : manager non trouvée).
[](https://documentation.xperteam.net/uploads/images/gallery/2025-10/SLLimage.png)
**Le fichier journal** vous indique les erreurs et les avertissements.
[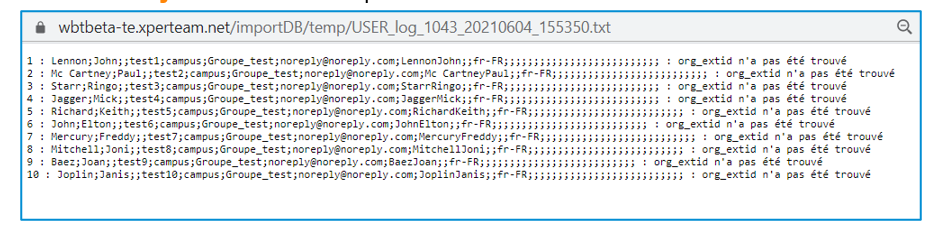](https://documentation.xperteam.net/uploads/images/gallery/2025-10/22Pimage.png)
**Le fichier des rejets** indique les imports rejetés.
[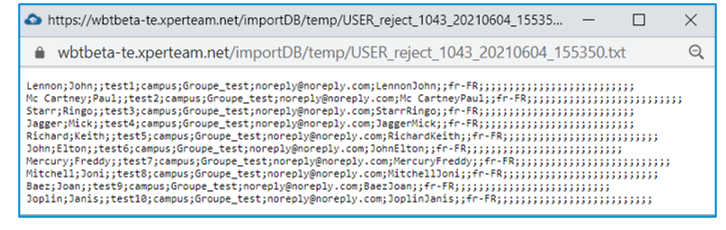](https://documentation.xperteam.net/uploads/images/gallery/2025-10/yBoimage.png)
Import d'affectation de cours
Rendez-vous dans **Assistants > Import >Affectation**
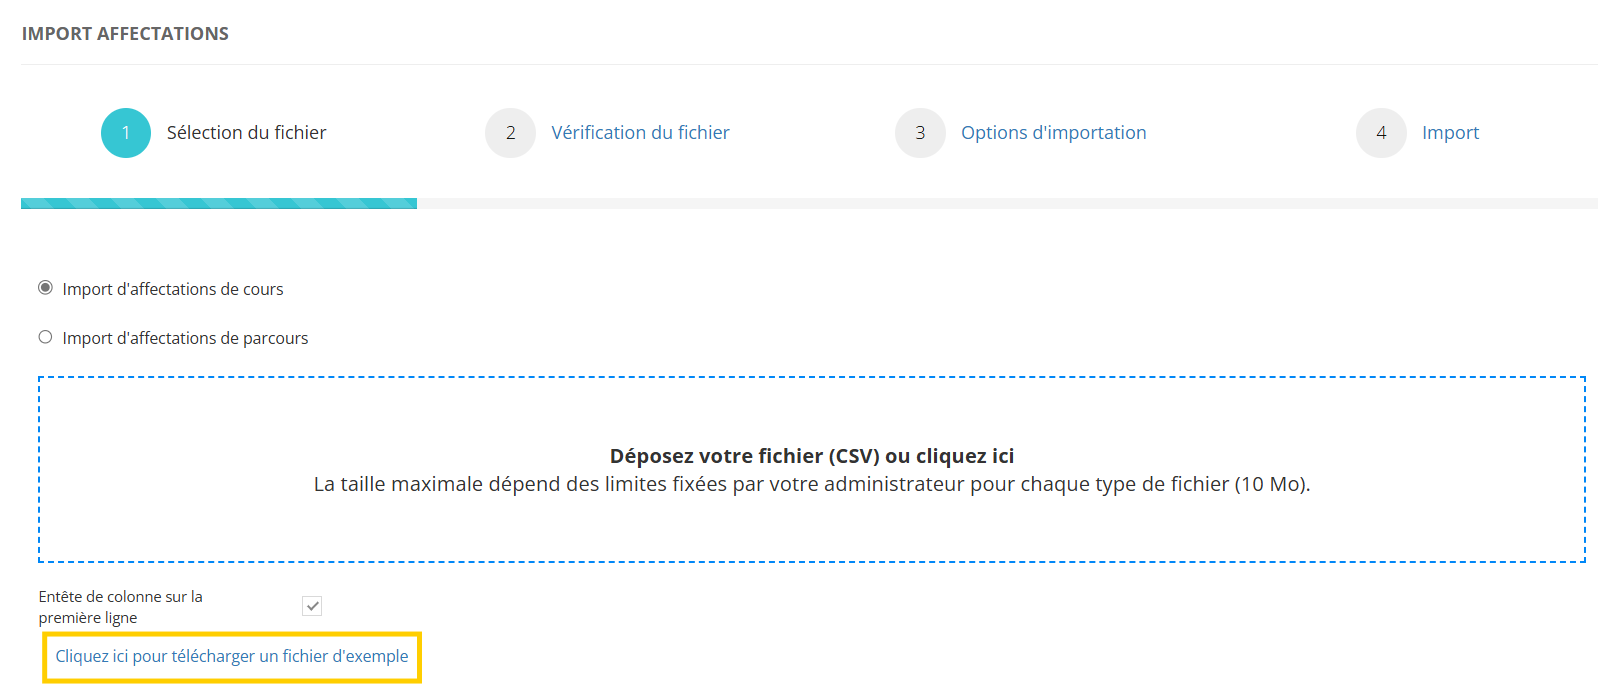
#### **Le fichier d'import**
Le fichier d'import doit respecter certaines règles. Afin d'avoir un fichier valide, il est recommandé dans un premier temps de **télécharger un fichier d'exemple**.
[](https://documentation.xperteam.net/uploads/images/gallery/2025-10/cRdimage.png)
Ce fichier d'exemple devra remplir les conditions suivantes :
- être enregistré au format **csv (séparateur point-virgule)** ;
- comporter **11 colonnes** exactement ;
- pour chaque ligne, les informations dans les 2 premières colonnes sont **obligatoires** (*user\_loginid* et *crsvname*)
Liste des informations du fichier :
1. **Identifiant** unique de l'apprenant ;
2. **Identifiant** unique du cours
3. **Date** de début
4. **Date** de fin
5. **Date** d'objectif
6. **Identifiant** de session externe
7. **Option** d'attribution
8. **Mode** de facturation
9. **Code** de facturation
10. **Statut** d'inscription à la session
#### **L'import du fichier**
Après avoir télécharger et modifier le fichier Exemple, on le dépose dans la zone prévue à cette effet. Vous obtenez un récapitulatif de la façon dont va être interprétée la première ligne de votre fichier.
[](https://documentation.xperteam.net/uploads/images/gallery/2025-10/nDAimage.png)
Cliquez sur le bouton **Suivant**.
L'écran suivant permet de préciser les actions lors de l'import
[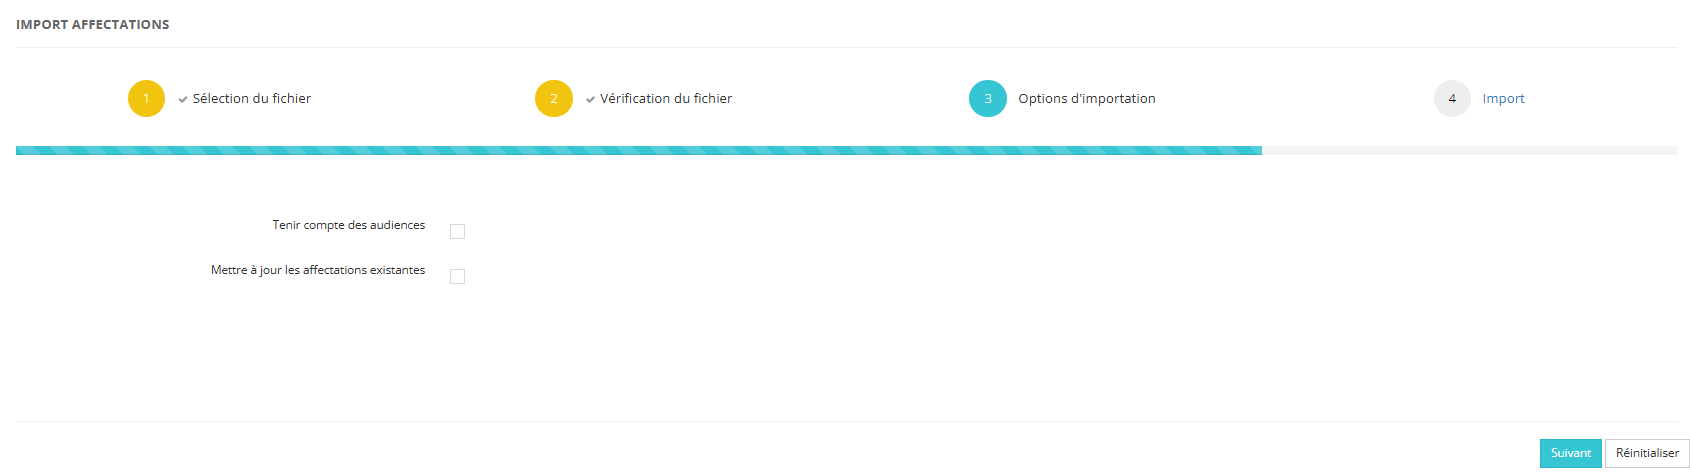](https://documentation.xperteam.net/uploads/images/gallery/2025-10/W0Rimage.png)
Vous pouvez cocher :
- **Tenir compte des audiences.** Si décoché, elle ne prendre pas en compte les audiences.
- **Mettre à jour les affectations existantes.** Si coché, vous pourrez modifier les dates et/ou modifier le statut du cours.
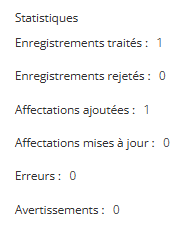
#### **Analyse du résultat de l'import**
**Si l’import est réussi**, le nombre d’enregistrement et le nombre d’affectation ajoutés et mises à jour seront indiqués.
Les erreurs seront à 0.
**Si l’import n’est pas complétement réussi**, le nombre d’erreurs et d’avertissements seront indiqués. Les erreurs empêche l’import, l’avertissement n’est pas bloquant.
[](https://documentation.xperteam.net/uploads/images/gallery/2025-10/6qdimage.png)
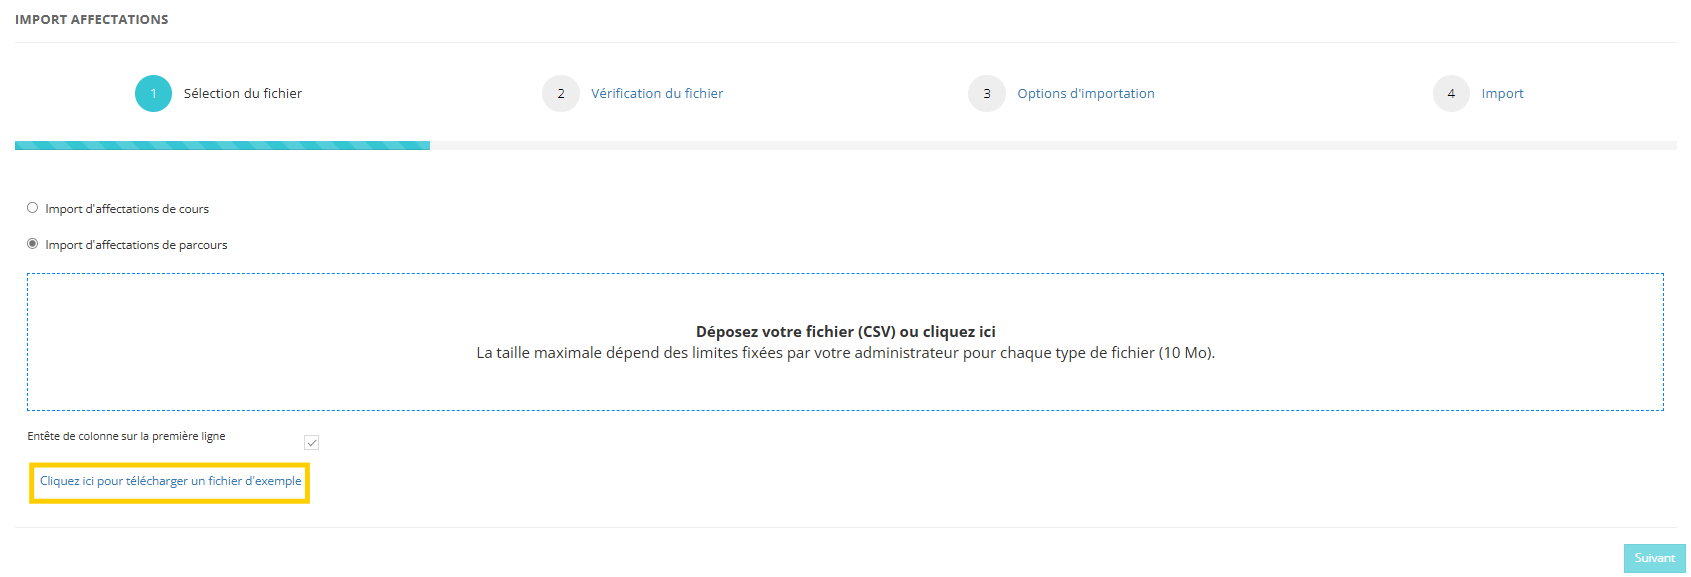
Import d'affectation de parcours
Rendez-vous dans** Assistants > Import >Affectation**
#### **Le fichier d'import**
Le fichier d'import doit respecter certaines règles. Afin d'avoir un fichier valide, il est recommandé dans un premier temps de **télécharger un fichier d'exemple**.
[](https://documentation.xperteam.net/uploads/images/gallery/2025-10/YBYimage.png)
Ce fichier d'exemple devra remplir les conditions suivantes :
- être enregistré au format **csv (séparateur point-virgule)** ;
- comporter **6 colonnes** exactement ;
- pour chaque ligne, les informations dans les 2 premières colonnes sont **obligatoires** (*user\_loginid* et *curriculum\_extid*)
Liste des informations du fichier :
1. **Identifiant** unique de l'apprenant ;
2. **Identifiant** unique du parcours
3. **Date** de début
4. **Date** de fin
5. **Date** d'objectif
6. **Option** d'attribution
#### **L'import du fichier**
Après avoir télécharger et modifier le fichier Exemple, on le dépose dans la zone prévue à cette effet. Vous obtenez un récapitulatif de la façon dont va être interprétée la première ligne de votre fichier.
[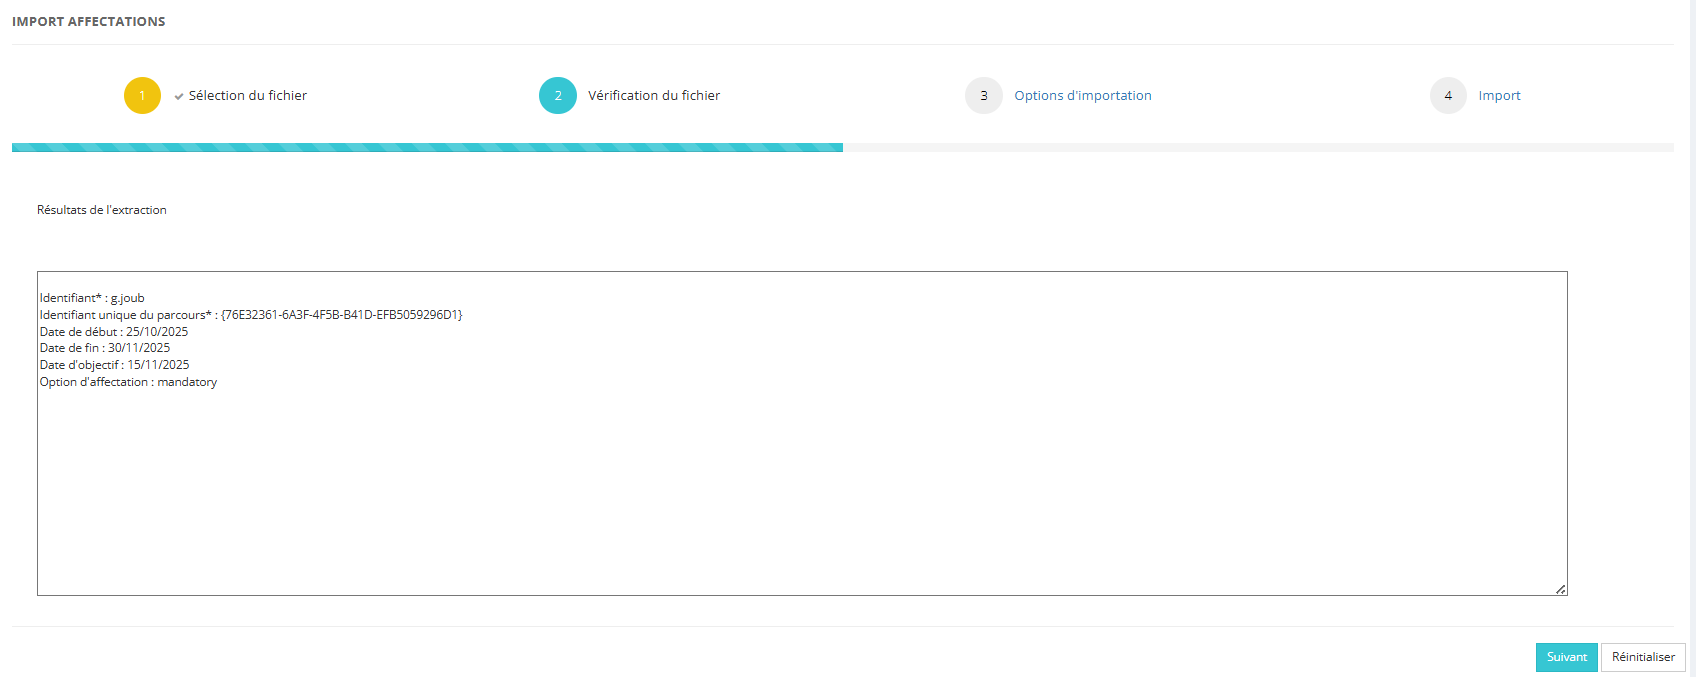](https://documentation.xperteam.net/uploads/images/gallery/2025-10/IVpimage.png)
Cliquez sur le bouton **Suivant**.
L'écran suivant permet de préciser les actions lors de l'import
[](https://documentation.xperteam.net/uploads/images/gallery/2025-10/OKrimage.png)
Vous pouvez cocher :
- **Tenir compte des audiences.** Si décoché, elle ne prendre pas en compte les audiences.
- **Mettre à jour les affectations existantes.** Si coché, vous pourrez modifier les dates et/ou modifier le statut du cours.
#### **Analyse du résultat de l'import**
**Si l’import est réussi**, le nombre d’enregistrement et le nombre d’affectation ajoutés et mises à jour seront indiqués.
Les erreurs seront à 0.
**Si l’import n’est pas complétement réussi**, le nombre d’erreurs et d’avertissements seront indiqués. Les erreurs empêche l’import, l’avertissement n’est pas bloquant.
[](https://documentation.xperteam.net/uploads/images/gallery/2025-10/6qdimage.png)
L'Assistant Import Affectation vous permet de faire des affectation en masse :
- de cours
- de parcours
Où importer les statistiques de cours ou de leçons
| L'import de statistiques se fait dans Assistants/ Import/ Statistiques | [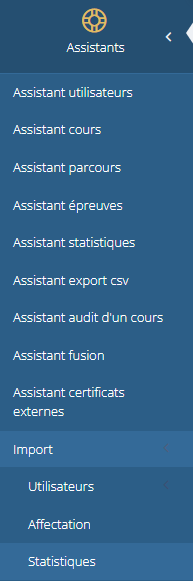](https://documentation.xperteam.net/uploads/images/gallery/2025-11/Bvkimage.png)
|
Il est possible de mettre à jour :
- Les statistiques des cours : statut du cours, date de statut du cour. Dans ce cas, un cours pourra avoir un statut terminé même si les leçons du cours ne sont pas toutes terminées.
- Les statistiques de leçons des cours (recommandé) : statut de la leçon, score de la leçon, date de statut, temps passée
[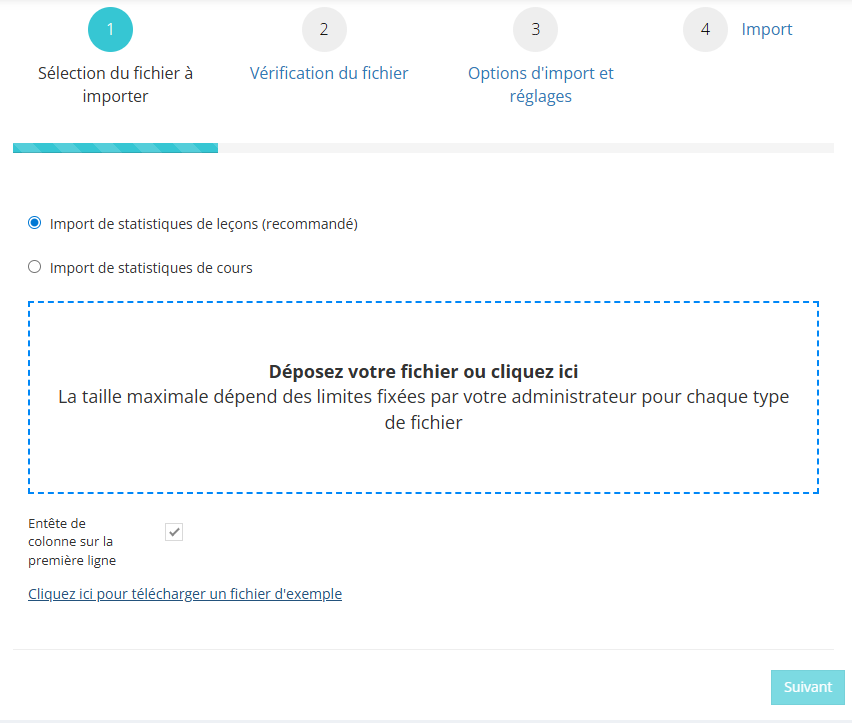](https://documentation.xperteam.net/uploads/images/gallery/2025-11/tkSimage.png)
Il est possible de télécharge les fichiers Exemple
L'import statistique de leçons
Le fichier d'import statistiques de leçons est composé de 9 colonnes
[](https://documentation.xperteam.net/uploads/images/gallery/2025-11/1Y0image.png)
- user\_loginid\* = Login apprenant
- crsvname\* = Identifiant unique du cours
- lsnvname\* = Identifiant unique de la leçon
lnk\_type\* = Type de leçon
- A (Assignement/ Mission),
- L (lesson/ leçon),
- W (Webinaire),
- T (Lti activity/ Leçon présentielle),
- E (educational resource/ Ressource pédagogique)
- lesson\_status\* = statut de la leçon
- C pour Completed/ Terminé
- P pour Passed/ Réussi
- F pour Failed / Echoué
- I pour Incomplete/ En cours
- N pour Not Started/ Non commencé
- lesson\_status\_date = Date du statut au format AAAA/MM/JJ
- lesson\_score = Score sur 100
- lesson\_time = Temps passé en secondes
- ilt\_status = Pour les leçons présentielles, P si l'apprenant était présent.
Lors de l'import, il est nécessaire d'indiquer ce qu'il se passe si l'apprenant a déjà des statistiques
[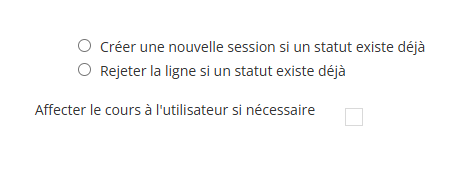](https://documentation.xperteam.net/uploads/images/gallery/2025-11/rfAimage.png)
- Soit l'import enregistre la statistiques (option Créer une nouvelle session si un statut existe déjà)
- Soit l'import rejette la ligne (Rejeter la ligne si un statut existe déjà)
- Enfin, les apprenants qui ne seraient pas inscrits au cours peuvent être inscrits lors de l'import si "Affecter le cours à l'utilisateur si nécessaire" est coché.
A l'issu de l'import, le résultat vous est indiqué.
En cas d'erreurs, vous pouvez consulter le fichier journal qui vous indique les erreurs et le fichier des rejets qui vous indique les statistiques qui n'ont pu être mises à jour.
[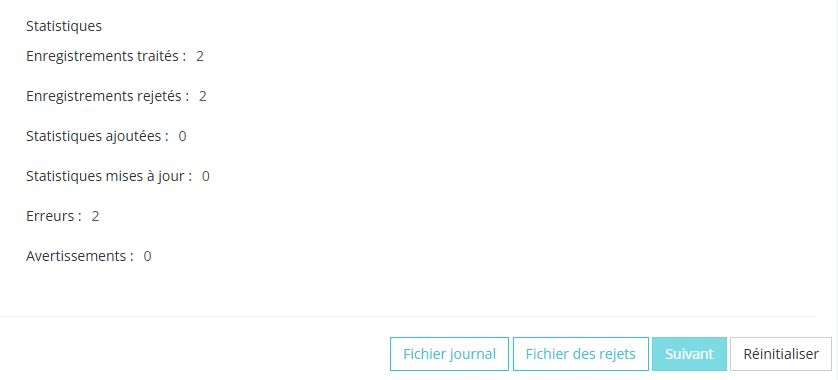](https://documentation.xperteam.net/uploads/images/gallery/2025-11/1cjimage.png)
L'import statistique de cours
Le fichier d'import statistiques de cours contient 5 colonnes
[](https://documentation.xperteam.net/uploads/images/gallery/2025-11/zUkimage.png)
- user\_loginid\* = Login apprenant
- crsvname\* = Identifiant unique du cours
- course\_status\* = Statut du cours
- N pour Not started/ Non commencé
- I pour Incomplete/ En cours
- C pour Completed/ Terminé
- course\_status\_date = Date de statut au format AAAA/MM/JJ
- course\_enrollement\_date = Date d'inscription au format AAAA/MM/JJ
Lors de l'import, il est nécessaire d'indiquer ce qu'il se passe si l'apprenant a déjà des statistiques
[](https://documentation.xperteam.net/uploads/images/gallery/2025-11/rfAimage.png)
- Soit l'import enregistre la statistiques (option Créer une nouvelle session si un statut existe déjà)
- Soit l'import rejette la ligne (Rejeter la ligne si un statut existe déjà)
- Enfin, les apprenants qui ne seraient pas inscrits au cours peuvent être inscrits lors de l'import si "Affecter le cours à l'utilisateur si nécessaire" est coché.
A l'issu de l'import, le résultat vous est indiqué.
En cas d'erreurs, vous pouvez consulter le fichier journal qui vous indique les erreurs et le fichier des rejets qui vous indique les statistiques qui n'ont pu être mises à jour.
[](https://documentation.xperteam.net/uploads/images/gallery/2025-11/1cjimage.png)
| L'import des utilisateur dans une liste statique se fait dans
Assistants/ Import/ Listes statiques
| [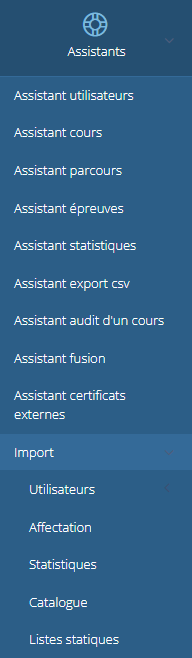](https://documentation.xperteam.net/uploads/images/gallery/2025-11/image.png)
|
[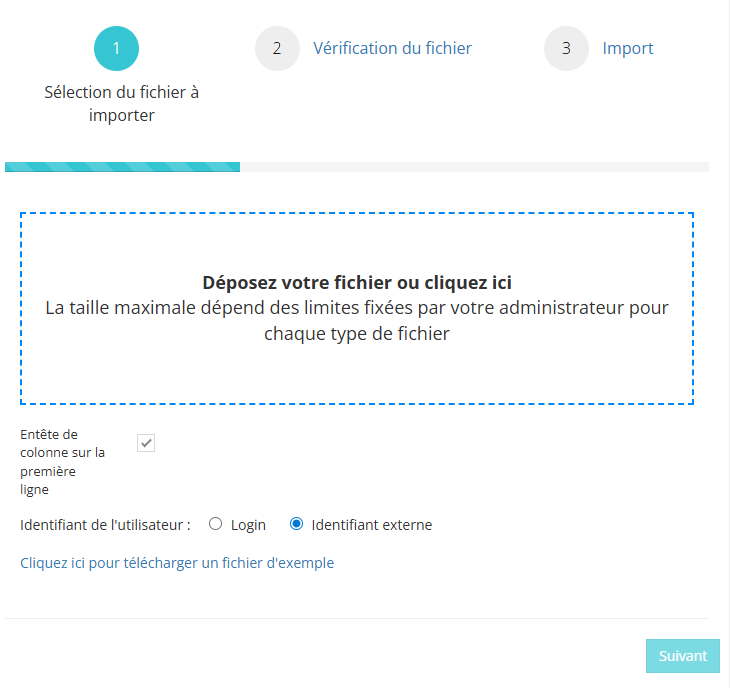](https://documentation.xperteam.net/uploads/images/gallery/2025-11/PNqimage.png)
**Il est possible de télécharger un fichier Exemple**
[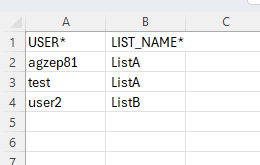](https://documentation.xperteam.net/uploads/images/gallery/2025-11/3ZNimage.png)
Le fichier d'import de liste statique comporte deux colonnes uniquement :
- La colonne USER\* avec l'identifiant externe ou le login
- La colonne LISTE\_NAME\* avec le nom de la liste
**- Si la liste n'existe pas, elle sera créée dans le dossier Default**
**- Par défaut la première ligne est considérée comme un en tête et n'est pas prise en compte**
**- Par défaut, l'import se base sur l'identifiant externe. Il est possible de choisir de se baser sur le login.**
# L'assistant Import Formation en présentiel
Où importer les formations en présentiel
| L'import de formation en présentiel se fait dans Assistants/ Import/Formation en présentiel | [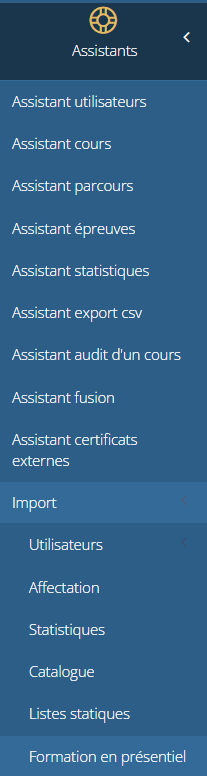](https://documentation.xperteam.net/uploads/images/gallery/2025-11/PrGimage.png)
|
L'import formation présentielle
#### **Le fichier d'import**
Le fichier d'import doit respecter certaines règles. Afin d'avoir un fichier valide, il est recommandé dans un premier temps de télécharger un fichier d'exemple.
[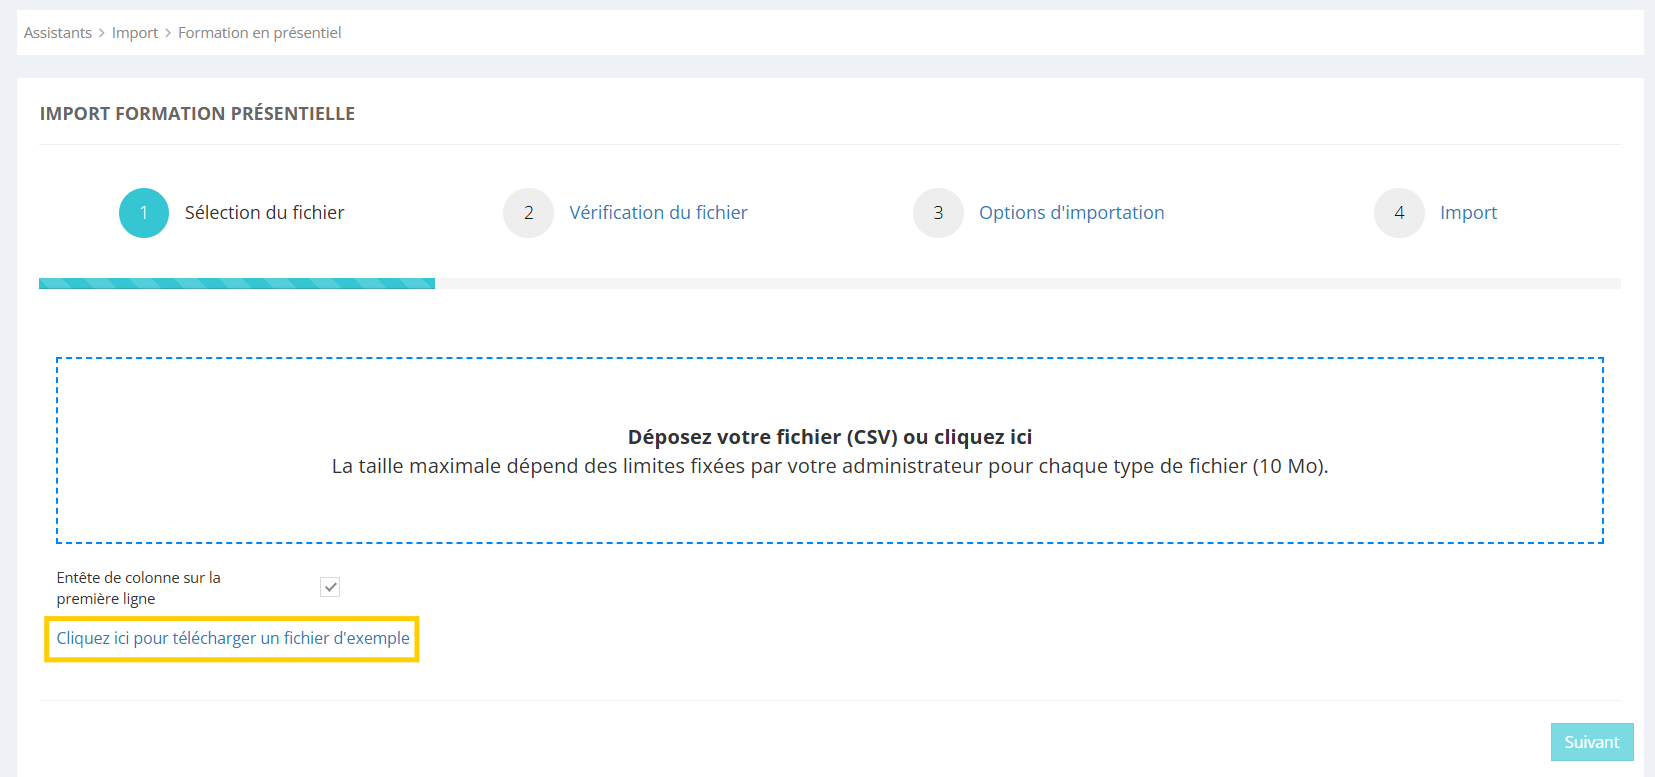](https://documentation.xperteam.net/uploads/images/gallery/2025-11/u1Limage.png)
Ce fichier d'exemple devra remplir les conditions suivantes :
- être enregistré au format **csv (séparateur point-virgule)** ;
- comporter **13 colonnes** exactement ;
- pour chaque ligne, les informations dans les colonnes comportant un \* sont obligatoires.
Liste des informations du fichier :
1. **Identifiant** unique du cours \*
2. **Session** Informations sur les sessions des leçons, exemple du format à suivre : Identifiant Unique de la Leçon1|DateetheureDebutSessionLeçon1|DateetheureFinSessionLeçon1$IdUniqueLeçon2|DateetheureDebutSessionLeçon2|DateetheureFinSessionLeçon2
3. **Date et heure **de début \* au format AAAA/MM/JJ
4. **Identifiant **de la session \* (il sera créé lors de l'import)
5. **Statut** de la session (N = en préparation, 0 = ouverte, C = fermée, D = fermée, X = Annulée)
6. **Nombre **maximum de participants \*
7. **Confirmation** de la réservation immédiate (Y/N)
8. **Liste d'attente** mettre en liste d'attente si le nombre max est atteint (Y: pour Yes, N:Pour No)
9. **Identifiant** du formateur \*
10. **Identifiant **formateurs additionnels séparés par des virgules
11. **Identifiant externe **de la salle ou MBT
12. **Identifiant **du gestionnaire
13. **Liste** des organisations séparés par un |
#### **L'import du fichier**
Après avoir télécharger et modifier le fichier Exemple, on le dépose dans la zone prévue à cette effet. Vous obtenez un récapitulatif de la façon dont va être interprétée la première ligne de votre fichier.
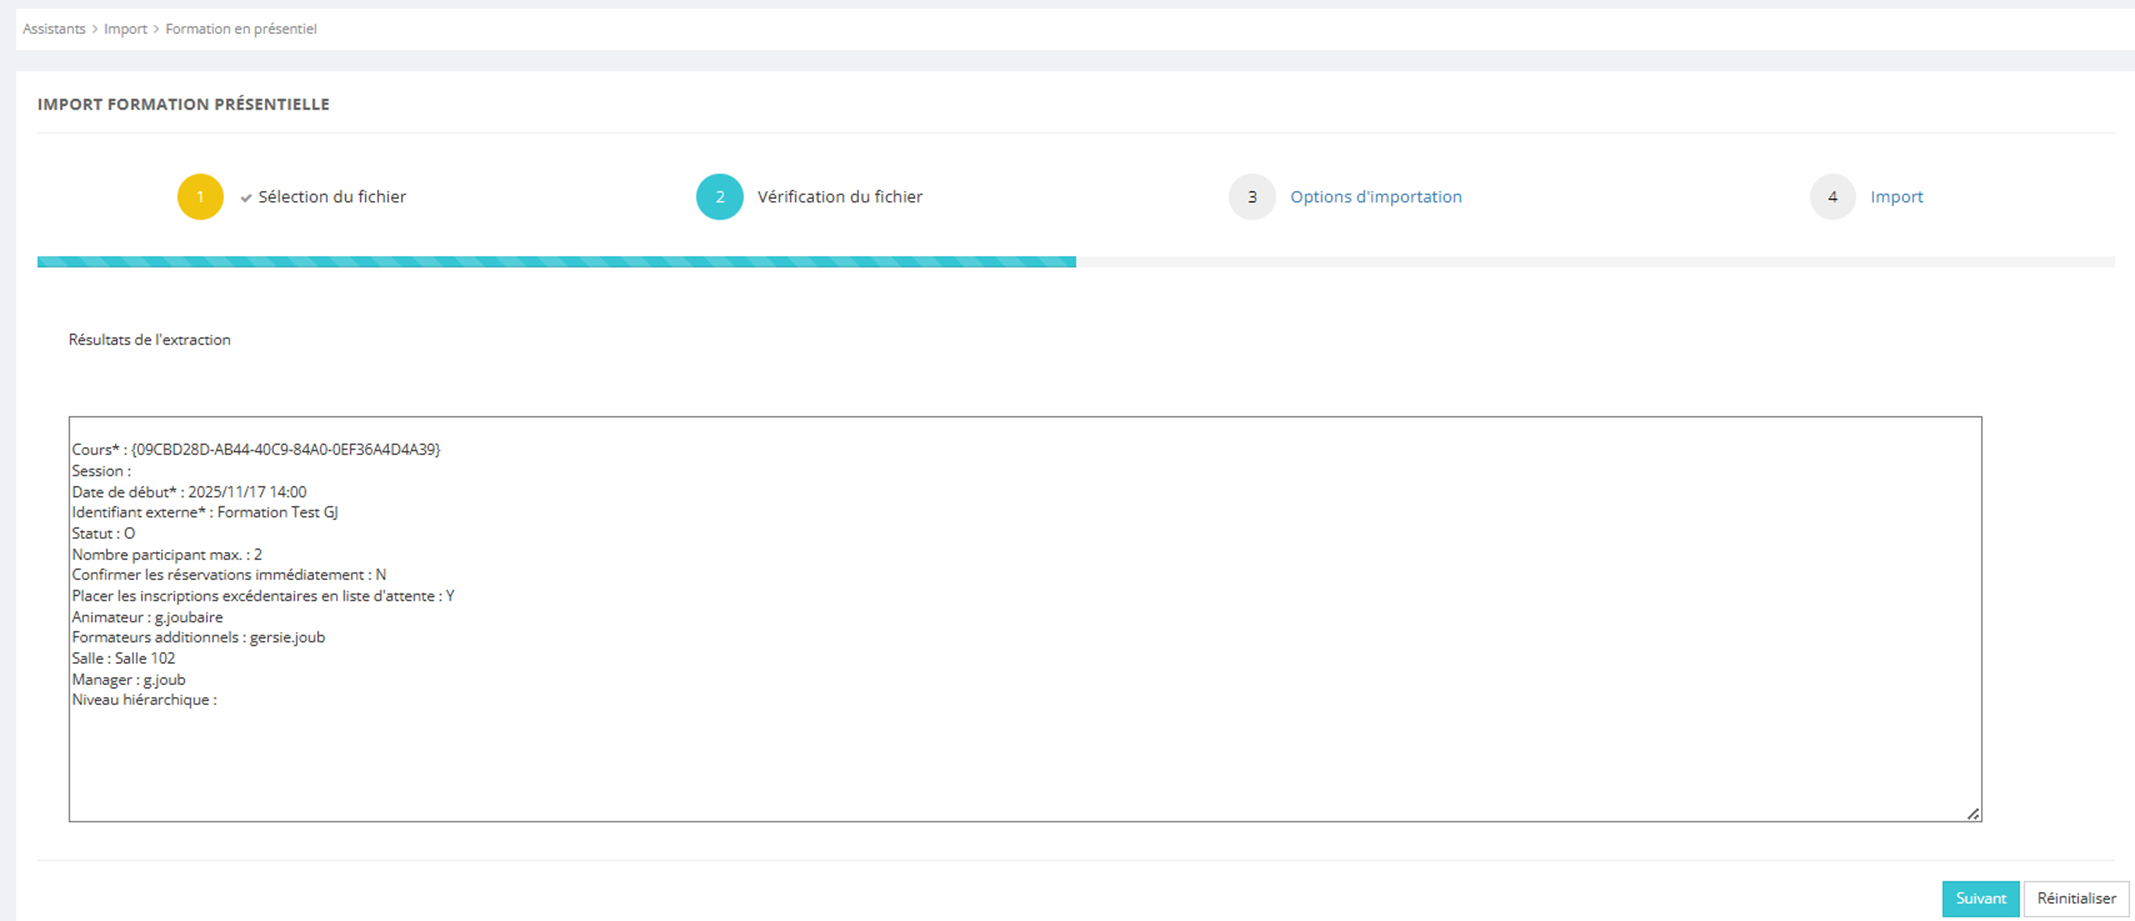
Cliquez sur le bouton **Suivant**.
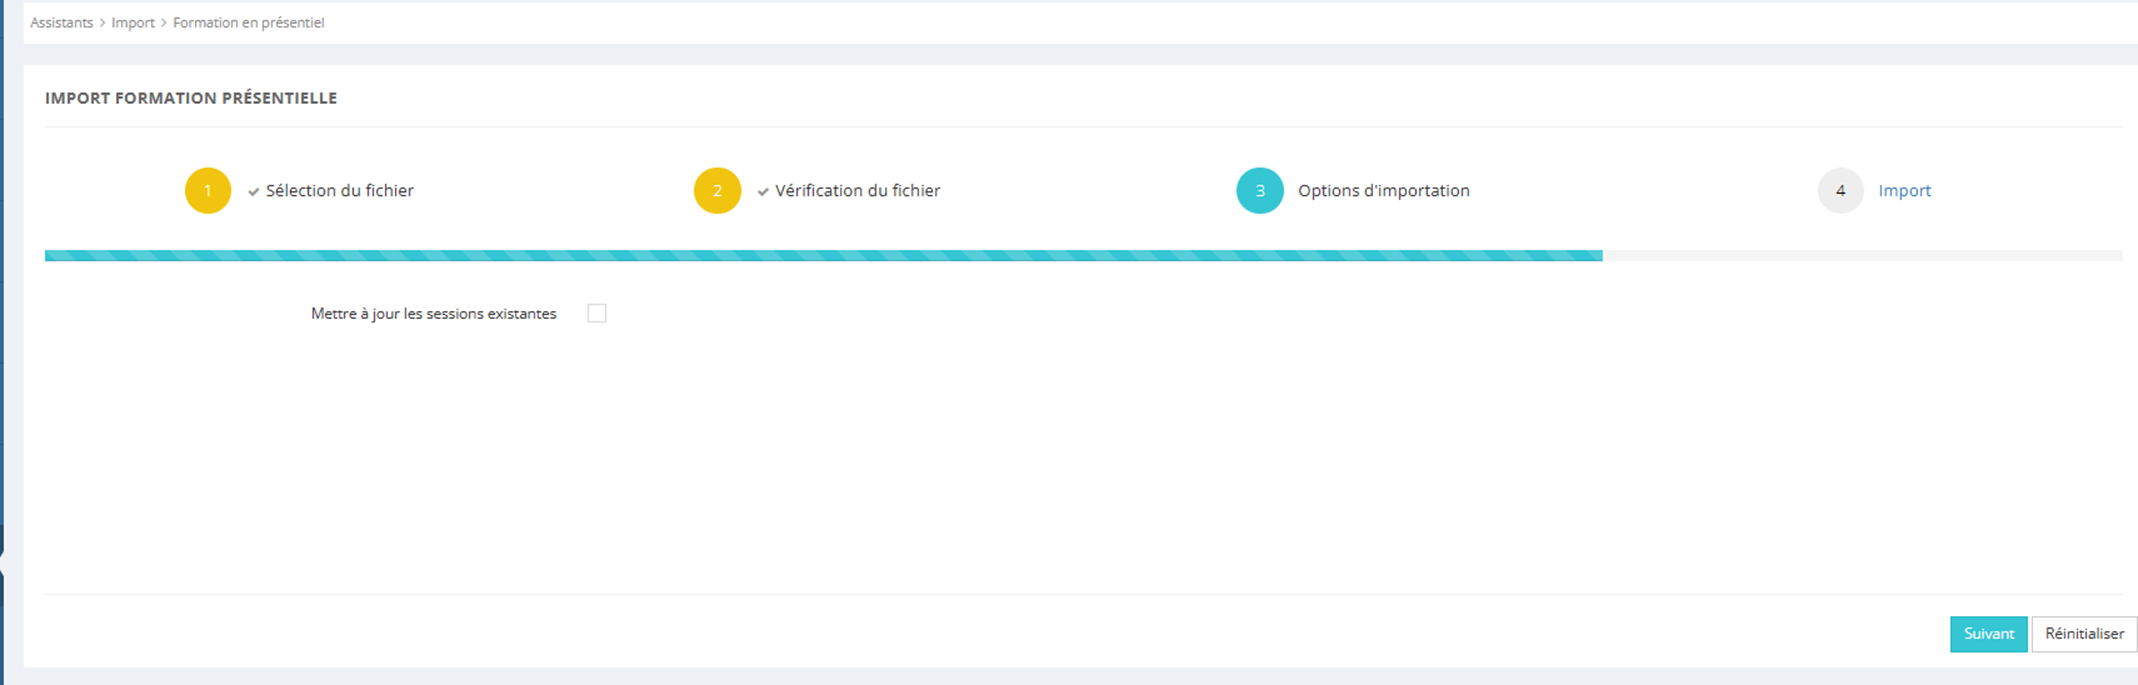
#### **Analyse du résultat de l'import**
**Si l’import est réussi**, le nombre d’enregistrement et le nombre de formations ajoutés et mises à jour seront indiqués.
Les erreurs seront à 0.
**Si l’import n’est pas complétement réussi**, le nombre d’erreurs et d’avertissements seront indiqués. Les erreurs empêche l’import, l’avertissement n’est pas bloquant.
[](https://documentation.xperteam.net/uploads/images/gallery/2025-10/6qdimage.png)
Les sessions importées se retrouvent dans Gestion>Session
[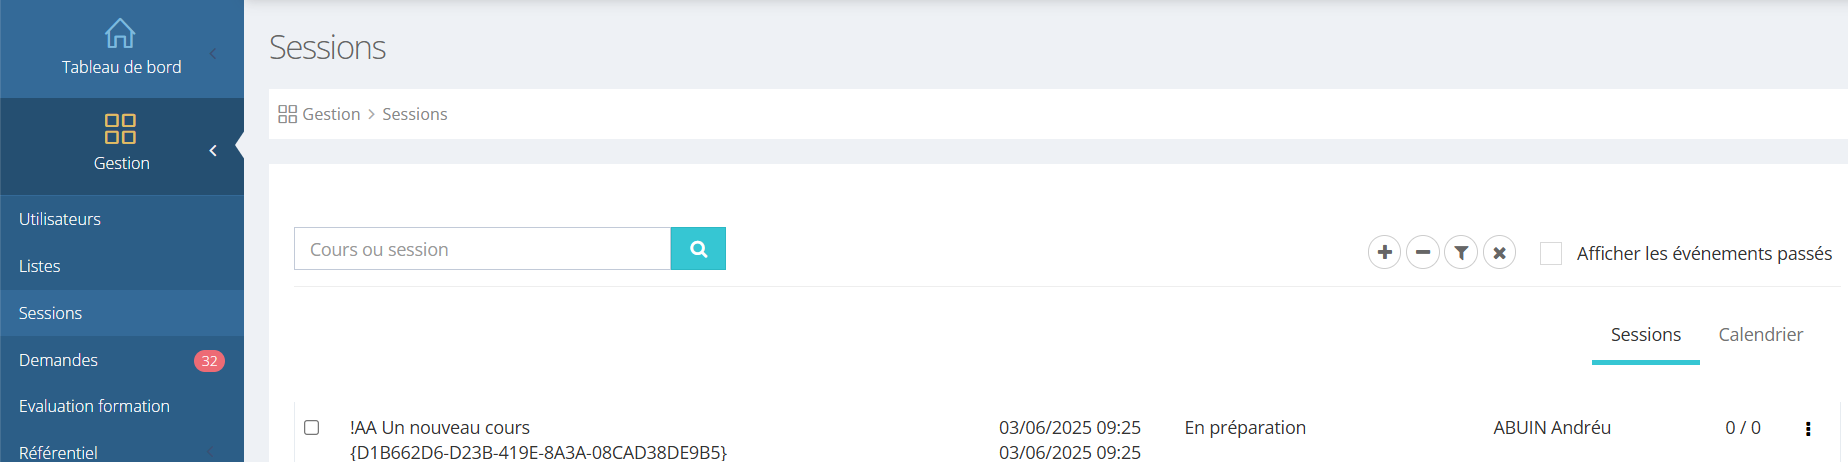](https://documentation.xperteam.net/uploads/images/gallery/2025-11/pSBimage.png)
Où importer les formations externes
| L'import de formation en présentiel se fait dans Assistants/ Import/Formation en présentiel | [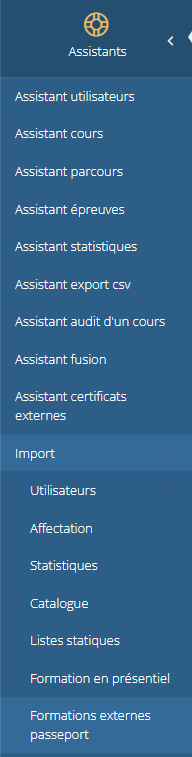](https://documentation.xperteam.net/uploads/images/gallery/2025-11/4vIimage.png)
|
L'import formations externes passeport
#### **Le fichier d'import**
Le fichier d'import doit respecter certaines règles. Afin d'avoir un fichier valide, il est recommandé dans un premier temps de télécharger un fichier d'exemple.
[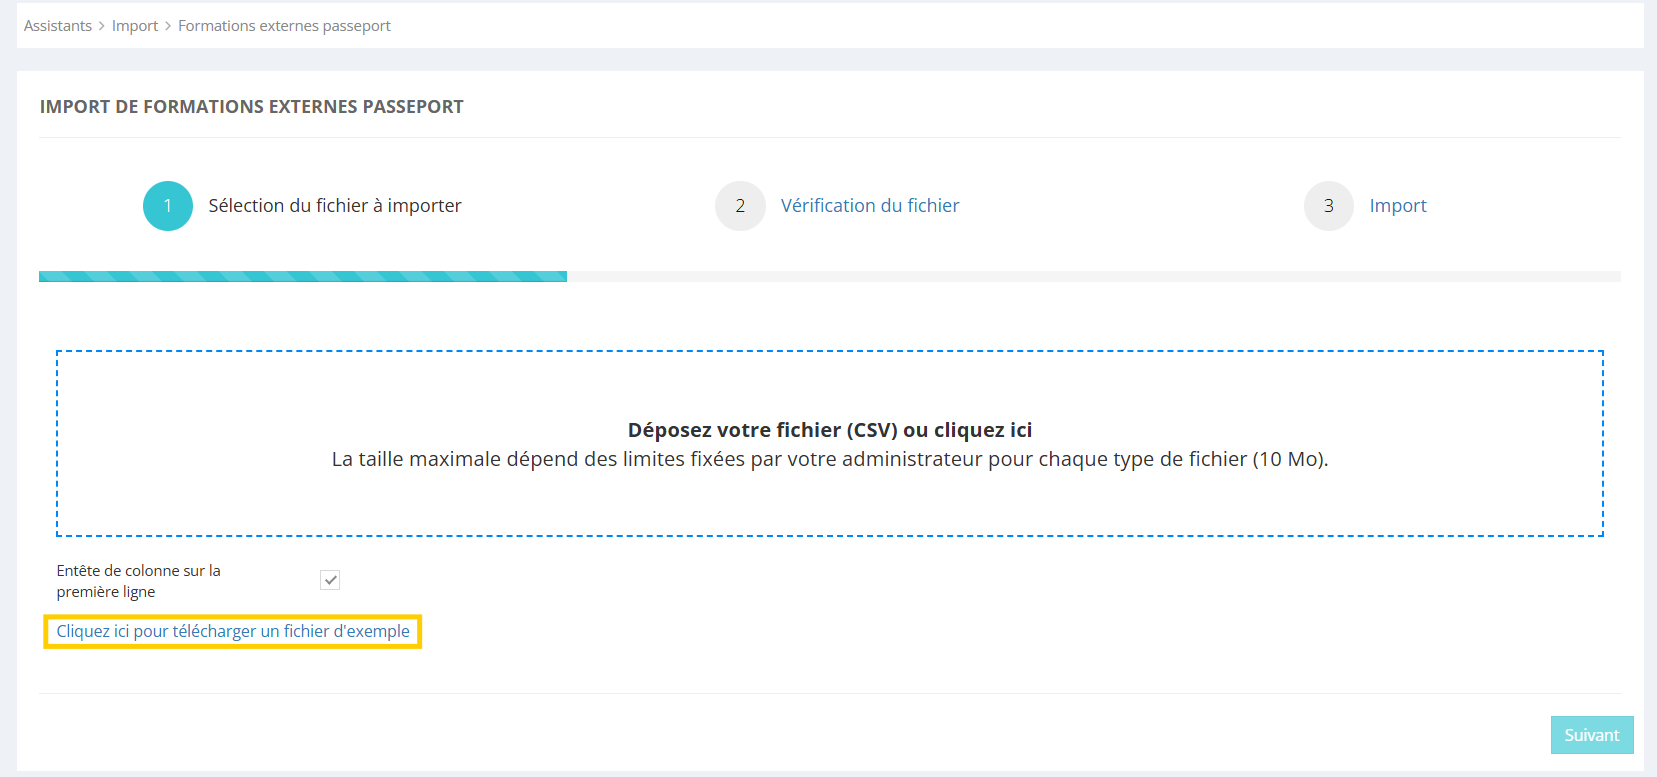](https://documentation.xperteam.net/uploads/images/gallery/2025-11/Dgtimage.png)
Ce fichier d'exemple devra remplir les conditions suivantes :
- être enregistré au format **csv (séparateur point-virgule)** ;
- comporter **12 colonnes** exactement ;
- pour chaque ligne, les informations dans les colonnes comportant un \* sont obligatoires.
Liste des informations du fichier :
1. **Nom** du cours \*
2. **Identifiant** unique du cours
3. Type de passeport
4. **Date** de début \*
5. **Date** de fin \*
6. **Fournisseur**
7. **Durée**
8. **Modalité**
9. **Identifiant** de l'apprenant\*
10. **Nom** de l'apprenant
11. **Prénom** de l'apprenant
12. **Action**
#### **L'import du fichier**
Après avoir télécharger et modifier le fichier Exemple, on le dépose dans la zone prévue à cette effet. Vous obtenez un récapitulatif de la façon dont va être interprétée la première ligne de votre fichier.
[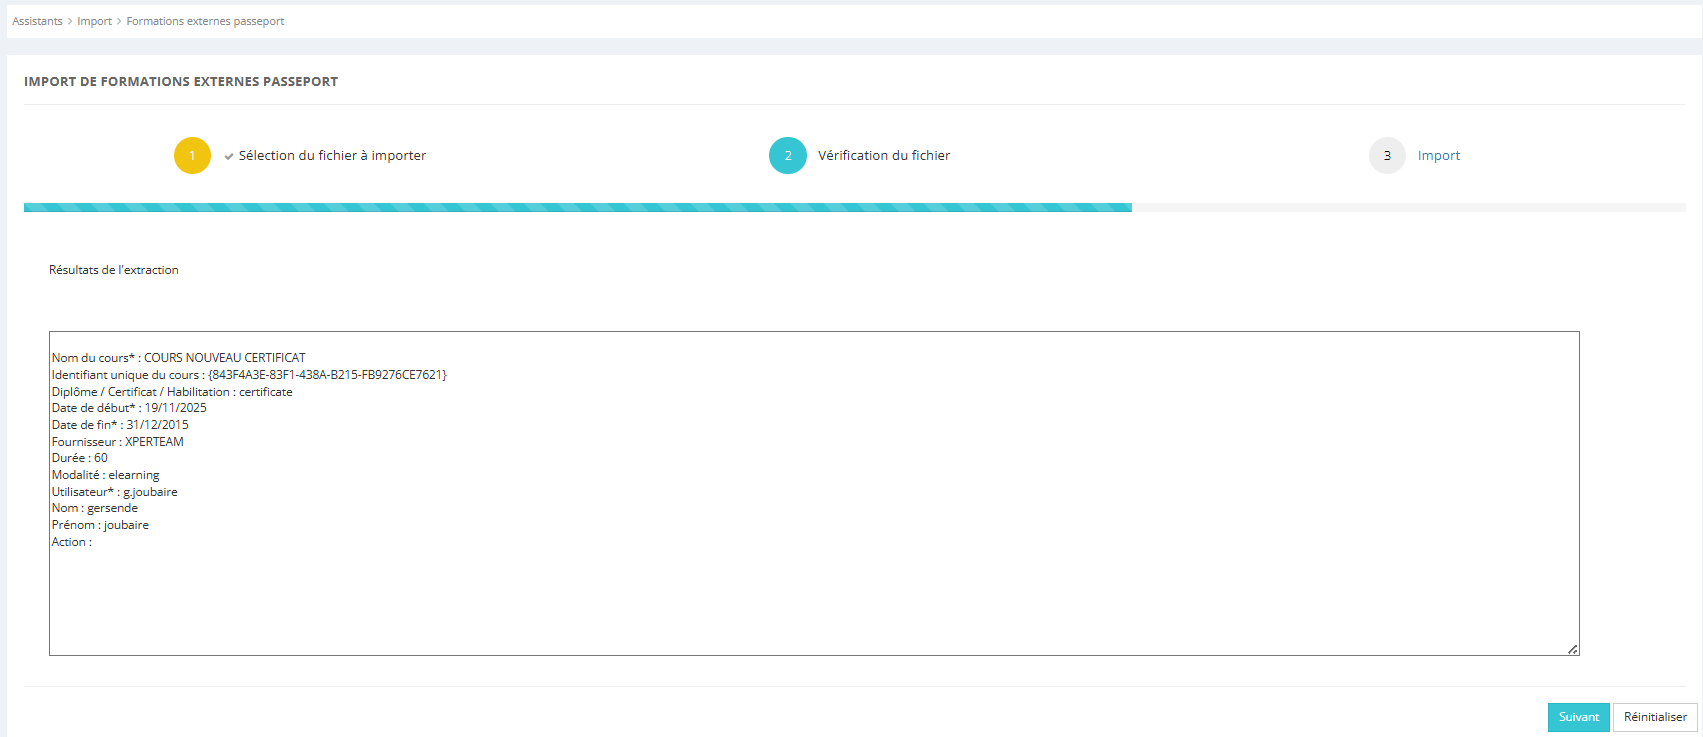](https://documentation.xperteam.net/uploads/images/gallery/2025-11/aGVimage.png)
Cliquez sur le bouton **Suivant**.
#### **Analyse du résultat de l'import**
**Si l’import est réussi**, le nombre d’enregistrement et le nombre de formations ajoutés et mises à jour seront indiqués.
Les erreurs seront à 0.
**Si l’import n’est pas complétement réussi**, le nombre d’erreurs et d’avertissements seront indiqués. Les erreurs empêche l’import, l’avertissement n’est pas bloquant.
[](https://documentation.xperteam.net/uploads/images/gallery/2025-10/6qdimage.png)