# L'Assistant Cours
L'assistant **Cours** vous permet d'effectuer, après avoir sélectionné des cours, un certains nombre de tâches d'administration. Vous trouverez la liste de toutes les actions possibles plus loin dans la fiche.
### **Sélection des cours**
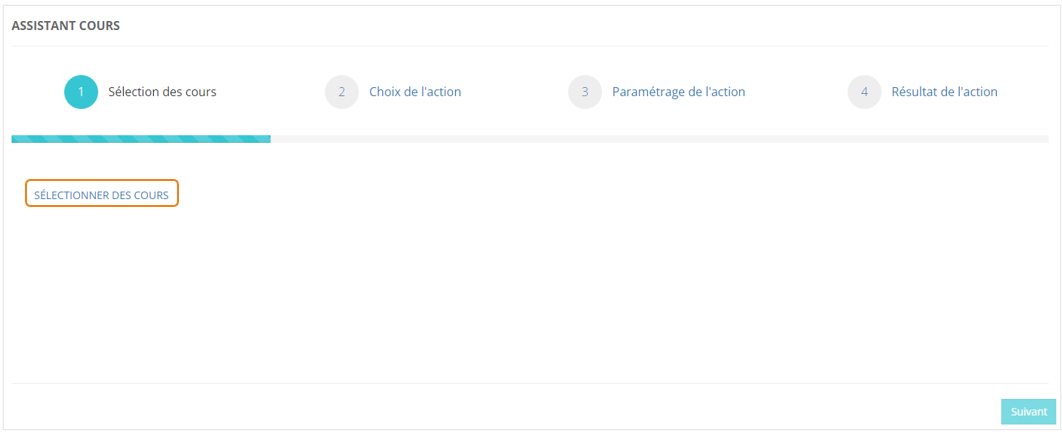
Dans le menu **Assistants > Assistant cours**, cliquez sur **SÉLECTIONNER DES COURS**.
[](https://documentation.xperteam.net/uploads/images/gallery/2024-05/wNIimage.png)
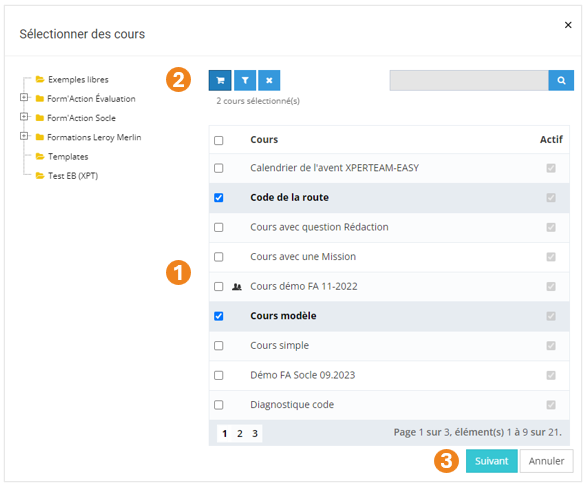
Dans la pop-up qui s'ouvre :
1. Sélectionnez les **cours** à modifier ;
2. Cliquez sur le **chariot** ;
3. Cliquez sur **Suivant**.
[](https://documentation.xperteam.net/uploads/images/gallery/2024-05/f7oimage.png)
Le filtre de cours
1. Vous pouvez **filtrer** votre recherche grâce : au **nom** du cours, son **identifiant unique**, sa **description**, son **audience**, son **fournisseur**, sa **modalité**.
2. Si vous cherchez parmi les **cours désactivés**, cochez cette case.
3. Vous pouvez également filtrer votre recherche à l'aide des **champs personnalisés** des cours.
4. Choisissez si les **critères** doivent tous être valides ou s'il suffit qu'un des critères soit valide pour proposer un résultat.Dans l'exemple ci-dessous, si vous choisissez :
**-** **Tous les critères :** vous obtiendrez toutes les cours dont le nom contient la chaîne de caractères 'DUP' et le champ personnalisé 1 contient la chaîne de caractères '2024' ;
**-** **Au moins un critère :** vous obtiendrez l'ensemble de tous les cours dont le nom contient la chaîne de caractères 'DUP', ainsi que tous les utilisateurs dont le champ personnalisé 1 contient la chaîne de caractères '2024'.
5. Cliquez sur **Valider**.
6. Sélectionnez les **cours** qui vous intéressent parmi les cours trouvés par filtrage.
**//Image en attente de correction de la fenêtre de filtre**
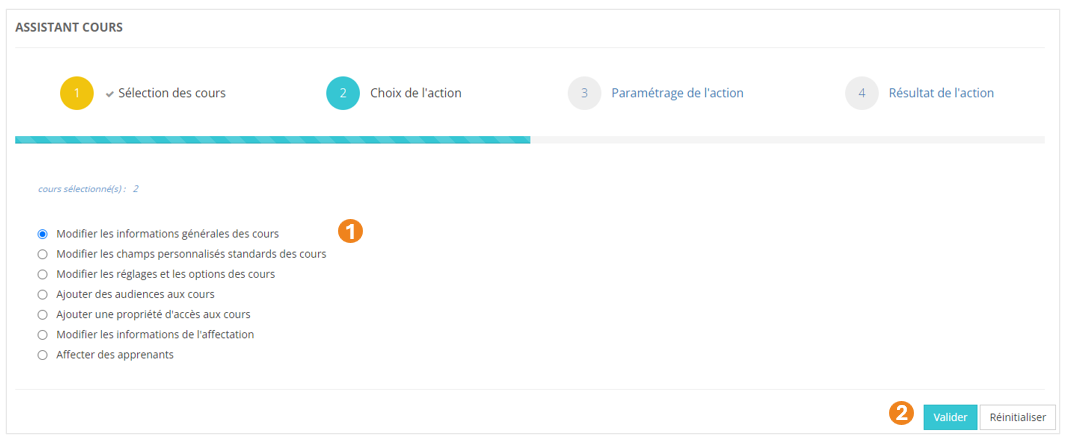
Modifier les informations générales des cours
1. Sélectionnez l'action **Modifiez les informatiques générales des cours** ;
2. Cliquez sur **Valider**.
[](https://documentation.xperteam.net/uploads/images/gallery/2024-05/NX9image.png)
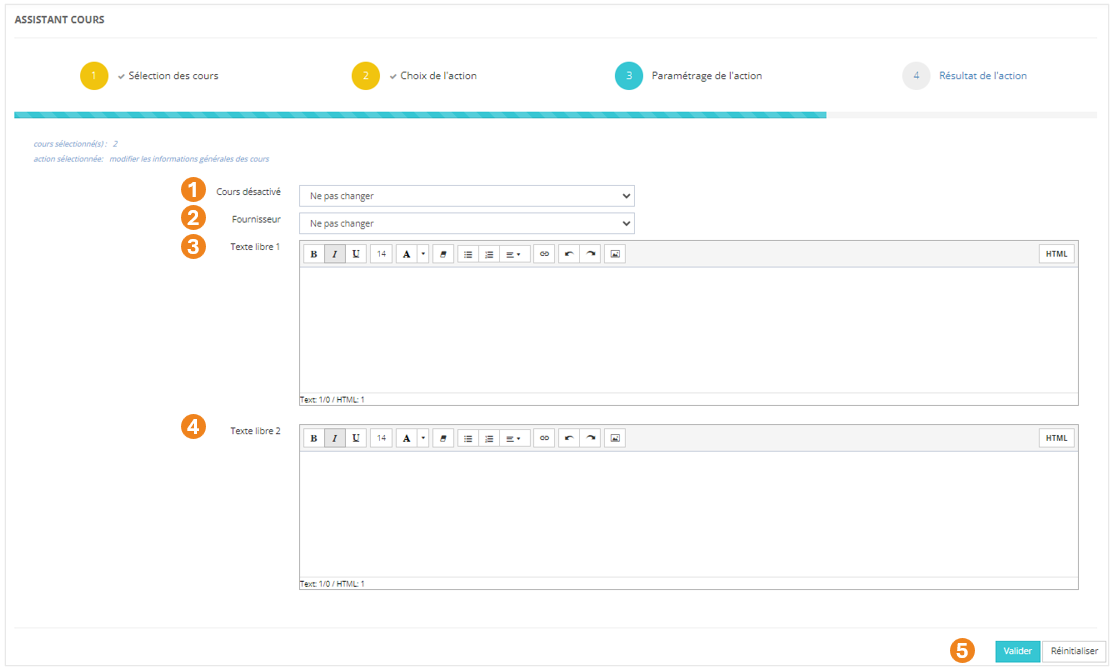
#### **Paramétrage de l'action**
Vous avez la possibilité de modifier une ou plusieurs des valeurs ci-dessous :
1. Le **statut** du cours : désactivé ou non (*Ne pas changer / Oui / Non*) ;
2. Le **fournisseur** du cours ;
3. Le **texte libre 1** du cours ;
4. Le **texte libre 2** du cours ;
5. Lorsque vous avez effectué les modifications souhaitées, cliquez sur **Valider**.
[](https://documentation.xperteam.net/uploads/images/gallery/2024-05/2VNimage.png)
Pour plus d'informations sur les informations générales du cours, voir la page ***//Créer un cours***.
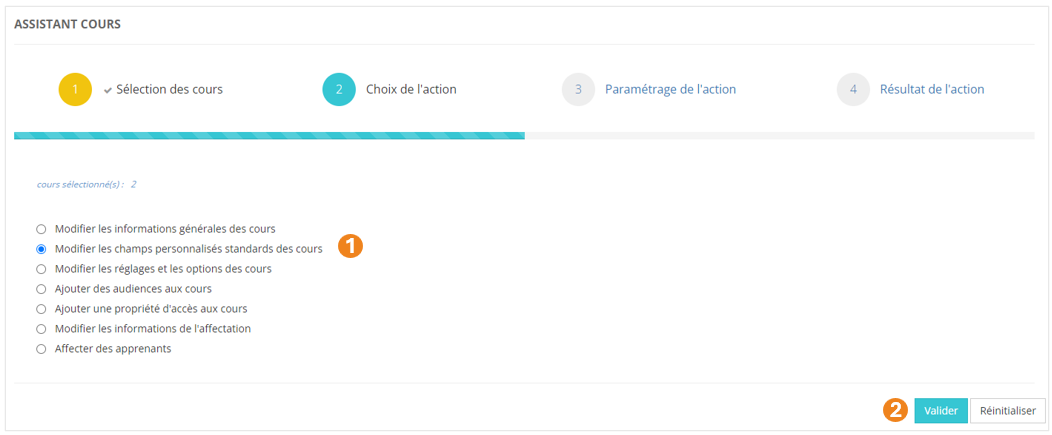
Modifier les champs personnalisés standards des cours
1. Sélectionnez l'action **Modifiez les champs personnalisés standards des cours** ;
2. Cliquez sur **Valider**.
[](https://documentation.xperteam.net/uploads/images/gallery/2024-05/7oUimage.png)
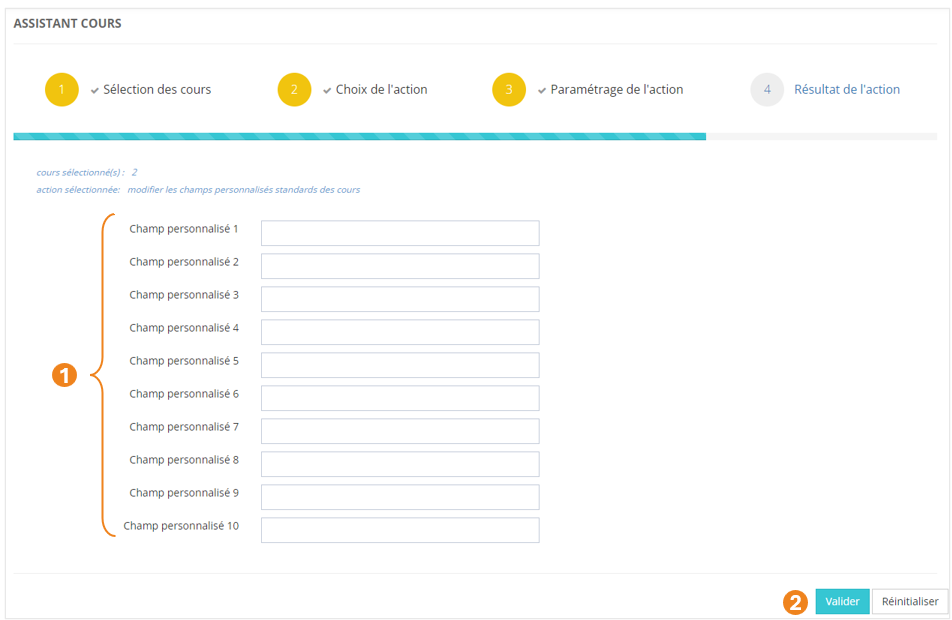
#### **Paramétrage de l'action**
1. Vous avez la possibilité de modifier un ou plusieurs **champs personnalisés** des cours sélectionnés ;
2. Lorsque vous avez effectué les modifications souhaitées, cliquez sur **Valider**.
[](https://documentation.xperteam.net/uploads/images/gallery/2024-05/Urrimage.png)
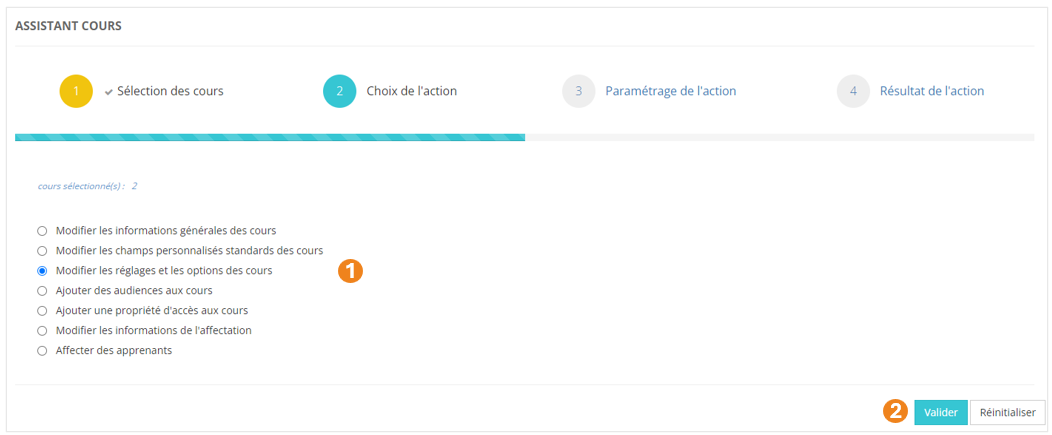
Modifier les réglages et les options de cours
1. Sélectionnez l'action **Modifiez les réglages et les options des cours** ;
2. Cliquez sur **Valider**.
[](https://documentation.xperteam.net/uploads/images/gallery/2024-05/mh6image.png)
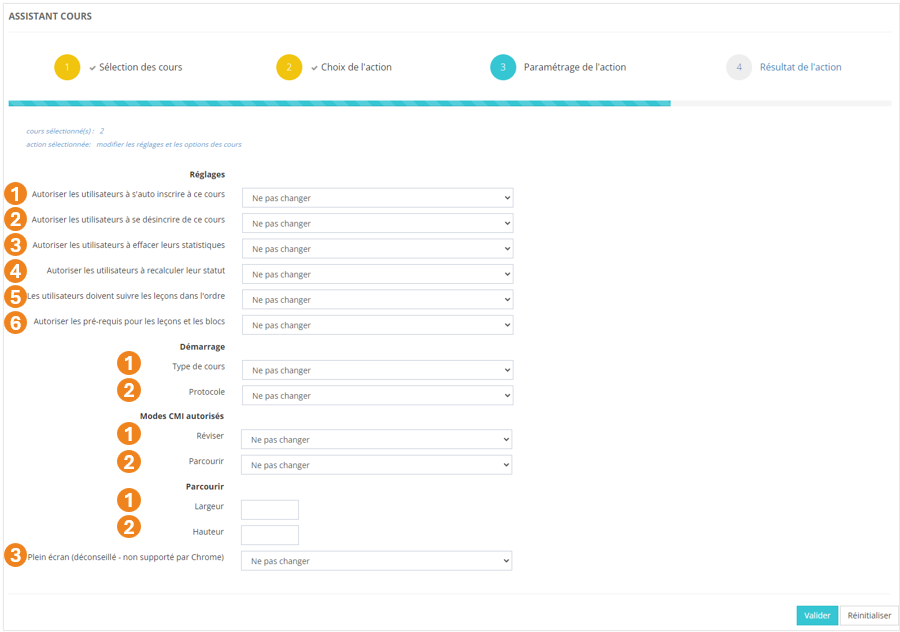
#### **Paramétrage de l'action**
Vous avez la possibilité de modifier une ou plusieurs des options ci-dessous :
- **Réglages :**
1. L'autorisation pour les utilisateurs de **s'auto-inscrire** au cours : *Ne pas changer / Oui / Non* ;
2. L'autorisation pour les utilisateurs de **se désinscrire** du cours : *Ne pas changer / Oui / Non *;
3. L'autorisation pour les utilisateurs d'**effacer leurs statistiques** de cours : *Ne pas changer / Oui / Non* ;
4. L'autorisation pour les utilisateurs de **recalculer leur statut** du cours : *Ne pas changer / Oui / Non *;
5. Le **suivi séquentiel** des leçons du cours : *Ne pas changer / Oui / Non ;*
6. L'autorisation pour les administrateurs d'**ajouter des prérequis pour les leçons et les blocs** du cours : *Ne pas changer / Oui / Non ;* *Les options « **Suivi séquentiel** » et « **Ajout de prérequis** » sont **incompatibles** : vous ne pouvez pas mettre Oui à chacune de ces options, ni mettre Non à chacune de ces options.*
- **Démarrage** :
1. Le **type de cours** : *Ne pas changer / Compatible AICC / SCORM / AICC uniquement / Présentiel ;*
2. Le **protocole** utilisé :* Ne pas changer / AICC (HACP) / SCORM (API) ;*
- **Modes CMI autorisés :**
1. **Réviser** : *Ne pas changer / Autorisé / Non autorisé / Suspendre ;*
2. **Parcourir** : *Ne pas changer / Autorisé / Non autorisé / Suspendre ;*
- **Parcourir** :
1. Définissez la **largeur** de la fenêtre d'affichage du cours (en pixels) ;
2. Définissez la **hauteur** de la fenêtre d'affichage du cours (en pixels) ;
3. Choisissez d'ouvrir ou non le cours en **plein écran** : *Ne pas changer / Oui / Non *;
[](https://documentation.xperteam.net/uploads/images/gallery/2024-05/08Aimage.png)
Terminez l'action en cliquant sur le bouton **Valider**.
Pour plus d'informations sur les réglages et les options du cours, voir la page ***//Créer un cours***.
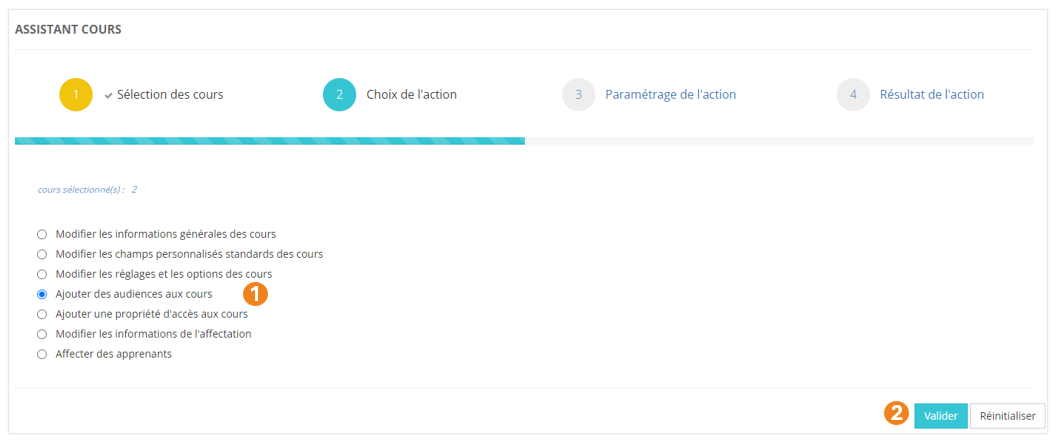
Ajouter des audiences aux cours
1. Sélectionnez l'action **Ajouter des audiences aux cours** ;
2. Cliquez sur **Valider**.
[](https://documentation.xperteam.net/uploads/images/gallery/2024-05/GvRimage.png)
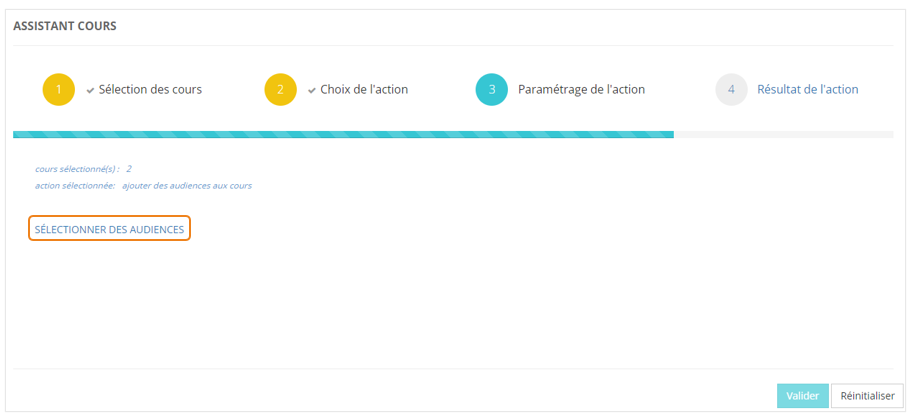
#### **Paramétrage de l'action**
Cliquez sur **SÉLECTIONNER DES AUDIENCES**.
[](https://documentation.xperteam.net/uploads/images/gallery/2024-05/XrXimage.png)
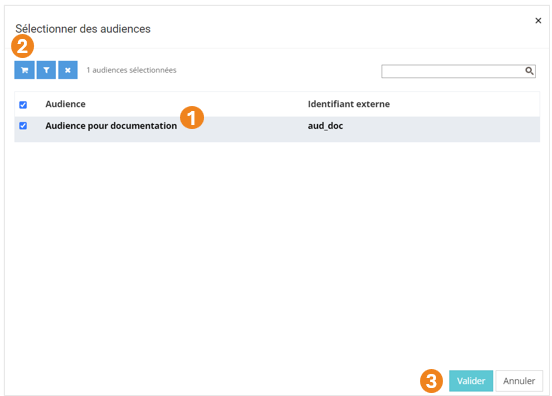
Dans la pop-up qui s'ouvre :
1. Sélectionnez les **audiences** à jouter aux cours ;
2. Cliquez sur le **chariot** ;
3. Cliquez sur **Valider**.
[](https://documentation.xperteam.net/uploads/images/gallery/2024-05/3bGimage.png)
---
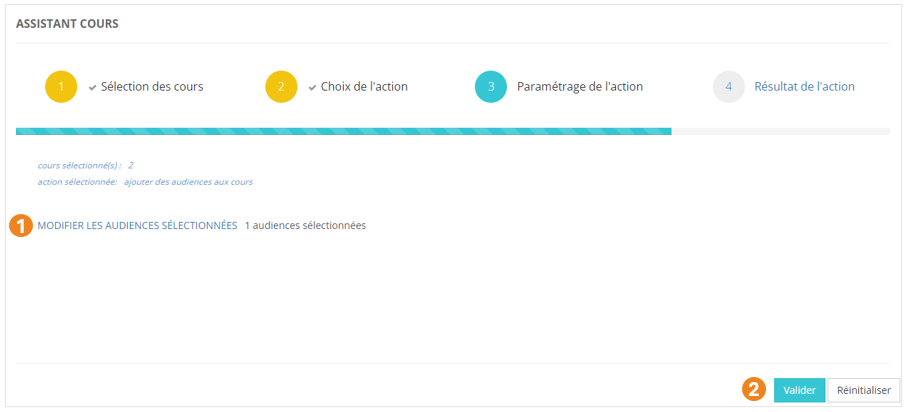
De retour sur l'écran principal, vous pouvez :
1. **Modifier** les audiences sélectionnées ;
2. Cliquer sur **Valider** lorsque vous êtes satisfait de la sélection des audiences.
[](https://documentation.xperteam.net/uploads/images/gallery/2024-05/GWlimage.png)
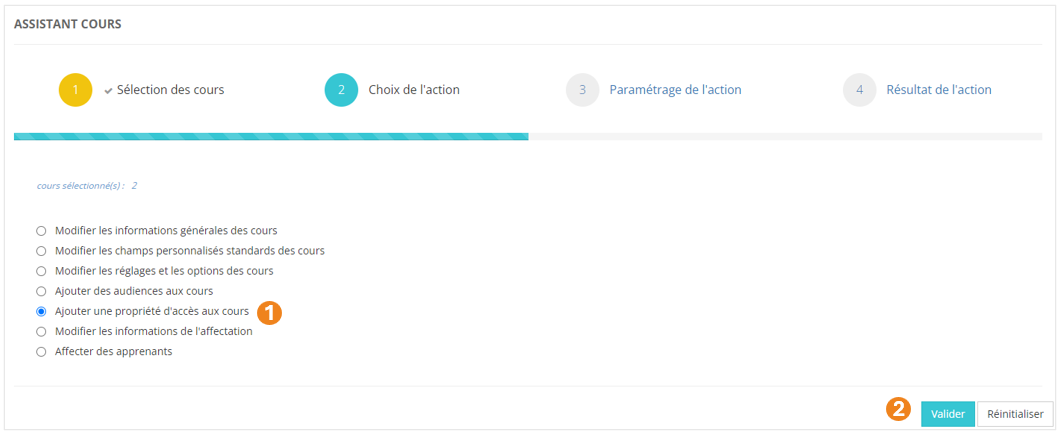
Ajouter une propriété d'accès aux cours
1. Sélectionnez l'action **Ajouter une propriété d'accès aux cours** ;
2. Cliquez sur **Valider**.
[](https://documentation.xperteam.net/uploads/images/gallery/2024-05/tqNimage.png)
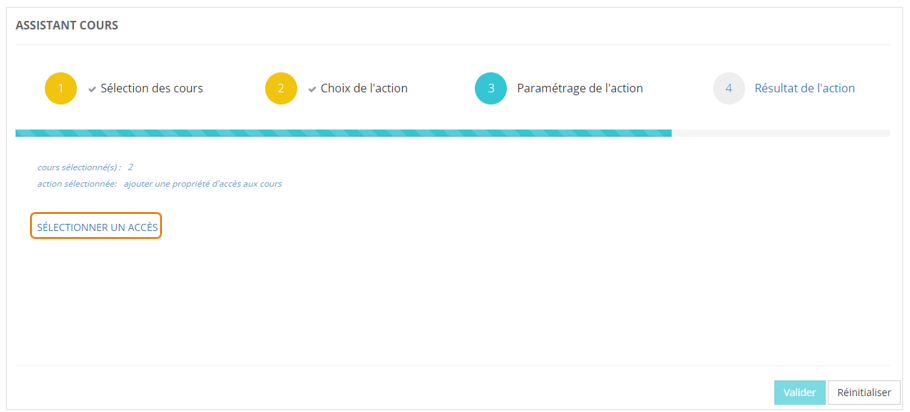
#### **Paramétrage de l'action**
Cliquez sur **SÉLECTIONNER UN ACCÈS**.
[](https://documentation.xperteam.net/uploads/images/gallery/2024-05/TOUimage.png)
Dans la pop-up qui s'ouvre :
1. Sélectionnez des **listes** ;
2. Cliquez sur **Valider**.
Dans la nouvelle pop-up, vous pouvez choisir de :
1. Restreindre ou non la **visibilité du cours** à ces listes d'utilisateurs ;
2. **Inscrire** ou non les utilisateurs de la liste à ce cours.
Si vous cochez cette case, vous pouvez modifier :
(a) l'**option d'affectation** : *Libre / Recommandé / Obligatoire* ;
(b) les **dates de début**, **d'objectif** et **de fin** : soit par **date fixée**, soit par **délai** à partir du moment où les utilisateurs sont entrés dans la liste ;
(c) lorsque des dates ont été renseignées, cochez cette case si vous souhaitez que les modifications soient **effectives immédiatement**.
3. Cliquez sur **Valider**.
[](https://documentation.xperteam.net/uploads/images/gallery/2024-05/El1image.png)
Pour plus d'informations sur les propriétés d'accès, voir la page ***//Droits d'accès***.
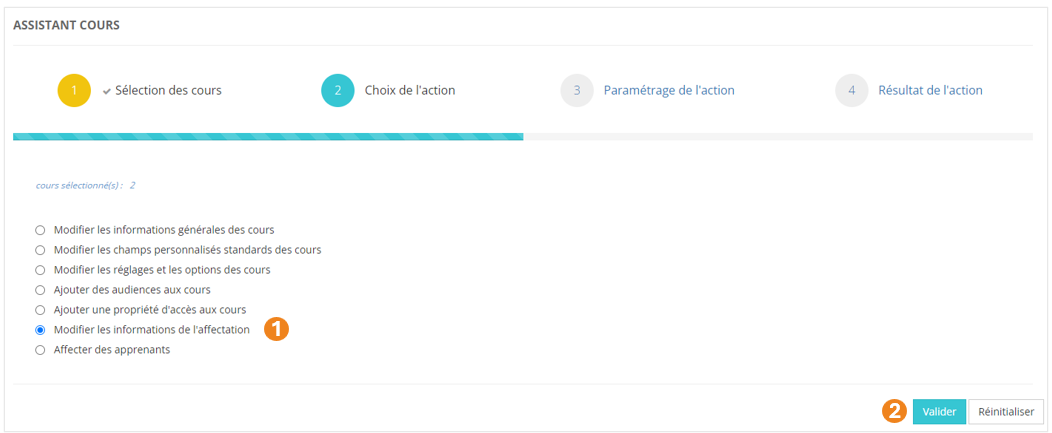
Modifier les informations de l'affectation
1. Sélectionnez l'action **Modifiez les informations de l'affectation** ;
2. Cliquez sur **Valider**.
[](https://documentation.xperteam.net/uploads/images/gallery/2024-05/HH5image.png)
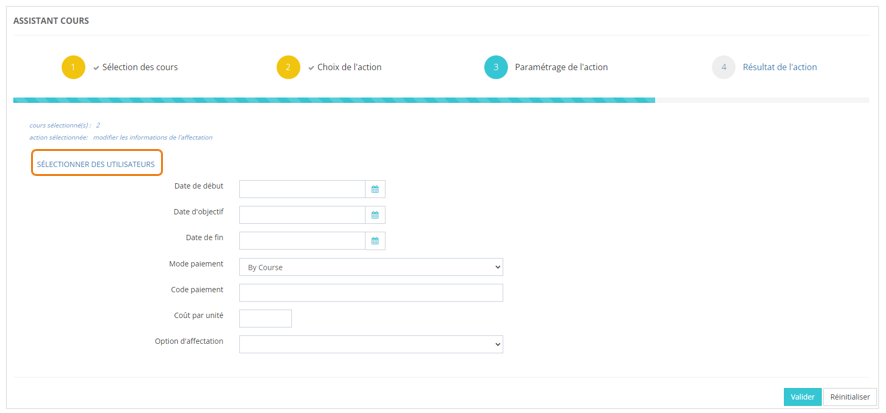
#### **Paramétrage de l'action**
Cliquez sur **SÉLECTIONNER DES UTILISATEURS**.
[](https://documentation.xperteam.net/uploads/images/gallery/2024-05/HoLimage.png)
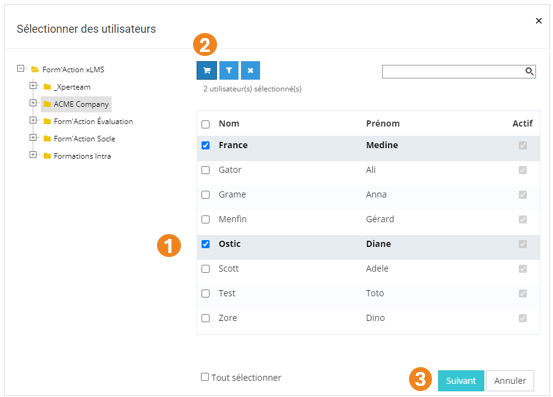
Dans la pop-up qui s'ouvre :
1. Sélectionnez des **utilisateurs** ;
2. Cliquez sur le **chariot** ;
3. Cliquez sur **Suivant**.
[](https://documentation.xperteam.net/uploads/images/gallery/2024-05/ejvimage.png)
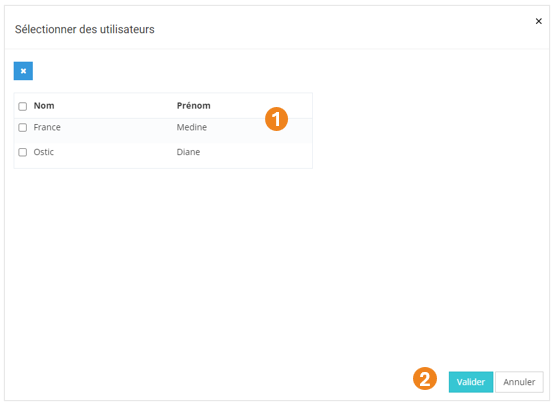
Dans la nouvelle pop-up :
1. Retrouvez le **récapitulatif des utilisateurs** que vous avez sélectionnés ; À ce niveau, vous pouvez supprimer des utilisateurs en les sélectionnant dans le tableau puis en cliquant sur le **bouton \[x\]**.
2. Cliquez sur **Valider**.
[](https://documentation.xperteam.net/uploads/images/gallery/2024-05/wAXimage.png)
---
De retour sur la page principale, vous pouvez modifier :
1. Les **dates de début**, **d'objectif** et **de fin** d'affectation du cours ;
2. Les renseignements inhérents à la facturation du cours : **Mode de paiement** (By Course / By Hour / Not Billed / Prepaid Account) , **Code paiement** et **Coût par unité** ;
3. L'**option d'affectation** : Libre / Recommandé / Obligatoire.
4. Cliquez sur **Valider** lorsque vous êtes satisfait de vos modifications.
[](https://documentation.xperteam.net/uploads/images/gallery/2024-05/SwBimage.png)
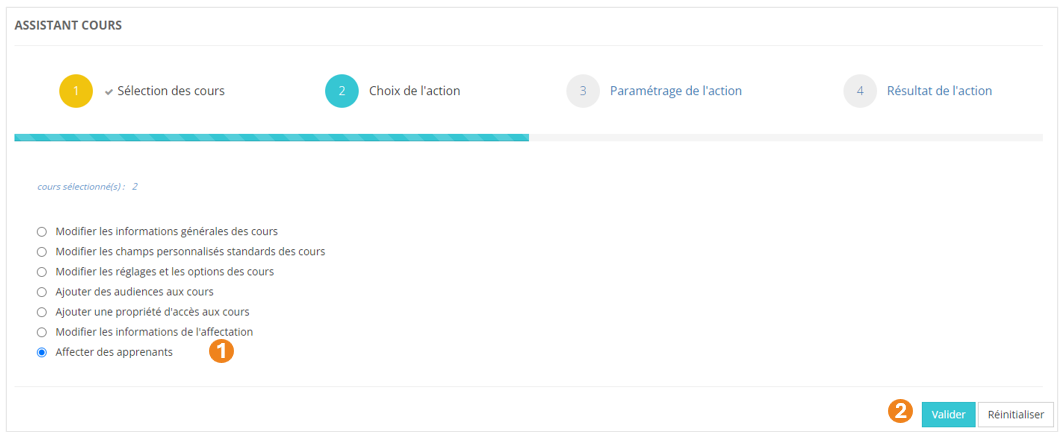
Affecter des apprenants
1. Sélectionnez l'action **Affecter des apprenants** ;
2. Cliquez sur **Valider**.
[](https://documentation.xperteam.net/uploads/images/gallery/2024-05/jTIimage.png)
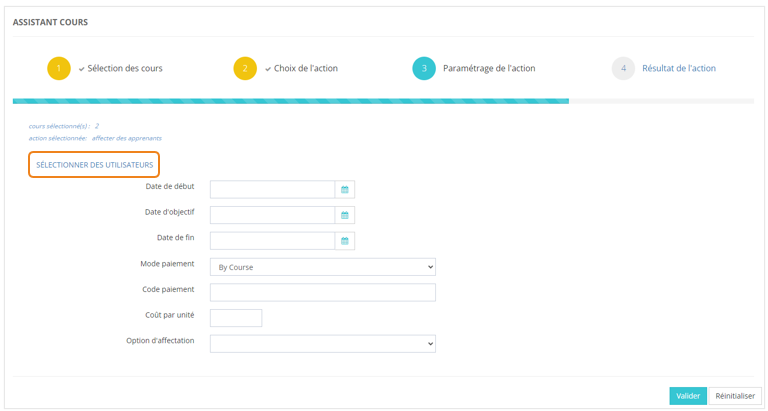
#### **Paramétrage de l'action**
Cliquez sur **SÉLECTIONNER DES UTILISATEURS**.
[](https://documentation.xperteam.net/uploads/images/gallery/2024-05/Hu6image.png)
Dans la pop-up qui s'ouvre :
1. Sélectionnez des **utilisateurs** ;
2. Cliquez sur le **chariot** ;
3. Cliquez sur **Suivant**.
[](https://documentation.xperteam.net/uploads/images/gallery/2024-05/ejvimage.png)
Dans la nouvelle pop-up :
1. Retrouvez le **récapitulatif des utilisateurs** que vous avez sélectionnés ; À ce niveau, vous pouvez supprimer des utilisateurs en les sélectionnant dans le tableau puis en cliquant sur le **bouton \[x\]**.
2. Cliquez sur **Valider**.
[](https://documentation.xperteam.net/uploads/images/gallery/2024-05/wAXimage.png)
---
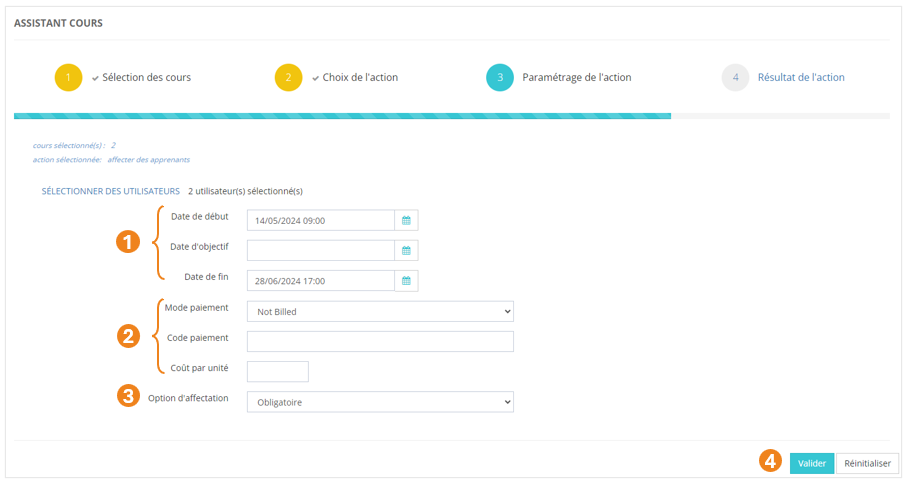
De retour sur la page principale, vous pouvez modifier :
1. Les **dates de début**, **d'objectif** et **de fin** d'affectation du cours ;
2. Les renseignements inhérents à la facturation du cours : **Mode de paiement** (By Course / By Hour / Not Billed / Prepaid Account) , **Code paiement** et **Coût par unité** ;
3. L'**option d'affectation** : Libre / Recommandé / Obligatoire.
4. Cliquez sur **Valider** lorsque vous êtes satisfait de vos modifications.
[](https://documentation.xperteam.net/uploads/images/gallery/2024-05/NjFimage.png)
Le bouton **Réinitialiser** n’annule pas la dernière action.