# L'Assistant Épreuves
L'assistant **Épreuves** vous permet d'effectuer, après avoir sélectionné une épreuve, un certains nombre de tâches d'administration. Vous trouverez la liste de toutes les actions possibles plus loin dans la fiche.
### **Sélection des épreuves**
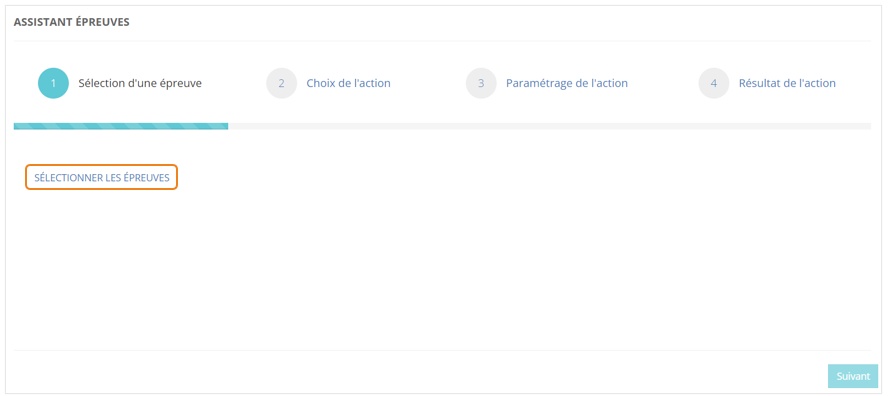
Dans le menu **Assistants > Assistant épreuves**, cliquez sur **SÉLECTIONNER LES ÉPREUVES**.
[](https://documentation.xperteam.net/uploads/images/gallery/2024-05/WXUimage.png)
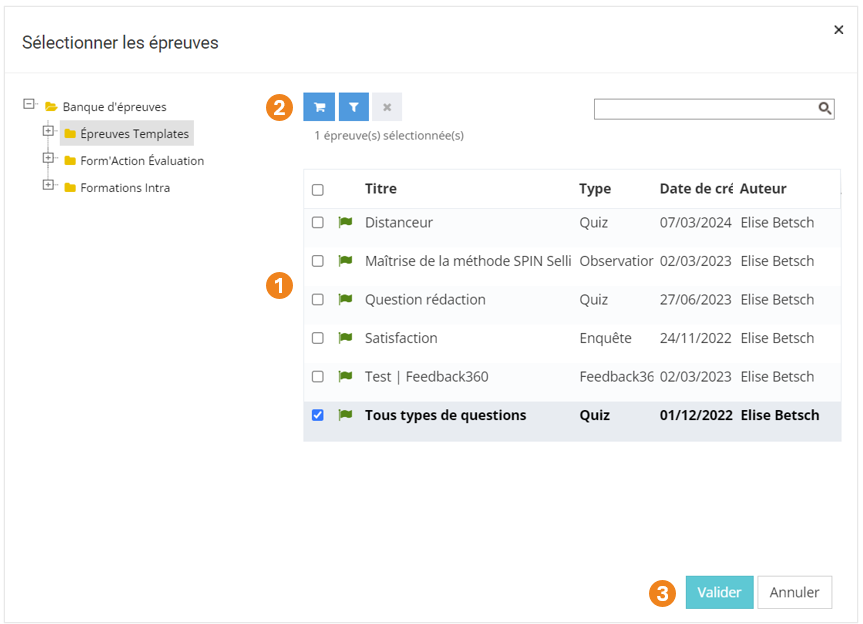
Dans la pop-up qui s'ouvre :
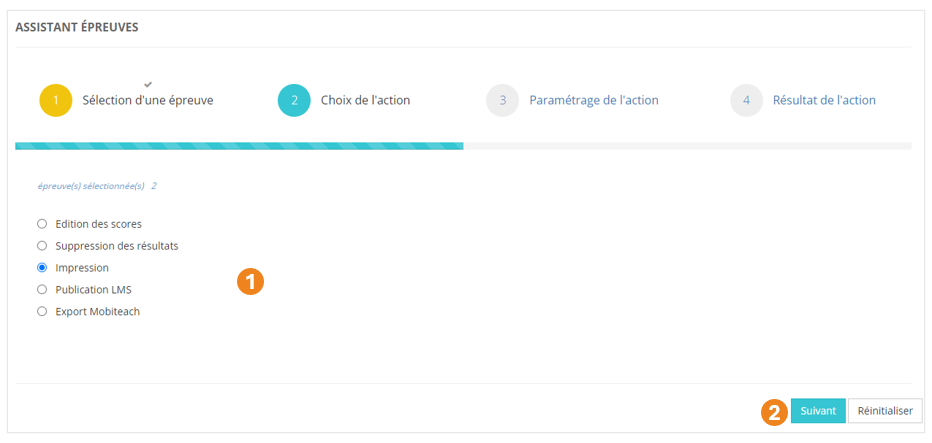
1. Sélectionnez les **épreuves** à modifier ; **Attention !** Selon l'action que vous sélectionnerez ensuite, vous ne pouvez pas toujours sélectionner plusieurs épreuves :
| **Édition des scores** | **Suppression des résultats** | **Impression** | **Publication LMS** | **Export Mobiteach** |
| Une épreuve | Une épreuve | Plusieurs épreuves | Plusieurs épreuves | Une épreuve |
2. Cliquez sur le **chariot** ;
3. Cliquez sur **Suivant**.
[](https://documentation.xperteam.net/uploads/images/gallery/2024-06/image.png)
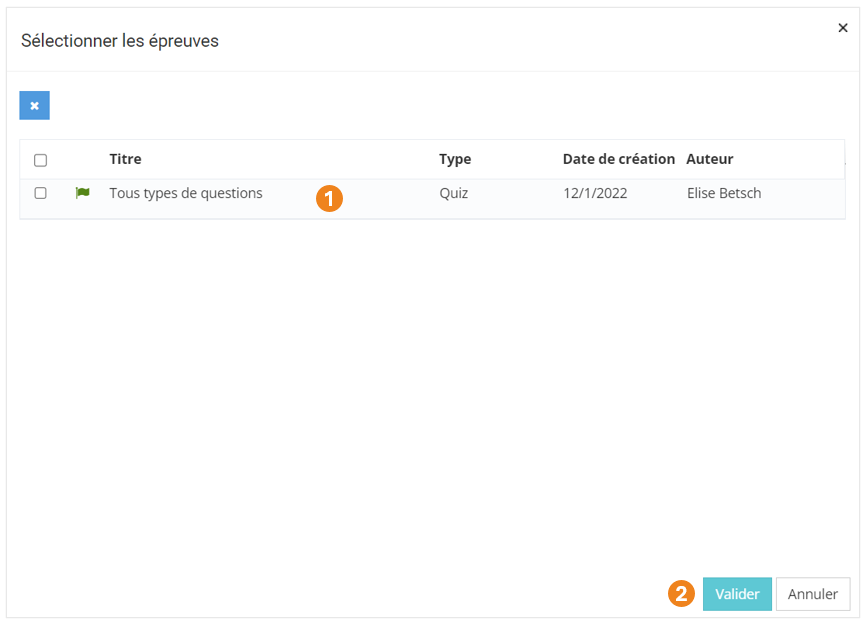
Dans la nouvelle pop-up :
1. Retrouvez le **r****écapitulatif des épreuves** que vous avez sélectionnés ;À ce niveau, vous pouvez supprimer des épreuves en les sélectionnant dans le tableau puis en cliquant sur le **bouton \[x\]**.
2. Cliquez sur **Valider** lorsque vous êtes satisfait de la sélection des épreuves.
[](https://documentation.xperteam.net/uploads/images/gallery/2024-06/FqVimage.png)
---
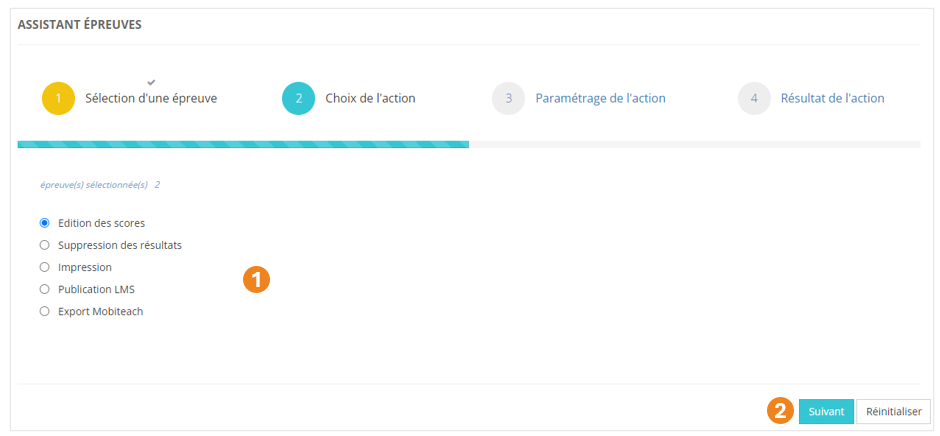
De retour sur l'écran principal, vous pouvez :
1. **Modifier** les épreuves sélectionnées ;
2. Cliquer sur **Suivant** lorsque vous êtes satisfait de la sélection des épreuves.
[](https://documentation.xperteam.net/uploads/images/gallery/2024-06/w7simage.png)
---
### **Sélection et paramétrage de l'action**
Édition des scores
1. Sélectionnez l'action **Édition des scores** ;
2. Cliquez sur **Suivant**.
[](https://documentation.xperteam.net/uploads/images/gallery/2024-06/oahimage.png)
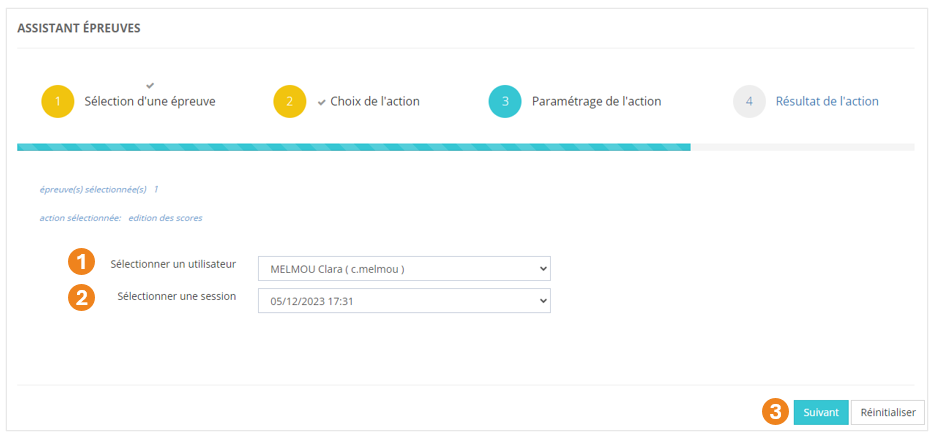
#### **Paramétrage de l'action**
1. Sélectionnez un **utilisateur** ;
2. Sélectionnez une **session** ;
3. Cliquez sur **Suivant**.
[](https://documentation.xperteam.net/uploads/images/gallery/2024-06/qPdimage.png)
---
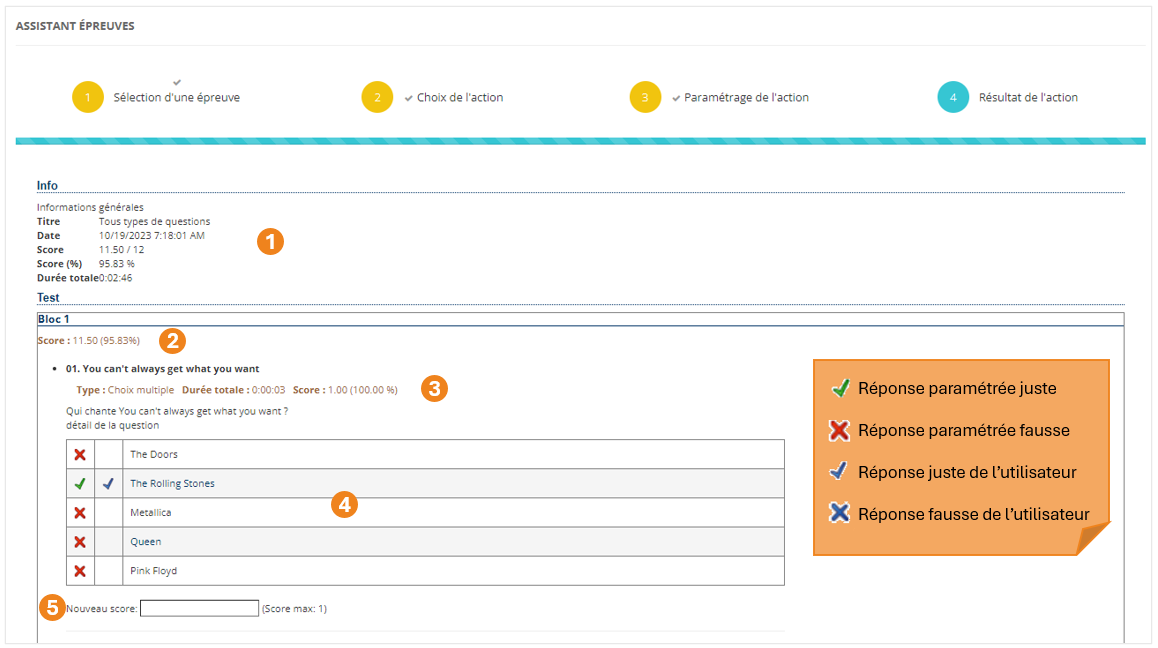
Sur le nouvel écran, vous trouverez :
1. les **informations générales** du passage de l'épreuve par l'utilisateur (titre, date, score en points et en pourcentage, durée) ;
2. le s**core obtenu à chaque bloc** ;
3. les **informations de chaque question** (type, durée, score) ;
4. les **réponses justes et fausses** telles que paramétrées sur la plateforme et les **réponses données par l'utilisateur** pour chaque question ;
5. le champ dans lequel vous pouvez **entrer un nouveau score**, avec le **score maximal** autorisé.
Vous ne pouvez pas modifier les réponses cochées par l'apprenant dans le tableau récapitulatif des réponses.
[](https://documentation.xperteam.net/uploads/images/gallery/2024-06/lxOimage.png)
Lorsque vous avez modifié les scores, cliquez sur **Valider** tout en bas de la page.
Suppression des résultats
1. Sélectionnez l'action **Suppression des résultats** ;
2. Cliquez sur **Suivant**.
[](https://documentation.xperteam.net/uploads/images/gallery/2024-06/A30image.png)
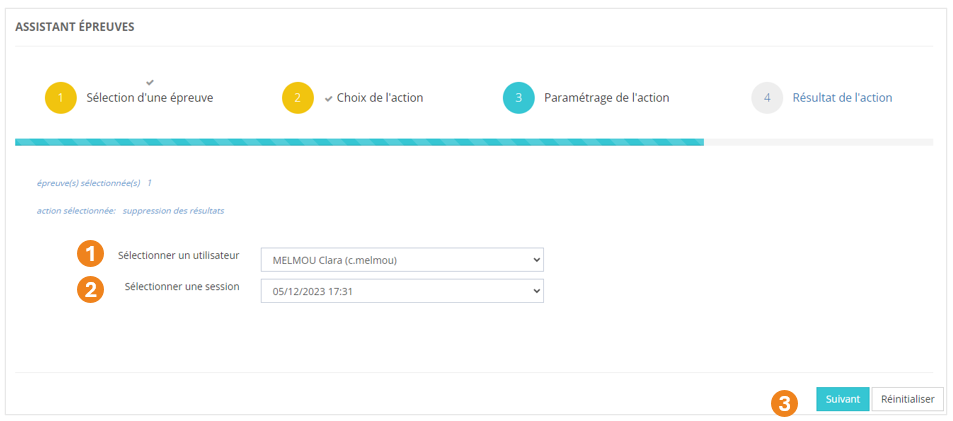
#### **Paramétrage de l'action**
1. Sélectionnez un **utilisateur** ;
2. Sélectionnez une **session** ;
3. Cliquez sur **Suivant**.
[](https://documentation.xperteam.net/uploads/images/gallery/2024-06/7Yyimage.png)
---
Sur l'écran suivant :
1. Vérifiez que vous avez sélectionné **le bon utilisateur et la bonne session** ;
2. Cliquez sur **Valider** lorsque vous êtes satisfait de votre sélection.
[](https://documentation.xperteam.net/uploads/images/gallery/2024-06/S3limage.png)
Impression
1. Sélectionnez l'action **Impression** ;
2. Cliquez sur **Suivant**.
[](https://documentation.xperteam.net/uploads/images/gallery/2024-06/RLlimage.png)
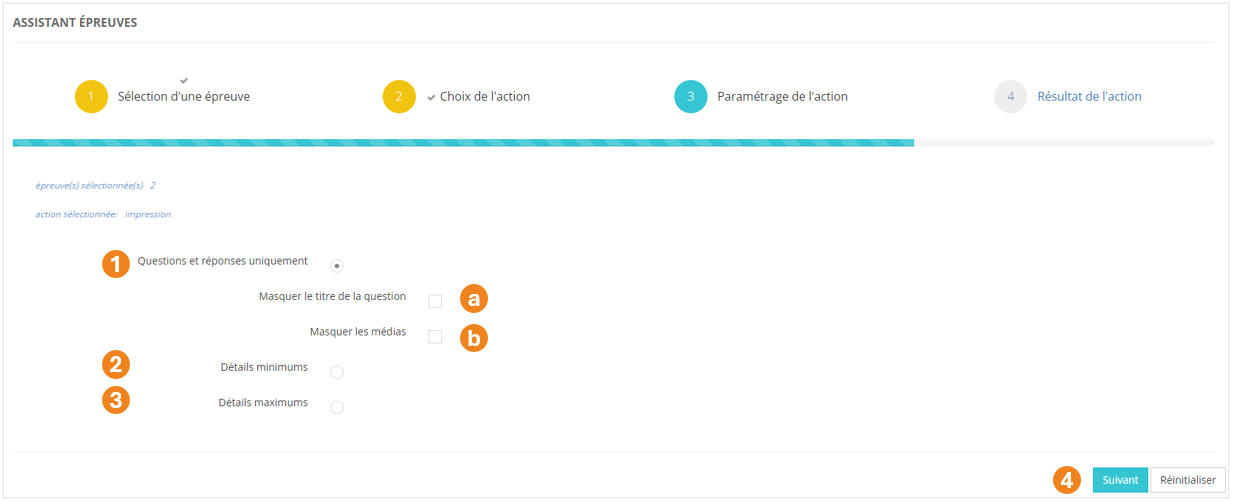
#### **Paramétrage de l'action**
Pour votre impression, vous pouvez choisir de faire apparaître :
1. Les **questions et réponses uniquement** ;
Si vous choisissez cette option, vous pouvez décider de **masquer** ou non :
(a) le **titre des questions** ;
(b) les **médias** illustrant les questions.
2. Le **minimum de détails** ;
3. Le **maximum de détails** ;
4. Cliquez sur **Suivant** lorsque vous avez sélectionné le type d'impression qui vous intéresse.
**Bon à savoir :** L'option **"Questions et réponses uniquement" sans masquer ni le titre des questions ni les médias** et l'option **"Détails minimums"** donnent le même résultat.
[](https://documentation.xperteam.net/uploads/images/gallery/2024-06/ExIimage.png)
Après avoir cliqué sur **Suivant**, un nouvel onglet s'ouvre avec le document demandé.
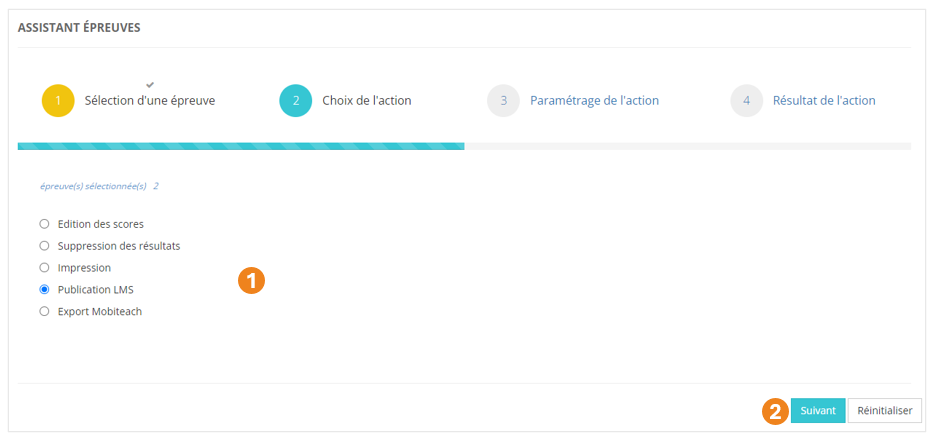
Publication LMS
1. Sélectionnez l'action **Publication LMS** ;
2. Cliquez sur **Suivant**.
[](https://documentation.xperteam.net/uploads/images/gallery/2024-06/A1Himage.png)
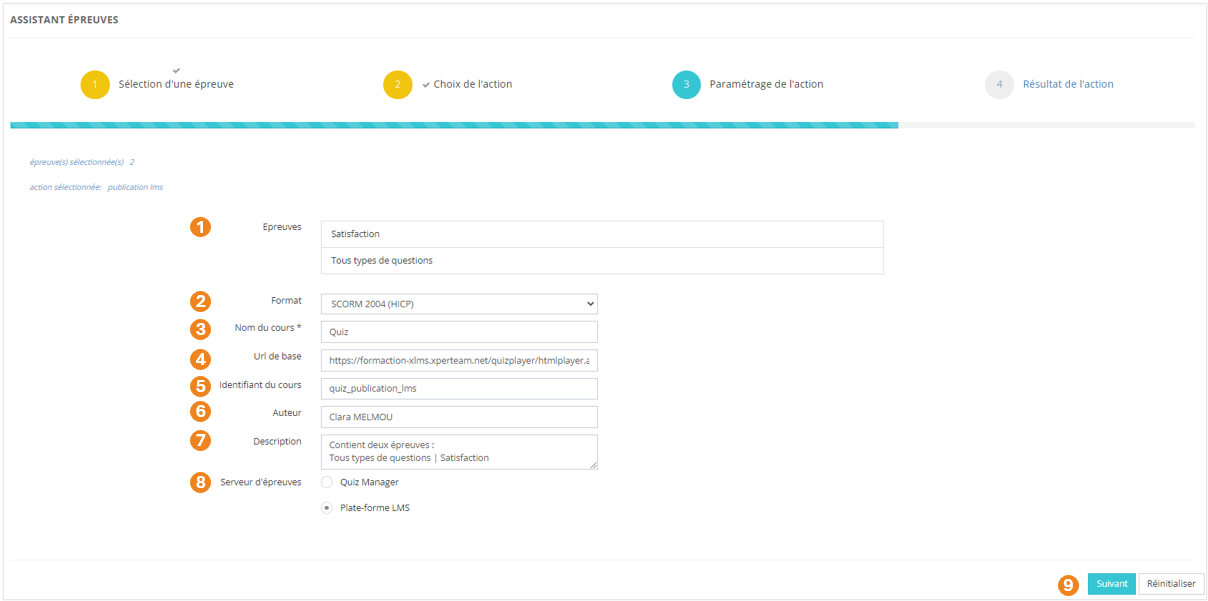
#### **Paramétrage de l'action**
Sur l'écran suivant, vous pouvez :
1. Visualiser le **nom des épreuves** sélectionnées ;
2. Choisir un **format d'export** (SCORM 1.2 (HICP) / SCORM 2004 (HICP) / TinCan) ;
3. **Nommer** le cours qui contiendra ces épreuves **(obligatoire)** ;
4. Visualiser l'**url** correspondant au cours ;
5. Utiliser l'**identifiant externe** qui est généré automatiquement ou en choisir un autre ;
6. Utiliser l'**auteur** déjà renseigné ou le modifier ;
7. Ajouter une **description** ;
8. Choisir le **serveur d'épreuves** sur lequel vous importerez ce cours (Quiz Manager / Plateforme LMS);
9. Cliquer sur **Suivant** lorsque tous les renseignements sont corrects.
[](https://documentation.xperteam.net/uploads/images/gallery/2024-06/Kurimage.png)
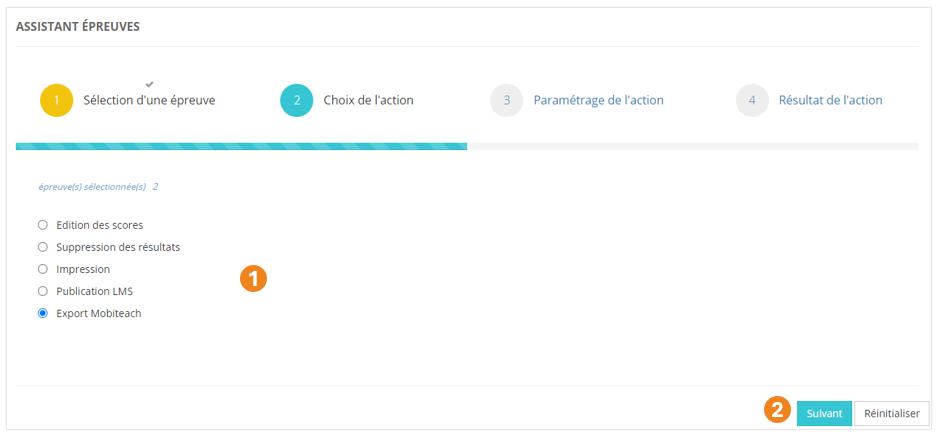
Export Mobiteach
1. Sélectionnez l'action **Export Mobiteach** ;
2. Cliquez sur **Suivant**.
[](https://documentation.xperteam.net/uploads/images/gallery/2024-06/DcLimage.png)
#### **Paramétrage de l'action**
Aucun paramétrage n'est demandé pour l'export Mobiteach : cliquez sur **Suivant**.
[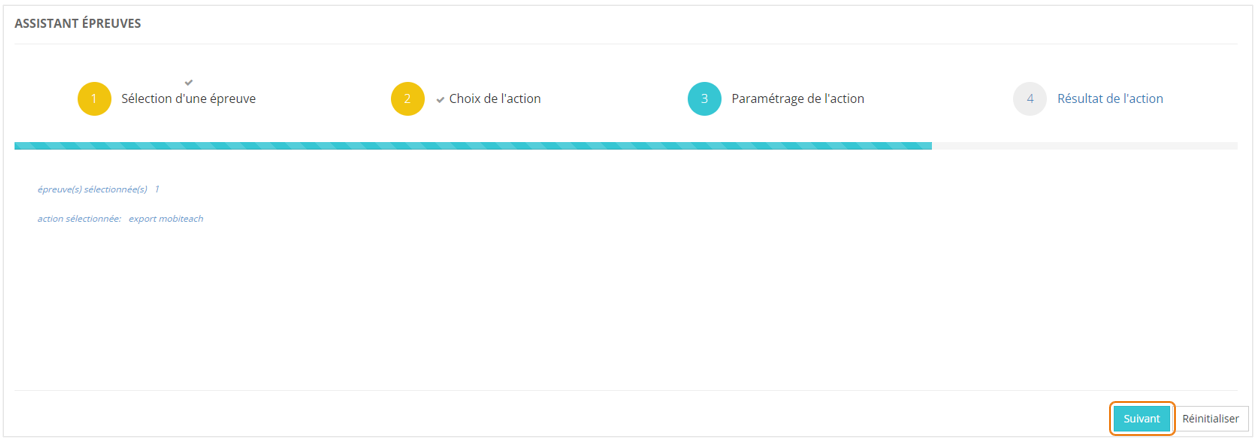](https://documentation.xperteam.net/uploads/images/gallery/2024-06/VMLimage.png)
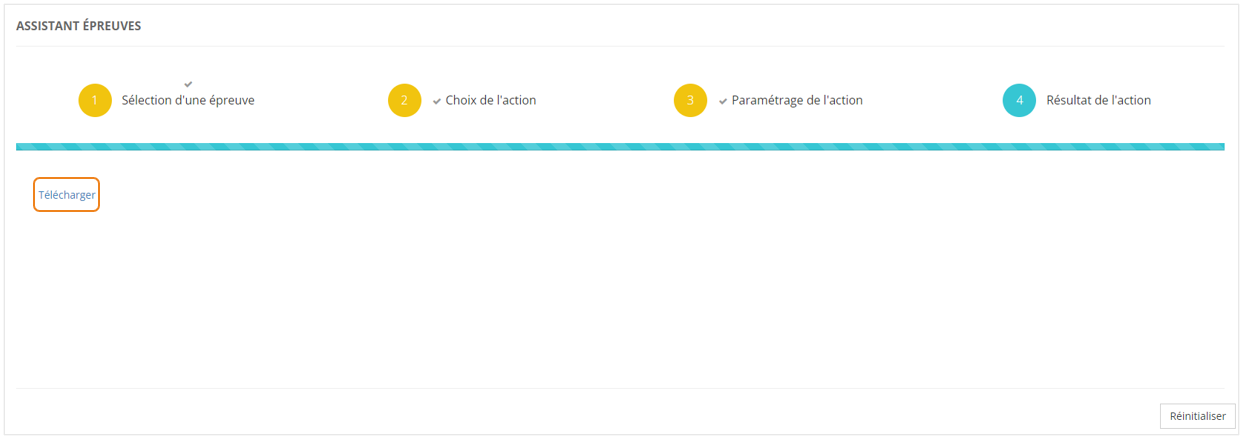
Cliquez sur **Télécharger** pour obtenir le fichier à importer sur Mobiteach.
[](https://documentation.xperteam.net/uploads/images/gallery/2024-06/Tmhimage.png)